A good feature of a heated floor with a liquid coolant is that it can be installed using existing communications, for example, main heating systems.
In this case, the heating of the premises can be done as a combined, that is, with the simultaneous use of heating radiators and a system of pipelines in the floor, and exclusively using only the piping system of the heated floor.

Warm floor with your own hands
The only, but very important nuance that must be taken into account when connecting the heated floor system to the main heating is the issue of water consumption. The fact is that in multi-apartment buildings the main heating channels go into the house, pass through all the apartments, and then leave it.
There are so-called straight and reverse flow pipes. If you connect a system of water heated by the water to the main pipe of direct flow, then a significant amount of thermal energy will be used to heat your premises. Consequently, your neighbors can feel the discomfort of not very hot batteries, which is unlikely to add to your popularity in the entrance.
It is recommended to connect the heated floor systems to the main heating only on the return pipes. At the same time, the closer your room is to the end of the cycle of heating pipes, the less displeasure your neighbors will have.
However, if you intend to heat a small room with a heated floor - for example a well-insulated loggia of a few square meters, then the total heat loss can be neglected.
Preparatory stage
The first stage of your work on creating a system of floor water heating from heating should be drafting. Take a sheet of millimeter paper and draw a diagram of your room on it. Mark the points of entry and exit of the water supply pipes, as well as the drawing of the installation of the pipeline contours of the heating system of the floor.
Required materials
Connection of water heating of a floor of a small premise to the main heating does not demand the big expenses.
You need to stock up:
- -pipes for water heating.

Pipes for water heating - photo
- connection node, consisting in turn of:
- Radiator valve:

Valves for radiator
- Thermostat.

Mechanical temperature controller - photo
- Gates that block the flow of water.

Gates for the warm floor
- And fittings for the connection of pipelines.

Piping fittings for

Schematic diagram of the installation of a heated water floor from heating is shown in the drawing

The algorithm for creating a heated floor system
At the first stage of construction, you will need to mount a water collector cabinet.

Installing the water manifold for the
Assemble the connecting circulating unit. Its task is to regulate the flow of the coolant, to maintain its specified parameters, excluding the case of system damage due to pressure drops.

Assembling the circular assembly for the warm floor
Then connect and inspect the manifold block. Its task is to distribute the flow of coolant through separate heating circuits. It is recommended to create several heating circuits for a large room. In the collector unit there is a supply and return manifolds on which flowmeters and shut-off valves are mounted. If necessary, electric actuators can be installed in the valves to regulate the force of the water flow.
The assembled structure is installed in a collector cabinet. With the main heating system it is connected via ball valves.

Installing the circular assembly in the
manifold. Carefully clean the room in which you are going to mount the heated floor. If necessary, vacuum.

We remove the room before installing the heated floor
Check the level of the floor surface. It must be strictly horizontal.

Checking the floor surface
After preparing the floor, spread the damper tape along the perimeter of the walls. It will protect the screed from the occurrence of cracks during thermal deformation.

We lay the damper tape
In addition, the damper tape reduces the heat loss through the walls. The tape should protrude above the surface of the future screed and the finish coat.
Puts a damper tape

Laying damper tape
If your ceiling may be wetted from below - lay on the floor waterproofing and vapor barrier material, such as thick polyethylene film.

Waterproofing the floor - photo
On top of the expanded polystyrene plates, which at the same time will serve as a thermal insulation and will serve as a support for pipelines.

We stack EPS boards
To improve the quality of the floor, take the plates that are connected with grooves along the edges.
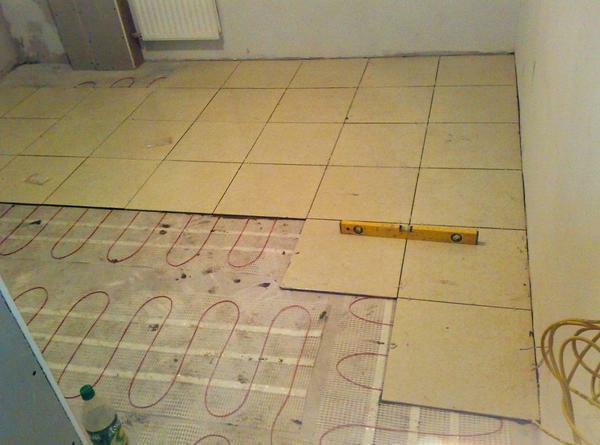
In accordance with the chosen scheme of layout, place on the plates the pipeline for floor water heating.

We lay the pipes of the hot water floor
To bend the pipe, use a special spring in which the pipeline is located.

This is what the
coolant piping looks like. Connecting the piping to the
water manifold Cut the pipe with a mechanical scissor.

cut the pipe

Using scissors calibrator remove the pipe end bevel

Set crimp connector on

Attach pipe end pipe to the manifold and tighten

key structure on the collector can be set specific servos
Which can remotely control the flow of hot water through the thermostat.

Thermoregulator photo

Servomotors and thermostat are connected by wires through the communicator.
We perform the test of the heated floor system - open the inlet valve.

Open valve underfloor
If your system is heated by water floor, powered from the heating maintains tightness during the test - proceed to fill it with concrete. Do not forget to add a plasticizer to the solution for pouring the warm floor - you can use the usual liquid soap.

Concrete floor screed
After final drying on a heated floor with water heating it will be possible to lay the final floor covering.