Aspiration certain part of the owners of apartments to give the premises of their home absolutely unique kind of forces them to look for completely unexpected solutions. The assortment of parquet, laminate, linoleum or ceramic tile, offered in the salons-flooring shops, can not satisfy them, and then the technology of polymeric flooring with the optical 3D effect comes to the rescue. This technology is a relative newcomer in construction and repair practice, however it is rapidly gaining popularity and enjoys growing demand.

3d floor with their own hands
Such a coating is usually performed by a team of masters with the appropriate qualifications, as the process of gradual pouring is quite complex and abounds with nuances. Is it possible to do this yourself? This article is addressed to those skilled craftsmen who wish to try to fill polymer floors with a pattern, or, as they are often called in common parlance, 3d floor with their own hands.
It is worth to warn that due to the specific characteristics of such a casting, the need for extremely careful and scrupulous
, to the smallest detail, following all technological recommendations to ensure success in the first experiment no vozmotsya. Lyubaya bobble could be "fatal", as usedquickly hardening compounds, and to eliminate the consequences of the error - is extremely difficult. Therefore, before making the final decision and running to the store for materials, carefully read this publication in order to really evaluate your strengths and abilities. Probably, someone will understand , that it is more expedient still to address to professionals. What3 D- floors and their basic dignity
- 1 content of the article What is 3D-floors and their main advantages
- 2 important question - the graphics choice for 3D-floor
- 2.1 Video: materials for drawing pictures for 3D-floors
- 3 What will it take to fill the 3D-floor with their hands
- 3.1 Basic materials for
- 3.2 required tools and accessories
- 4 Stages of work
- 4.1 Prepare floor surface
- 4.2 Carrying primedsurface repair
- 4.3 Basecoat priming
- 4.4 Decorating layer laying
- 4.5 Filling of the finish layer
- 4.6 Video: one of the examples of filling the 3D floor
- 4.7 Video: 3D flooring - the work of the professionals
3D- floor is a coating with a strong transparent polymer top layer several millimeters thick, under which are placed graphic images of varying degrees of complexity or material objects. Together, this design has a spatial optical effect, completely transforming the interior of the room.

3D floors completely transform the interior of the room
Bold experiments on such design decoration of floor coverings began held in the West several decades ago, basically , in large public institutions - supermarkets, concert halls, at exhibition venues and t. .Over time, these technologies "migrated" to residential homes - such floors began to decorate the kitchen, bathrooms, hallways and then and living rooms.
What are the advantages of such floors:
- First of all , of course, it is worth noting the decorative qualities. Always there is the opportunity to perform a completely exclusive design of the room.
- No less important and the performance of this coating. It, with proper performance, has a strong resistance to abrasion and impact, which determines the durability of the floors.
- The quality coating is chemically inert and is not afraid of the impact of aggressive chemicals from all those that can be used in everyday life.
- Such a polymer coating is absolutely harmless from the ecological point of view, and can not cause any harm to human health or pets.
- Polymer flooring floor "seals" the concrete, while not allowing dusting and waterproofing basis.
- Another is one important quality - most of the compounds used by to create 3 D floors in living quarters belong to group G1 - they absolutely not combustible .
- Care for this coating is not difficult - enough periodic is easy to clean because the floor does not absorb dirt and dust.
The drawbacks include the complexity of the technology of mounting such a coating, a fairly high price for it. Well, of course, the material is not natural, and definitely loses to the same wood in matters of "natural" heat.
Important question - the choice of graphics for 3 D- floor
How does create decorative effect, or, in other words, what can be used as graphic objects , creating volumetric image.
- One of the options - on a concrete base or underlay is performed using cutting tools or, on the contrary , applying mortars, relief inscriptions, textures or primitive drawings. After filling the transparent coating, the effect of the bulkiness appears. This approach is appropriate if the room is designed in terms of minimalism, for example, in the loft style.
- Interesting effect is given to the small objects laid out on the floor and filled with a transparent layer. So, you can use beautiful sea pebbles, shells, coins and even dry leaves of trees.

The volumetric floor can be made using small items
- Sometimes, if there are artistic talents, a pattern is applied to the underlying layer with acrylic paints. This can , for example, be a stencil printing.

The floor can be executed in only two colors, according to the method of screen printing
More complex variants executed for technique voluminous painting, of course, is available exclusively to professional artists. Similar work is very expensive, so they are rarely resorted to and only secured homeowners.
Other, picture - picture strife, and someone will like the simplest patterns or images made by themselves or even in conjunction with child .The memory of such children's creativity will remain for many years.

Some people will like to draw their own painted ornaments, which can even be used to draw children
- Most often they resort to placing under a transparent layer of the selected graphic image, executed using special technology in a typographical way. It is impossible to manufacture it independently without special expensive equipment, therefore will have to contact the services of printing houses or companies specializing in outdoor advertising.

3D images are printed in printing houses using special equipment
As a rule, in such companies will always be happy to offer a considerable assortment of ready-made solutions. However, it is also possible to choose your own version - the number of images on the Internet is not is amenable to calculus.
Picture can be made on vinyl film ( self-adhesive or not) or on banner fabric. Here you should take some care: for example, the manufacturer of liquid floors Elakor , TheoChim ( the technology of filling this floor and will be considered below) immediately warns that the use of banner fabric is not allowed. The compatibility of the graphic object with the components of the floor should be clarified in advance.
Video: materials for drawing images for 3D floors
You should never rush to make a decision to choose a particular pattern. It is better to scan dozens, and can, and hundreds of options to accurately determine one of them:
- Firstly, it is worth making such a panel very not cheap , prices are calculated not less than from 1000 rubles per square meter( and withhigh print quality, with a resolution of more than 1400 p, can be much higher).
- Secondly, such coverage is usually done for dozens of years. It is worthwhile carefully weighing whether the pattern will introduce some discomfort after the first sense of novelty will pass .The desire to surprise guests is understandable, but the friends of are in awe of and will leave, and you will live with it for many years. In addition, some unusual, "vintage" plot of the picture, which seems original and "cool" today, through a year - two will begin to perceive as ridiculous or frankly stupid, to cause irritation and unnecessary experiences.
- Thirdly, there must probably be a consensus in the opinions of all family members. That image, which one enthralls, can be negatively perceived by others. It happens that some pictures or "flashy" colors lead even to the certain health disorders.
- Fourthly, , do not forget about the fact that the drawing should correspond to the overall design style of the room. It is necessary to evaluate whether it will be easy to find suitable furniture, decoration of walls and ceiling , other elements of the interior of the room.

It would seem, beautiful. But is not such a bright color in the room "nestling", and how to pick it up?
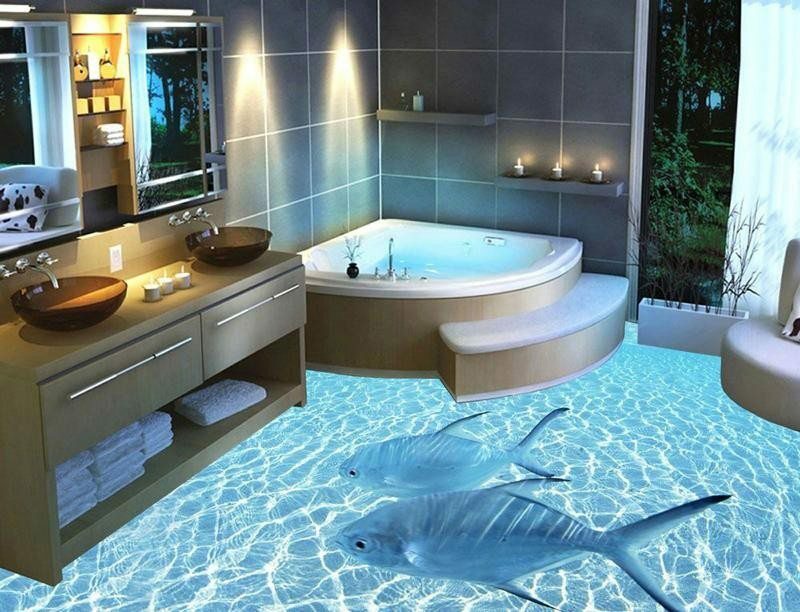
As a field for bold experiments, only small, isolated rooms are allowed, for example, a bathroom, a vestibule, a bathroom, and to some extent a kitchen. Here bright colors and large, to small detail detailed graphic objects are allowed.

Such dolphins will be appropriate, probably only in the bathroom
But in living rooms it is better to limit yourself to soft natural colors, unobtrusive figure. Especially it concerns bedrooms and cabinets. In the children's room, if the child wishes, the characters of popular cartoons or fairy-tale characters will be appropriate. But too, everything should be in moderation, without aggressive or frightening images.

original decision on the design of the entrance to the apartment
When ordering printed pattern certain size must take into account a small margin - it will be easier to adjust the canvas size of the room, having cut its edges as needed.
So, with a kind of decoration and a specific pattern determined. You can go to the building materials that will be used to fill 3D floor .
What is required to fill 3 D- floor with hands
The main materials for the work
Currently, many varieties of polymer polymer floors are on sale, which can be used, among other things, to create 3D compositions. They can be on epoxy, polyurethane, methyl methacrylate basis. From the point of view of the convenience of work, the strength of the coating obtained, the full ecological compatibility, including the during the for carrying out technological operations, preference should be given to epoxy formulations. In contrast, for example, from polyurethane, they in general do not smell in the original or diluted state.
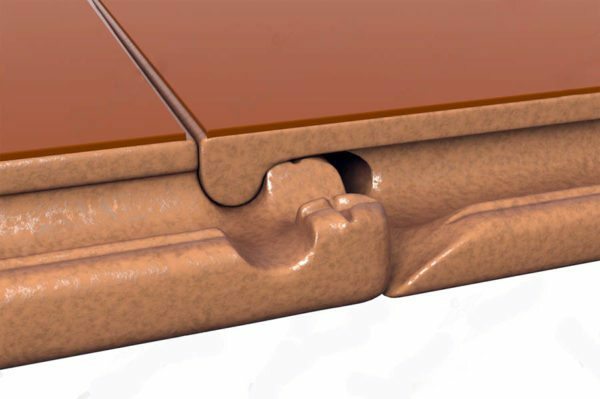
In principle, the technology of filling 3D floors with with various systems is similar in general. So, schematically the device of a similar covering can represent following image :

The approximate scheme of the device of a floor with 3D-effect
1 - a concrete basis of a floor. In principle, the floor can be laid on a wooden base, but only if the condition of its parts( lag and flooring) does not cause any concern, and there is a guarantee that it will be stable for many years.
2 is a primer layer providing hardening, waterproofing of the substrate and increasing adhesion to formulations filled with .
3 - Sealing and base layer. Provides t t required ideal evenness of the surface, complete closure of the concrete base.
4 - Decorative interlayer using graphic objects or material inclusions.
5 - Facial transparent layer, which along with the functions of the finish coat will serve as a kind of "lens" for the decorative composition.
The diagram is not shown, but is recommended. One layer is a protective varnish, which will prevent abrasive wear of the surface, will not allow scratches or scuffs of , capable of spoiling the visual effect of 3D floor .
The systems of self-leveling floors from different manufacturers, of course, have their own pouring technologies. We will not be able to talk about all of them, and in order not to work out common phrases, we will consider step by step the technology of arrangement of the 3D floor with the Elakor-ED system.

The products of the Russian company Teohim can be trusted
This is the - development of the of the Russian company TheoChim .In terms of quality and durability of use, it is, in any case, in no way inferior to the products of leading European manufacturers, and at cost looks much more attractive.
The table below shows the calculation of the required quantity of materials and their cost. For greater convenience, the data are calculated on 10 square meters of area with a thickness of the face layer of 3 mm. If necessary, it is easy to make your own calculations of , proceeding from of the real area of the room, in which the floor will be filled.
| Technological operation | Used material | price per 1 kg | consumption per 1 sq. M | required quantity | price per 10 sq. M. | price per sq. M.m | |
|---|---|---|---|---|---|---|---|
| Priming of the concrete surface | Priming of the concrete surface | Priming of the concrete surface | 360 | 4 | 1440 | 144 | |
| Priming underlay | Epoxy flooring "Elakor ED" | 325 | 1.1 | 11 | 3575 | 357.5 | |
| Refined quartz sand | 8 | 3 | 30 | 240 | 24 | ||
| Finishing filler layer | Epoxy forging floor "Elakor ED" transparent | 515 | 1.8 | 18 | 9270 | 927 | |
| Protective polyurethane coating | Elacor-Pu Lux clear glossy | 505 | 0.2 | 2 | 1010 | 101 | |
| TOTAL: | 15535 | 1553.5 |
It should be noted that calculation of was carried out with their maximum permissible thickness of the finishing layer - 3 mm.it can not be saved by reducing the of its even to 2 mm, but the is absolutely unnecessary to exceed the thickness 's first serious overrun of the material, and secondly, the too thick transparent layer drives the to refractions of light, distortion or deterioration of the picture quality. And thirdly, from the point of view of performance, this is not not set absolutely no benefit - the strength of the floor from this will not increase, it is observing the technology already with an excess of sufficient at 2 ÷ 3 mm.
The prices in the table are retail( up to 40 kg) as of the end of February 2015.The cost of materials - from the manufacturer, that is, in the trade networks, it can be somewhat higher.
Please note that the cost of the flooring "Elakor-ED" for the underlayer and the finish coat varies considerably. With a similar name and, in principle, equal performance, they have significant differences.
- The epoxy two-component composition( main component A + hardener "B") is used for the underlayer, which is diluted in a proportion of 5: 1.This predetermines also its commodity packaging: bucket metal for 20 kg + canister for 4 kg( in total - 24 kg), or polypropylene bucket for 25 kg and canister with hardener for 5 kg( total 30 kg).
This composition is opaque, and has defined tinting - from pure white to other shades on the catalog. There is an opportunity to make a color "substrate" for the drawing, which is especially important in the event that the artistic composition is not intended for the entire floor area.
- The face layer is made of an absolutely transparent composition "Elakor-ED", and it is much more expensive. Nobody prevents using it for the base layer as well - the quality will not suffer from this, but it will not look profitable. However, for some artistic compositions this will be the only possible option.
The proportions of components "A" and "B" are different here - 2: 1.On sale, it comes in packagings from the calculating 10: 6.Standard factory packages: bucket metal for 8 kg + canister 4.8 kg( amount - 12.8 kg), or bucket for 16 kg with canister hardener for 9.6 kg( 25.6 kg).
- To finish with materials, should mention the epoxy filler " Elacor - ED, Putty 2 To ".It may be needed if the concrete floor of the floor requires repair work - sealing of slots, shells, potholes and , .it also represents a two-component composition, which is prepared in a proportion of 5: 1.
The retail value of this material is about 275 rub / kg, but with the amount it is difficult to determine in advance, since its consumption will directly depend on the quality of the concrete substrate.
In general, this repair material shows excellent qualities, is easily applied to , has high adhesion with primed surface and absolutely not gives polymerization shrinkage.

Refined fine-grained quartz sand
- It is recommended to use refined quartz sand as filler filler. So, for primary shpatlevaniya it is added from calculation to volume from 1: 1 to 1: 1,5, and for finishing - from 1: 0,5 to 1: 0,8.
Required tools and accessories
In order for the to proceed with the , it is necessary to prepare certain tools and accessories:
- A mixing mixer or a drill with a power of at least 800 W is required to mix the two composites. A prerequisite is the adjustment of the drill speed and the presence of a reverse function( rotation in the opposite direction).If a drill is used, mixing nozzle is needed. Optimal version - two-way screw part, made of metal strips. Nozzles, in which the blades are made of a thin wire or a round bar, are unacceptable.

Suitable mixer for
- Drill For distributing and leveling the in accordance with , it is most convenient to use a rakley on which it is possible to set the required clearance.

Raklya - a convenient tool for distributing the composition over the floor surface
- The technology requires that the floor must be rolled with a needle roller.

Required flooring tool - needle roller
- For priming a surface or applying thin layers of material, synthetic rollers with a pile height of about 12 ÷ 15 mm are required. For hard-to-reach places, soft hair brushes will be required. We take into account that when working with epoxy compounds this tool becomes, as a rule, one-time.
- For repair work, puttying, and also for distribution of the filled composition according to , it is necessary to prepare spatulas, width from 120 to 600 mm.
- For moving on a freshly embedded floor surface on shoes, should be worn with .

Hooks will allow you to move around
- freshly applied surfaces. A clean container is needed to mix the compounds and to soak the tools after finishing the work.
- A powerful vacuum cleaner is needed to thoroughly clean the surface during the preparatory phase.
- To fulfill the quartz filling of the sealing layer, rigid plastic brush is required.
- Work clothes and should be provided for skin and respiratory protection equipment - gloves or mittens, respirator or mask. It would be superfluous to hide the hair under the cap or bandanu .
- In the place where it will be done by kneading the compounds, it is necessary to lay the floor and walls with polyethylene with film.
Stages of execution works
The work on the construction of bulk 3D floor runs in several consecutive stages.
Preparation of the floor surface
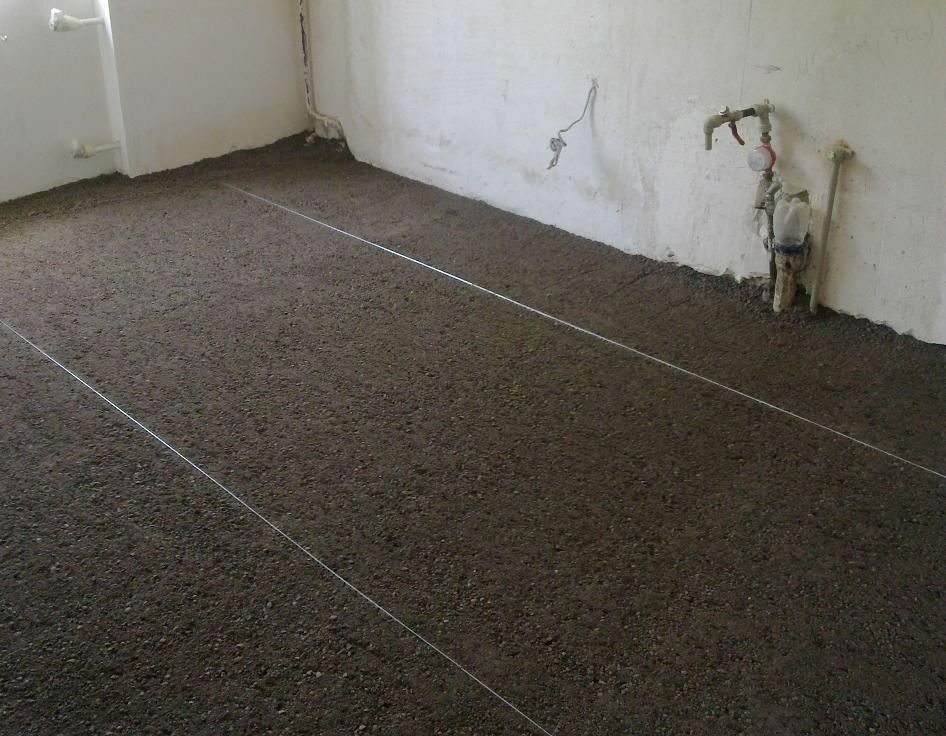
One of the key conditions - the surface of the floor to be filled should be almost perfectly horizontal. Maximum swings are allowed not exceeding 1 mm per 1 running meter. Of course, polymer compounds have the property of self-leveling, but if you imagine how much expensive material will leave for such alignment, then it becomes clear that it is cheaper to flatten the floor of concrete with a screed. All further work will be carried out only on its full maturation.
There are certain requirements with the strength and humidity of the concrete coating.
- So, the brand of concrete must be at least M200.
- The surface should gain the required strength - it's easy to check with the nail - it should leave only a light scratch, but do not cause crumbling.
- Permissible humidity of the floor - no more than 4%.It is clear that there is no special device for measuring this indicator in household goods. It is possible to proceed as follows: cover the surface with a sheet of plastic with the size 1 × 1 m , ensure tight pressing of edges and leave for a day. If after this time there will be drops of condensate on the film or even just a sweat, it is impossible to carry out the work.
In the room for work, it is necessary to create and maintain certain conditions:
- The temperature of the concrete substrate is not lower than +5 and not higher than +25 degrees.
- The temperature difference between the air and the concrete base at a height of half a meter from the floor is within 4 degrees.
- Relative humidity in the room - not more than 80%.
- All used formulations should be conditioned in the temperature range from + 15 to +20 degrees.
- There must be a fresh air in the room, but a draft is strictly forbidden.
Work begins with a thorough cleaning of the floor from debris and dust. It is necessary to reveal the weak places of concrete - so, where there are signs of crumbling, stratification, friability. Particular attention to the stains that impregnated the coating - bitumen, oil, paint residue. They should be cleaned or hollowed out to "healthy" concrete.
Small cracks, and the cracks are best separated somewhat( up to 5 mm in width) for further putty.

Quality guarantee - thorough cleaning of the substrate from dust and debris
Final cleaning must be carried out with a powerful vacuum cleaner. Particular attention is paid to the removal of small particles and dust from depressions and cracks.
Surface priming and repair
During floor pouring it is necessary repeatedly to mix a variety of epoxy compounds. For this operation it is necessary to provide a separate place outside the room, where will be carried out works .It is absolutely necessary to exclude the possibility of components falling on the floor surface. Best of all, if this issue will separate employee who will prepare the formulations as needed.
When working with any epoxy compounds, you should always remember that they have a very limited period of use in the prepared liquid form. It must be indicated in the instructions, and, in addition, depends largely on the temperature in the room. Still one nuance - the prepared component composition much more quickly loses properties, being in a container for mixing - it is necessary as fast as possible to provide its distribution on surfaces. In any case , only such amount of mixture is prepared that will be guaranteed within of the nearest 30, as a last resort - 40 minutes.
- According to the requirements of technology, priming of the surface must be carried out by no later than through 2 hours after the last dust removal .
- The soil is diluted in the ratio of 2 parts "A" to 1 "B" in the of the following sequence of .In the container with the base component "A" add the necessary amount of hardener "B" and mix at an average rotation speed of 500 rpm. It is necessary to alternate the forward and reverse rotation.

When mixing the components, the manufacturer's recommendations should be adhered to
- . Once the has obtained a perfectly homogeneous mixture, the of its is left for 3 minutes for the spontaneous release of air bubbles.
- The composition is then spilled according to according to the required quantity( see table) and with the synthepon roller spread evenly over the entire concrete surface. Particular attention is paid to the necessary priming of all irregularities and split slits. To handle such hard-to-reach places, as well as corners, it is better to use a brush.
- Ideally, you should get a uniform surface with glossy gloss. In practice, it happens that there are areas with particularly strong soaking - in these places you should slightly increase the consumption of the primer.
- For normal polymerization, soil requires about a day.
After the first coat of the primer is frozen, it's time to move on to repair work if there is a need.
- Epoxy putty is diluted in a proportion of 5: 1, and when the homogeneity of the mass is achieved, the required amount of quartz sand is added portion by piece, without stopping the rotation of the mixer.
- The resulting composition is filled in all areas requiring repair or alignment.
- If the defects are not so significant, it makes no sense to buy an epoxy putty package separately. You can use the composition of the liquid floor "Elakor-ED", diluting a small amount in the usual proportion and adding also 1 - 1.5 parts of quartz sand.
- The repair composition also needs time for polymerization - about a day. Then you can eliminate small defects by applying abrasive materials, for example, sandpaper.
After hardening of the putty and removal of dust( with its availability), a secondary surface priming is carried out. The work of is carried out by in the same way, but with the obligatory light powdered with quartz sand over with freshly smeared surface. As a result, , after curing, should get a smooth rough surface.
In a day you can proceed to the next stage.
Basing of the base layer
The very purpose of the underlying layer is the complete closure of the entire concrete surface with the simultaneous its alignment to the ideal, and the creation of a monolithic rigid basis for placing 3D- graphic objects of the floor.
In the description of the priming technology, you can meet the recommendations to lay stekloklest for it - this will give the surface the required solidity and rigidity .In the case under consideration, the manufacturer of materials advises us to do without such a measure, but to apply the quartz filling method.
- For this, the primer epoxy compound is first diluted again. Absorbed in the surface it will not be, and it is evenly distributed in a small amount, so that no puddles are created.
- After 15 - , the surface is filled with quartz sand for 20 minutes. At the same time, they do not regret it and fall asleep in excess, not less than one and a half - two kilograms per square meter. With the help of a spatula it is distributed on the surface.
- Primer in this case for polymerization is necessary about 15 ÷ 20 hours.
- Then, applying the rigid plastic brush , the sand residues that have not been absorbed into the primer are removed and the surface is cleaned of the remaining grains of sand with a vacuum cleaner.
- Now it is necessary to dilute the bulk composition that was purchased by for the base layer.
The technology of its mixing has some differences.
- To begin with carefully, within 3 - 5 minutes only the main component "A" is mixed, using forward and reverse rotation.
- Do not interrupt the by mixing a fine with a jet pour in the necessary amount of hardener.
- When performing mixing, special attention should be paid to places where it is difficult - in the corners at the bottom. At the same time, of rigid blade-mixer-blade contact with the walls and bottom of the can not be tolerated.
- After achieving complete homogeneity, the finished composition is left for 3 minutes for air release, and then immediately used. It is inadmissible to keep it in a bucket for more than 10 minutes.
- Before starting the filling, it is necessary to wear shoes - this will enable you to navigate the freshly applied composition. In this case, the leg should be placed on the floor and climb vertically, without shuffling movements. In this case, the pits from the spines quickly and without trace are tightened by the surface tension force of the semiliquid solution.
- The finished epoxy compound is spilled according to according to the flow rate and evenly distributed with a spatula. Special neatness need on at difficult sites, in places adjacent to semi-walls of , columns, in recesses and , .

Work better with two: one distributes the composition over the surface, and the second then rolls it with the needle roller
- . After the distribution, but no later than 10 ÷ 15 minutes, it is necessary to roll the whole surface with a needle roller. This procedure will additionally evenly distribute the composition over the surface and allow the remaining air bubbles to escape.

Needle roller allows air bubbles to escape
The primed base layer is left for 24 hours. Thus it is necessary to be convinced of the guaranteed absence of drafts and in exclusion of probability of hit on the filled area of a dust, building dust, water and t .
Laying of the decorative layer
This is one of the most difficult and critical stages, which requires extreme accuracy, special purity in performance. The work should be carried out only in clean soft shoes, and the is still better if you put on it shoe covers, so as not to leave random footprints from the sole.
- film with printed pattern can have a self-adhesive layer with a protective paper substrate. The main difficulty is to accurately lay out film on a flat floor surface and drive air pockets out of it . This work is best done by alone to prevent wrinkles or that is still worse, the on the folds - it can be so is hopelessly spoiled.
- It can be difficult if the picture is made of several fragments, which need to be very carefully docked among themselves, so that the junction line remains invisible.
- The printed type can and not have an adhesive layer. In this case, it is recommended to dilute a small amount of a transparent finishing epoxy compound and use it, as to lei. To do this, it is applied in a very small amount to the surface, and then film is adhered to it.
- This method is also used if small items like coins, shells, leaves and like are used as of ornament. A thin layer of epoxy compound reliably fixes them in the right place on the surface.
- If you prefer your own design, then it is applied with acrylic paints, which then need to be allowed to dry completely.
- After the decorative layer is installed, it must be primed with a transparent epoxy compound, which is intended for final casting. This measure is a must. The fact is that in order to work on pouring the finish layer you will have to again , and their sharp spikes can damage the drawing or the laid out composition. Thus, it is necessary to remove a similar threat with a primer layer.
Fill the finish layer
This layer "seals" the floor pattern and creates an image of the with an oval "lens" that forces t t with a rugged image effect. It is clear that its requirements are high. Contact dust or water on an unattached surface is unacceptable. Moreover, even a drop of sweat falling from the forehead can cause local clouding of the surface, which will be visually noticeable.

Applying a transparent finish layer requires extreme care
The fill technology is similar in many respects to the application of the base layer.
- The transparent composition "Elakor-ED" is used, which is diluted in a proportion of 2: 1.The technology of stirring has no special features.
- The primary distribution of the epoxy composition can be carried out with a wide spatula, but it is better to use a special tool - a rake, on which the necessary clearance is exposed.
- It is important to remember the material consumption rates, depending on the chosen thickness of the finishing layer. At the same time , it is impossible to "greedy" - the property of an epoxy composition to self-leveling will be ensured if a square meter is applied not less than a kilogram. And in the case when the temperature in the room is close to the critical( about +5 degrees) of the bulk the composition needs even more - about 1, 8 kg. If we look again at the table, we will see that exactly this amount is necessary for a three-millimeter layer.
- Do not forget about the needle roller - the whole surface should be rolled to them after 15 - 20 minutes after pouring.
- The polymerization of the finish layer will take for at least 24 hours. However, one should not hurry in any case, and even in soft shoes, walking on this surface is allowed only after 4 - 5 days. And you can talk about full readiness for mechanical operating loads in a week.
Video: one of the examples of filling the 3D floor
To finish the work it is advisable to apply a polyurethane lacquer coating. It is absolutely transparent and will not spoil the optical effect.
- Elacor-PU Lux varnish is diluted in a ratio of 2: 1 for 1 ÷ 2 minutes at a sufficiently high speed of the drill( about 1000 rpm).The time for the release of air bubbles needs more - up to 10 minutes, but you can also use varnish for an hour.
- Work with polyurethane-based compounds can be accompanied by a sharp unpleasant odor, which increases the importance of respiratory protection and access to fresh air, but without creating a draft.
- For application, use a roller with a velor "fur coat" and a short, up to 4 ÷ 5 mm pile. Estimated failure d For one layer - 80 ÷ 100 ml per square meter of surface. lacquer usually very well spreads over surfaces, leaving no droplets or of drips.
- Drying time of the first layer - about 8 ÷ 12 hours. Then you can proceed to the application of the second layer. It is very important - between application of layers of should not take more than a day, otherwise will not provide reliable their contact with each other.
- Moving people in soft shoes is permissible three days after the final varnishing. The full load of the finished 3D semi can be given in a week.
So, the whole cycle of creating 3D with hands will take for at least two weeks. Work - extremely responsible, requiring increased accuracy and constant concentration of attention. Following the advice of the ancient proverb, it is necessary to "think seven times" before accepts the only correct decision about the possibility and expediency of independent fulfillment of such a task.
At the end of the article - another video example of professional 3D- performance of the floor: