How to equip a floating floor in 3 ways - choose what is right for you
Table of contents
- 1 The principle of arrangement and the charm of floating floors
-
2 As mounted floating system
- 2.1 Method № 1. Installation of prefabricated structures
- 2.2 Method № 2. How to dry screed
- 2.3 Method № 3. Construction of concrete screed
- 3 Output
How to make a floating floor with their hands? I'll tell you in detail what kind of design and how to mount such floors. And as a bonus 3 propose a method of floating mounting systems.

Floating floors as one of the components of comfort in the house.
The principle of arrangement and the charm of floating floors
Design and floating floors to the very concept of swimming a little remote. Experience has shown that confusion arises because all the newcomers are vaguely device floating floor.
This technology was called floating because of the fact that the topcoat does not provide rigid attachment either to the wall or to the very basis of sex. Simply put, a floating floor - finishing flooring is laid on a soft surface and not fixed with respect to the capital structure.
Advantages:
- Soundproofing floor. floating floor apparatus made by analogy with a sandwich wherein there is a porous sound insulating gasket between the roughing and finishing coating;
- Warming. Cold concrete base can be perfectly insulate by mounting the intermediate porous layer;

Independent screed on concrete base.
- Installation of the floor on the ground. floating floor construction is not only great for parquet or laminate, with the help of this technology, possible to equip an independent concrete screed almost any curved surface, up to an open ground. I bathed in such a way floating floors in the garage, but more on that later;
- Pure and simple operation. If you need to align the base and you do not want to mess with dirty concrete work, for you have dry screed, which also refers to this technology. Plus, such a coupler can be mounted many times faster than a concrete counterpart, with their own hands;

Installation of the flooring to dry the screed.
- Installation of floor heating. Finally, all of us are well-known technology "warm floor", also has a variety of techniques under consideration.

Underfloor heating in the extruded polystyrene foam for dry screed.
In this niche there are 3 main areas, they differ depending on what kind of sex, or rather its upper layer, What material is used for the arrangement of the porous substrate, and for what purpose you are going to all this contrive.

Technology tongue and groove the most common.
- Collapsible design. In the domestic sector the most popular destination is prefabricated floating floors. Many manufacturers are trying to present their products as a separate, exclusive view of the floor, and so, to the prefabricated buildings are all coatings, joined by tongue and groove system. This includes flooring decking, laminate and parquet flooring.

Mounting flooring with natural cork covering.
-
dry screed. It was invented for easy fixes distortion and other defects of the basics:
- on the basis of the curve is filled loose and durable material;
- it is aligned with the horizon;
- it is going to shield from durable monolithic sheet;
- Durable concrete screed. Pouring concrete floating floor can be performed on the basis of a sheet heater, for example, extruded polystyrene, and the particulate substrate. The main feature here is the high strength of such floors.

Pouring concrete screed on the basis of extruded polystyrene.
As mounted floating system
Although arranged similarly to all floating floors, however, to install the main types of the difference is quite essential, so you should first decide what you need it, and only then choose the type of design.
Method № 1. Installation of prefabricated structures
For prefabricated buildings are virtually all coatings, joined by tongue and groove system. And here it is not so important what they are made, and what the configuration and dimensions of the elements floating floor.

Types of locks in the prefabricated floors.
Paint the same technique several times, I do not see any reason, why stop at one of the most popular options today, settling at a floating laminate technology:
When installing any topcoat mounted on modular floating technology is very important that the substrate be perfectly flat.
- Small bumps or nodules weather do not, they can either paint over putty, or bring down a chisel. In this case, it is important to avoid large fluctuations in the plane and the horizon;
- If the swings on a plane higher than 10 mm, you will have to fill in a leveling screed. Certainly cheaper to install beacons and align the tie for him, about the technology, I tell you a little later;
- But if your home is not very high ceilings, and even you yourself never poured screed on the horizon, believe me, better to spend money and buy a building mix that aligns itself, it is called "self-leveling tie ".
| Illustration | Stepwise filling machines |
 |
Self-leveling. Self-leveling ready to take on «Ceresit» or another producer that you trust. |
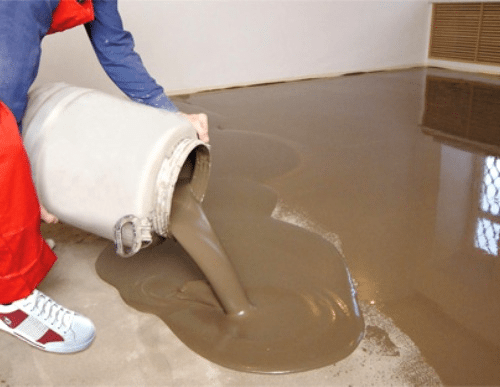 |
Pouring a self-leveling screed.
|
 |
Needle roller. Slowly roll it with a spiked roller, until it is evenly distributed throughout the plane. Further force of Earth's gravity will do everything for you. By the way on any such mixture has detailed instructions. |
Thus, durable and perfectly smooth wooden or concrete base we have. Now our base under floating floor must be waterproofed.
For prefabricated buildings does not make sense to make a powerful and expensive waterproofing, I'm in such cases, simply blanketed the room with plastic wrap. But keep in mind, any waterproofing must be installed with an overlap on the wall, at least to the level of the finishing coat, trim the excess later.

Plastic film for waterproofing the floor in the apartment.
Now we need to equip the very porous pad:
- Using izolona. If this city apartment in any of the middle floors, then insulate the foundation you need not, because under you a warm room. In this case, the insulation is often sufficient to lay izolon (foamed polyethylene) with a thickness of about 1 cm or soft tube coils;

Izolon foil for floating floors.
- Using polystyrene plates. Residents first floor concrete floor is desired to insulate. I in this case down stack layer of foam or of extruded polystyrene foam with a density of 35 kg / m3, the top of which is the same Stel izolon (0.5 cm);
- Using mineral wool. There is another option instead of extruded polystyrene foam boards laid izolona with mineral wool with a high density polyethylene and cover them.

Plates of mineral wool as a foundation under floating floor.
Then we only need to mount Finish coating. As you remember floating floor should not be rigidly attached to the walls, so we'll insert wedges 7-10 mm between them and flooring.
As the wedges when installing prefabricated can use any available material, above that they all have the same thickness. These wooden glazing beads are perfect, pieces of drywall or trim the same thin sheet of foam.

Mounting pads on the perimeter of the deck.
When mounting coatings tongue and groove is made according to the technology golden rule: the joints between the strips in adjacent rows do not overlap each other. The principle is about the same as in masonry.
| Illustration | prefabricated flooring installation technology. |
 |
|
Equipping a floating floor, in any case can not be fixed to the plinth of the finishing coating, they are fixed only on the walls. It is desirable that between the floor and the skirting board there is a gap of about 1 mm. This gap can then paint over with silicone to prevent water from entering or leave as is.
Method № 2. How to dry screed
Dry screed selected masters quite often, here are a few reasons:
- It is much easier for the concrete analogue;
- Under such floating floors is not necessary to align the surface are the technology itself provides for the alignment;
- This type of arrangement is considered relatively clean;
- In terms of labor dry screed to do with their hands is much easier.

General scheme dry screed.
As in the previous case, the work begins with cleaning the room and coanda continuous layer of plastic film, with a stop on the wall above the finishing coating.
In this case, the wedges will not be used, instead, on the perimeter of the room on the walls of the damper attached tape. Now almost universally used master tape of polyethylene foam about 10 mm thick.
Now we need to determine the future level of the finishing coat, or more precisely with the horizontal plane, on which we will align dry backfill. To do this, the walls around the room place a mark.

Markup principle for mounting dry screed.
The minimum dry thickness of dumping is 20 mm, the maximum is not as such, but it is easiest to mount the dumping of about 50 mm thickness.
Good if you have a laser level, with the help of such labels are made in a couple of minutes. Otherwise, the need to buy and mark the future gidrouroven tie on it.

Gidrouroven for layout.
Now I would like to say a little about the material dry screed. In theory, such a structure can be mounted on either a solid particulate material, in practice it often expanded clay sand is used.
Plain concrete block can not be taken, it is too big and eventually will shrink, we need it expanded clay sand with a grain size of 1-5 mm. The leader in this market is considered to be a German manufacturer «Knauf».

Expanded clay backfill from «Knauf».
From my own experience I can advise the filling of the Minsk company marketed under the brand name "Kompevit", the quality is much better, plus dust from her less.

Expanded clay backfill from the brand "Kompevit".
Russian Serpukhov expanded clay plant producing dry screed under the label "RDS" product quality is second only to Belarusians from the German sand "Knauf" this product is no different. I even had the impression that they are packed in one pile, only the price is different.

Backfill from domestic producers, "RDS".
Dry screed displayed on the beacons, so first we need to expose themselves beacons. Compared with the pouring of the concrete ties of the beacon equipment is a little bit different.
The main tool:
- plaster two-meter rule;
- two-meter building level.
| The general scheme of laying the dry screed | |
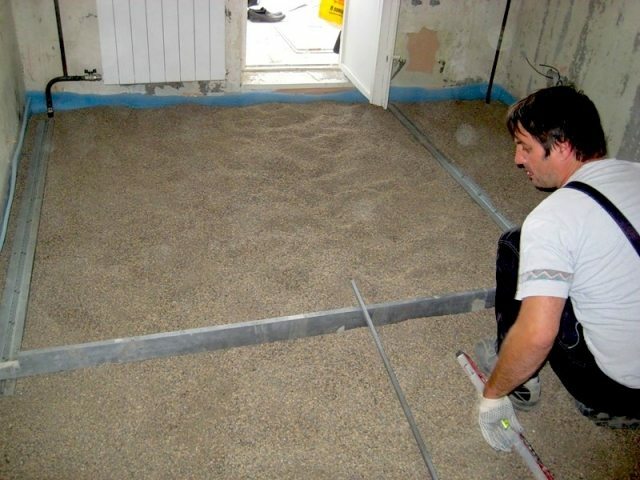 |
Beacons of CD profiles for dry screed. You should begin with the farthest from the entrance angle. Beacons can be set in any direction, but it's best to do it in the direction of the exit. As lighthouses I use normal CD ceiling profiles of the structures under the drywall. |
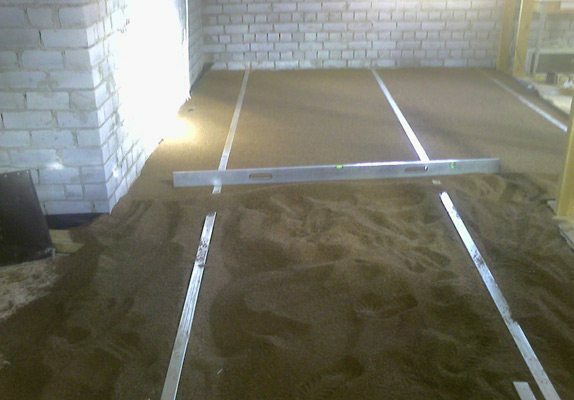 |
Checking the horizon level in lighthouses. First pour the wall expanded clay sand hill on the length of our lighthouses. After about half a meter from this hill do next, and the same way until we reach the opposite wall. Lighthouses like pritaplivayutsya in expanded clay sand:
|
 |
Align filling beacons. Then fill the space between the beacons of expanded clay with sand so that the sand just covers our lighthouses. After that we take a rule, a little leans on its lighthouses and leveling the sand under a zero. |
 |
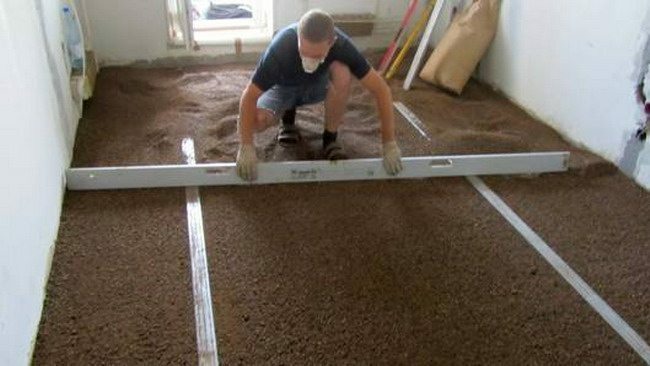
Leveled screed. Beacons can not leave in the array, because if dumping will shrink in area lighthouses plane may warp. To be able to move safely on the leveled sand, to the sand placed GVL plate such Statement improvised islands. |
Now very carefully take out our beacons, moving around the islands, bumps spiked with sand and immediately align metal trowel with a wide blade 30 cm.

Laying GVL dry screed.
When GOLS sheets of flooring is assembled, the joints between the sheets and the cap screws and shpaklyuyut entire flooring Deep penetration primer. Then you can proceed to the installation of any topcoat, from linoleum to ceramic tiles or parquet.
Method № 3. Construction of concrete screed
Independent levelcrete considered the most capital one. It is durable, not afraid of water, it can be mounted heavy equipment or furniture, and by the way, is worth quite reasonable money. The only negative is that it is a heavy and dirty work.
As I promised, I will tell you first how this settling screed on the ground. This option works well in the construction of garages and other technical or outbuildings. Here, even if the foundation will shrink, the screed will not crack.

Concrete screed on top of the pillow in expanded clay in the section.
- In theory you could just compact the ground and lay on it a layer of waterproofing, but I went a little further, I made excavation on 100 mm, falling asleep on a place clay, lightly moisten it well and He rammed. As a result, I got a strong earthen gate;
- Now at the bottom with a stop at the wall plank waterproofing, I used the technical polyethylene 200 microns, because the bottom I was still a clay seal. In general, the soil is recommended to dim at least roofing material;
- After that, I mounted on the perimeter of the damping tape izolona pieces and fell asleep in the pit conventional concrete block 250 mm. Before backfilling I expanded clay mixed with medium and fine fraction, so that the pillow has turned more dense and not subsided;
- Expanded clay pillow I leveled rule, but without a beacon to the eye. Above the cushion I lay reinforcing mesh with a cell of 50 mm and a wire thickness of 4 mm;

Beacons installed on the expanded clay cushion reinforcement.
- Now it's time to put beacons. To put them on such a shaky foundation, I kneading small portions of gypsum, makes him a pyramid and while the plaster is not grasped, pritaplival it on the level of carbon beacons.
It is believed that for the garage under the passenger car enough screed 50 mm thick, but I used to do everything with stock and poured screed 70 mm. Initially I poured concrete layer thickness of 30-40 mm, it laid another layer of reinforcing mesh and then poured portionwise cement-sand mortar and leveled its rule beacons.
When pouring concrete screed independent beacons can not clean up. In this case, I specifically bought a beacon of carbon fiber, so that in time they do not rot, and the top layer of concrete at these locations has not begun to flake.

Screed of expanded clay in the apartment.
About as filled with concrete screed independent of expanded clay and in a residential area. Only when the concrete block is filled to not less than 150 mm, and the coupler itself can be filled with approximately 30 mm thickness, with a single layer of reinforcement mesh.
But the most reliable, warm and durable floating floors you get, if the porous layer lay extruded polystyrene density of 35 kg / m3. The only problem here is that these plates should be stacked on a flat substrate.

Reinforced screed on extruded polystyrene.
On top of sand put slabs of extruded polystyrene, they are reinforcing mesh, lighthouses and beacons pour the concrete floor. Beacons can be set here as gypsum, and the screws. That is screwed into the insulation long screws, put them on lighthouses and beacons adjust the height by screwing screws.

Scheme reinforced screed on plate heat insulation.
Output
I hope I have dispelled all your preconceptions about floating floors. The photo and video in this article some aspects of the topic clearly disclosed, and if there were questions about the floating floor - write in comments, talk.


