We choose the material
The material of production is very different - wood, brick, metal profile, natural stone, gypsum board. Of course, not everyone can build a wooden interior arch( especially a brick one) with his own hands - for this one should have a set of professional skills and special tools.
Fortunately, the appearance of plasterboard construction materials in the market made it possible to implement the most daring design solutions - decorative curly wall constructions, shelves with illumination, suspended ceilings. Well, of course, interior arches with their own hands, photos of which will allow you to admire the variety of shapes and designs.
Drywall is a flexible material that allows to produce almost any shape. To do this, moisten the workpiece with water and start gently bending in the desired "direction".Then pieces of material are attached to a pre-assembled structure of wood or metal profiles.

Classics, Art Nouveau or
At the design stage, you should decide on the shape of our future design. A popular option is a classical arch, whose radius is half the width of its volume. However, if the ceiling of the room is low, this option is most likely not suitable. In a room with low ceilings, the arch "modern" will look best. Choose elegant simplicity? A wonderful way out is the style of the "portal"( in the form of the letter "P").

Installation of interior arches by your own hands
For work you will need such tools:
- Drill( or perforator) - for drilling screws
- Hacksaw - for sawing drywall sheets
- Knife - for adjusting the edge of gypsum board
- Construction level
- Measuring tape
- Pencil
When you have decided onform of the future arch, you should choose a way to collect it. If the opening is wide, it is better to stop the choice of using metal profiles. With narrow walls you can attach drywall with a special glue.
So, let's get to work. To begin with, we calculate the radius of curvature of our design, which depends on the width of the doorway. If the planned arch is high, it will be necessary to knock out the upper part of the wall - above the door opening. We proceed to the formation of the structure itself. We cut out of a gypsum board 2 rectangles, each of which has a width equal to the width of the doorway, and the length - the same with the height of the arch. Then on each of the sheets we draw a semicircle, which we cut out with a file or an electric jigsaw.
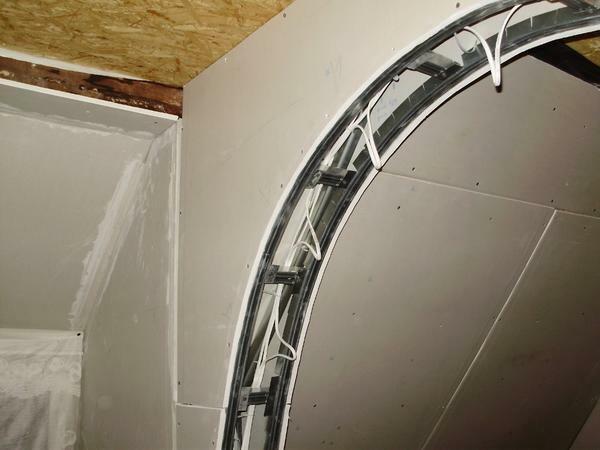
The next step is the formation of an arched framework of metal profiles. On both sides of the doorway( from the end) on the top and side we attach the profile to which we attach the prepared rectangles with an arched "cutout".

We measure the length of the arch along the radius and cut off 2 identical profiles in this indicator. Then, with an interval of about 5 cm, make "incisions" on each side of each profile, which then bend in the form of an arch with subsequent screwing to the plasterboard.
Next, we cut out a strip of gypsum cardboard, the length of which coincides with the radius of the arch, and the width - with the width of the door opening. The front side of the resulting "billet" is wetted with water and rolled with a needle roller. When bending the part, be careful not to damage the material. After giving the element the desired shape, we wait for complete drying and fix the part to the frame with the help of screws.
The arched edges are framed with a plastic perforated corner, all the seams are "superimposed" with the reinforced tape and finally putty putty. The finished surface of the arch needs to be plastered, and then whatever it is you want - paint, wallpaper or tile.
How to install arches internally with your own hands? The video clearly shows the entire workflow, which, if desired, can be considered in detail.
So, to establish inter-room arches with their own hands is quite possible for each builder - "lover".The main thing is to have a set of simple tools, detailed video instruction and some patience.


