Peephole - kinds of designs and installation technology
Table of contents
- 1 Recommendations for choosing a product
-
2 Installation Recommendations
- 2.1 Installation of a standard eye
- 2.2 Installing an electronic eye
- 3 Output

By installing a peephole in the door, you will be able to control the situation at the entrance to the house or apartment
You think install a peephole difficult? Our experience allows me to say that this work is possible even for inexperienced webmaster. I'll tell you how to choose high-quality equipment and give instructions with illustrations, which will get the job done, even those who have never put a peephole in the door.

Video Intercom system - a new option that is gaining popularity
Recommendations for choosing a product
The main element of conventional holes - wide-angle lens "Fisheye", which provides a good overview of the space. In electronic versions of the camera is used.
To begin, analyze what types of holes are:
| Illustration | Description |
 |
Standard door peephole. This embodiment is simple and consists of two parts - inner and outer, which are twisted together. The cap structure may be present to close the opening against the ingress of light. |
 |
Panoramic peephole. Its distinguishing feature - the lens is divided into two lenses. This design allows you to skip the larger luminous flux. To view the image, optionally be back to back, can be placed on the side of the structure. |
 |
System for double doors. This can be a standard or panoramic embodiment. The design consists of two parts, setting accuracy should be particularly that the elements are aligned. |
 |
bulletproof option. Used on the bulletproof door leaves, to ensure the reliability of the design. By mounting procedure is no different from the conventional embodiment. |
 |
Peephole, periscope. This option is ideal for those who have small children. You can watch in the normal position, and at the bottom, which is very convenient if you want to exclude the option of opening the door to strangers. The system is quite complicated to install, so most of the work carried out by experts. |
 |
Videoglazok electronic type. Earlier versions of video signal adjustment required for transmission to the monitor or TV. Modern technologies allow to make a compact and easy option that will set any person without difficulty. |
If you have decided on the type, it is necessary to deal with a number of criteria that are taken into account when choosing:
- viewing angle. The higher it is, the better it is clear space in front of the entrance. At cheap embodiment the angle is 120 degrees, have improved - 180 degrees. Most modifications are qualitative review of more than 200 degrees, this allows to eliminate the distortion of image boundaries;

The viewing angle depends on the shape and arrangement of the lenses
- The thickness of the door leaf. There can be three versions of products:
- to 60 mm;
- to 100 mm;
- over 100 mm.
Any version of the eyelet is adjustable 20-30 mm due to the thread. Some models are supplied different sleeve, so you can choose the optimal solution for your door;

A threaded connection allows to adjust to the thickness of the door leaf
- The diameter of the eye. This rate determines how big a hole to be drilled. If the new designs you can choose any option, the replacement of the old elements of the easiest way to choose a product of the same size. In most cases, the inner diameter portion is 20 mm;
- Material. Optics may be plastic or glass, the price far below the first embodiment, but the second is much stronger and more durable. The housing can be made of plastic or metal, the second option is preferable, although it is more expensive.
Installation Recommendations
I tell you about the two versions of the works: the installation of a conventional peephole and video surveillance option.
Installation of a standard eye
We look at how you are installing eye on the metal door.
| Illustration | Description stage |
 |
measurements are made. We are primarily interested in web thickness, other dimensions are not so important. Knowing the thickness, you can choose the appropriate peephole, and not to acquire them at random. |
 |
Prepared tool. To perform the work with his own hands need the following:
If the diameter of your eye more, then down, and core drill bit is chosen in accordance with the parameters of the product. |
 |
It marks the center of the door leaf. Peephole is usually located in the middle, so with the help of a tape measure and a pencil mark the middle. |
 |
It marked the height of eye position. Standard version - it is 150 cm from the floor, but you can raise or lower the eye so that its use has been as comfortable as possible. |
 |
produced drilling. Primarily in metallic doors must be drilled through-hole diameter of 5 mm. It is important to use a drill of sufficient length so that it came out the back of the door. When drilling pay attention to the horizontal position of the screwdriver. If the hole get distorted, then the eye will be askew. |
 |
Drilled hole on the outside. The electric drill or screwdriver bit is inserted into the metal, by which the opening is expanded to the desired diameter us. It is important to work carefully to avoid damage to the door leaf or bend it. |
 |
Drilled lining on the inside. Used to work down the drill, the main thing - just to keep the screwdriver, not to take sides. |
 |
The hole is cleared of debris and checked. Just look through it if there are no distortions, so everything is done as needed. |
 |
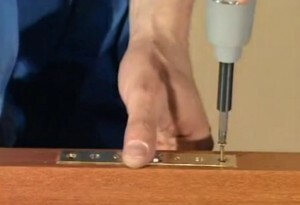
fixed eye. For this purpose it is necessary to hold the outside and screwed to the inside. If the set includes the key, it is possible to further clamp the inside unit. |
 |
Checked the system work. Close the door and look through the peephole. At this assembly has been completed. |
Installing an electronic eye
Consider how you are installing the camera:
| Illustration | Description stage |
 |
Here is the camera kit. It includes:
To work need only a screwdriver. |
 |
the battery is inserted. If you have a system running on batteries, the batteries are placed. |
 |
Put the memory card. Under it there is a special slot, you do not mess up anyway. |
 |
Cleared protective film between the power contacts. Typically, the outside has a tab for which you need to pull and thereby remove protection from contact. |
 |
Since the camera is twisted sleeve. It will keep the element from the inside, so it is necessary to remove in advance. |
 |
The sleeve is inserted into the camera mounting platform. In this preparatory work has been completed. |
 |
The platform with the sleeve is placed on the door leaf. For clarity, the work is displayed on a transparent module simulating door 70 mm thick. Of course, before you change the system, you need to remove the old eye. If you have a new door, all the features of drill holes described above, the technology is suitable for the occasion. |
 |
On the outer side is inserted into chamber. She carefully is put in the hole, the loop is pulled into the sleeve. After that, the tightening sleeve to the stop. On the mounting plate and the chamber may be double-sided tape to adhere to the door leaf, before mounting elements Remove the protective layer. |
 |
The connector connects plume chamber. In the photo you can see how looks the connection in this case, but it may be configured differently for different models of equipment. |
 |
mounted camera. She carefully aligned with the socket, and then snapped onto the plate. |
 |
The camera is fixed with screws. For reliability, the housing is fixed to the plate by two screws. |
 |
The camera turns on. All the customization features of the system will prompt instruction. You can use the camera as required, and can adjust the motion sensor, and the camera will always be switched on when the door is someone to pass or stand. |
Output
You learned how to install a peephole and will be able to work without assistance. Videos in this article will help to better understand the subject, and if something is unclear - ask in the comments.