Sliding doors with their hands - 3 options for independent production
Table of contents
-
1 Classification of sliding doors
- 1.1 Design for interior doors
-
2 mount technology
- 2.1 The choice of tools and materials
- 2.2 Preparation of the opening and the door leaf
- 2.3 Option 1: Installation of suspended doors
- 2.4 Option 2: installation of sliding doors
- 2.5 Option 3: Set the sliding door in niche
- 3 conclusion

Sliding doors do not take up space and fit harmoniously into the interior design.
You want to purchase and then install the sliding door with his own hands? I'll tell you what are the types of sliding doors, and describe their advantages and disadvantages. In addition, three variants of manufacturing these doors, which you can easily implement on their own.
Classification of sliding doors
In modern construction and furniture industry uses several types of sliding doors:
- Single- or double-leaf interior doors - one or two flaps are arranged in one plane and moved along a common guide;
- cascading design - several flaps are moved one after the other for a variety of guides in several planes;
- radius doors - are made up of one or two rounded wings, which move on the guide radius;
- sliding doors compartment - two flaps are moved parallel to each other on different guides in different planes;
- sliding Folding - each flap consists of several articulated vertical fragments. When opening they form an angle relative to each other.

Of all the types of sliding doors, the first and second options are best suited to independent production.
Design for interior doors
Depending on the method of assembly and location of the fixing points, interior doors, sliding doors are divided into three types:
- Suspension design - each movable flap is attached to the wall only at the top of Multi-roller suspensions:
- Suspensions are moved by a common horizontal rail, which is mounted above the doorway;
- The floor mounted the lower guide box, which is inserted into a longitudinal groove in the lower end of the door;
- It positions the two flaps on the same plane, and keeps them from swaying sideways.
Benefits:
- A simple and lightweight construction;
- Quick installation;
- Low cost accessories.
Disadvantages:
- Gapping door to the opening leads to the formation of drafts and deterioration of thermal and acoustic insulation properties;
- When opening the possible misalignment or falling off with a door guide;
- Not suitable for the installation of bulky and heavy sashes.

The upper guide takes all the weight load of the suspension leaves.
- Sliding design - differs from the previous embodiment by multiple support rollers and the lower guide:
- It is fastened to the floor or to the bottom end of the door;
- Support rollers are installed at the bottom of each door, and roll on the floor or on the lower guide rails;
- Thus, the main load of the weight of the door panels have to lower the roller mechanism and the upper hangers serve only to retain the flaps in a vertical position.
Benefits:
- The absence of backlash and stable position in the open doors closed;
- Snug fit wings to the doorway provides better heat and sound insulation;
- More uniform stress distribution reduces the wear of moving parts;
- This design can be used to install large and heavy doors.
Disadvantages:
- More complex device and the high price of the sliding system;
- For mounting the lower guide part is required to alter the flooring;
- Over time, the guide rails can become clogged debris and sand.

Sliding doors are more reliable, since the load of the weight of the valves is transmitted to the floor.
- penile construction - sliding system of this type is mounted in a recess (pencil box), so that the door in the open position are hidden inside the wall:
- Pencil made of plasterboard and is installed inside or behind a door opening;
- By carrying frame guides fastened to the canister and outboard support rollers;
- The rest of this design repeats previous versions.
Benefits:
- Good heat and sound insulation properties;
- Open the door wing are hiding from the eyes and does not spoil the appearance of the interior;
- For opening the door does not require additional space;
- The closed construction of the sliding mechanism protects it from dirt, sand and dust.
Disadvantages:
- Production of the canister will require more time and additional costs;
- In some cases, installation of the canister reduces the size of an existing doorway.

The penile design load of the weight of the door is evenly distributed over the base plate.
Everything for penile construction of sliding doors can be used as pendant and sliding roller mechanisms.
mount technology
The choice of tools and materials
Self-installation of the sliding door - a simple matter. For this you need a common set of tools in the home workshop:
| Illustration | Set of tools |
 |
Power:
|
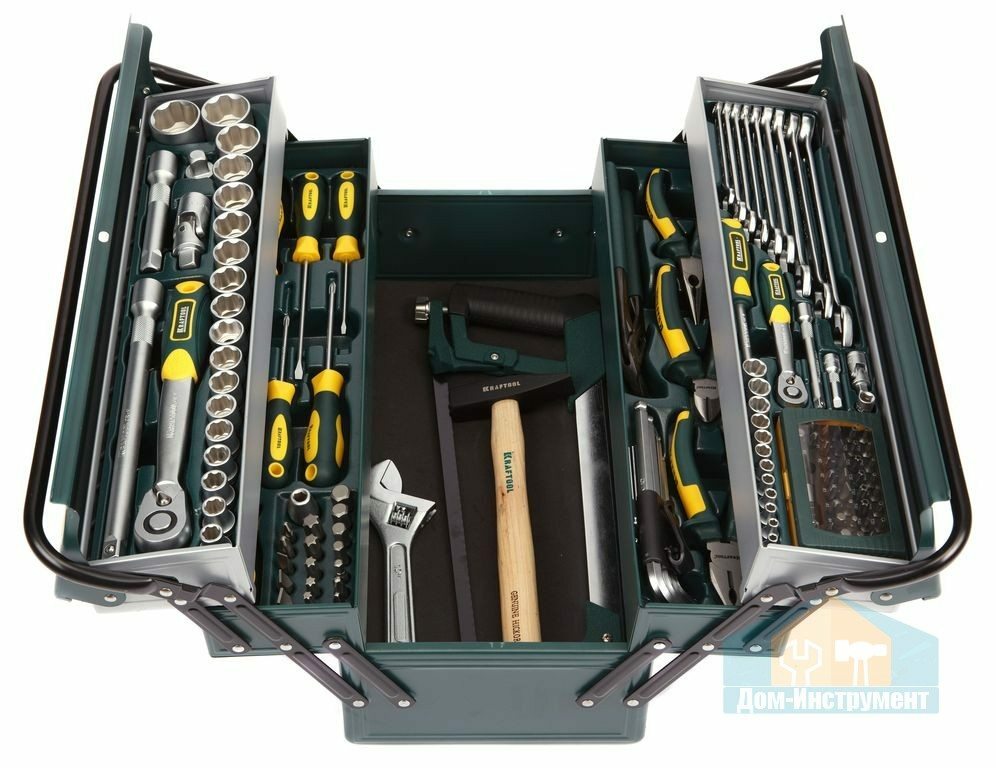 |
Hand tools:
|
 |
Measuring tools:
|
 |
fasteners:
Fastening of the roller mechanisms must be sold complete with sliding system. |
For finishing the doorway and decorative facing sliding system will need to purchase a few bars and a set of wooden or plastic casings.
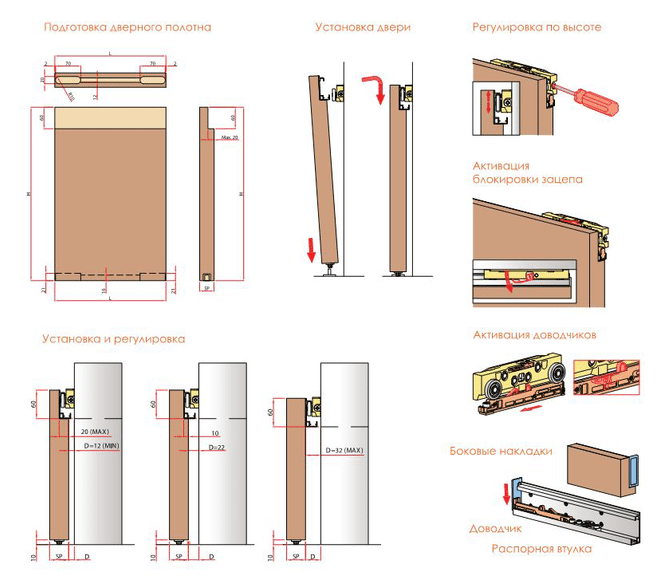
Preparation of the opening and the door leaf
you can buy a new door panel for the installation of retractable design, but you can use the existing swing doors, which you had previously installed:
| Illustration | Description of work |
 |
door Preparation:
Accessories are not sold complete with sliding system, so it will have to buy separately. |
 |
Preparation of the opening:
|
 |
Geometrical dimensions:
|
 |
plinth:
|
 |
Adjoining walls:
|
Option 1: Installation of suspended doors
Shown below is an illustrated step by step instructions describing the technology of installation of single-hanging door:
| Illustration | Description of work |
 |
Set for single door:
|
 |
Preparation of the door leaf:
|
 |
Fastening assembly platforms:
|
 |
Preparation guide.
|
 |
Installation guide:
|
 |
Facing the opening:
|
 |
The guide box:
|
 |
Installation of sliding systems:
|
 |
Hanging cloth:
|
 |
Adjusting the door:
|
Installation sliding double doors is performed in the same way. In this case, over the inlet opening is mounted a common horizontal rail of greater length.
Option 2: installation of sliding doors
Below I'll show you how to make a sliding door, in which the lower support rollers can ride directly on the hard floor covering (parquet, laminate). In this case, the lower guide is not used, which eliminates many problems at once.
| Illustration | Description of work |
 |
Technical features:
Options on one flap:
|
 |
Installing the support rollers:
|
 |
Flag guide:
|
 |
The upper guide:
|
 |
Finish the opening:
|
 |
The upper roller assembly:
|
 |
Installation of door closers:
|
 |
The guide box:
|
 |
door installation:
|
 |
Single-wing sliding doors after installation. When you open the web is a bit skewed, it can be corrected by adjusting the screws on the upper pulley. |
Vertically sliding door with their hands mounted in the same way, only the roller assembly and guide the box to the right valve must be installed in mirror image.
Option 3: Set the sliding door in niche
In this section, I will discuss how to make the sliding doors in the pencil case. This option is well suited for interior partitions built-in wardrobe or a plasterboard wall:
| Illustration | Description of work |
 |
Interior walls:
|
 |
The upper guide:
|
 |
Installation guide:
|
 |
Preparing the door panels:
|
 |
Door installation:
On top of the door opening, I advise you to leave a narrow strip of removable drywall. It will provide access to the caster mechanism for maintenance and repair. |
conclusion
Now you know what to install sliding doors with their hands can master any home without practical skills and special tools. I recommend to watch the video in this article, and all your requests and questions in the comments, I'm waiting.

