One of the most common mistakes in choosing doors to the bathroom and toilet is the opinion that all doors have a standard size that will be the same in all apartments. As a consequence, then they grab at the head and go buy a new door. But the size of the door always depends on the type of house. It is unlikely that in two different types of neighboring houses the width of the opening in the bathroom will be the same. To protect yourself from errors, make measurements. At the same time and find out, the standard size at your doors or not.

Standard
Very many manufacturers try to keep to the accepted international standards. The height is usually always the same and is 2 m. But with the width is already more difficult. The standards include dimensions such as 40, 60, 70, 80, 90, 100 cm. Here is a simple comparison: in "Khrushchev" the width of the door leaf is the same and is equal to 60 cm, and in houses of a new type it is somewhat larger and amounts to 70 cm.
Increasing the width of the doorway is not related to the desire to improve living conditions. Simply, the current baths and showers are much easier to install with an expanded doorway, because they do not pass to a narrower one. The extended opening, of course, is convenient, but due to it the area of the bathroom is significantly reduced. We already have to think about how to put a washing machine or place a sink.
For combined bathrooms, the standard opening width is usually 80 cm .More than this size, there are usually doors in houses and apartments of individual planning. If you, for example, decided to install a Jacuzzi in the bathroom, then you will not have 80 cm, which means that the opening will have to be expanded.


Correct calculations
Immediately we advise you to read our article about typical errors when calculating the size of doors.
First we will determine how to measure the doorway. To do this, perform the following procedure:
- measure the height from floor to floor. It is desirable that the finish has already been completed. Otherwise, take some stock on it;
- measure the width of the door leaf from one wall to the other;
- measure the thickness of the wall( the depth of the opening).If the finish is not yet completed, the measurements are carried out with a margin. It is the thickness of the mortar and the tile itself. Do not count on the fact that the thickness of the wall in the bathroom will be the same as in other rooms. Often it is smaller, so make a measurement.

After completing the measurements of the opening, we proceed to calculate the size of the door leaf:
- , try to roughly calculate what the size of the door leaf will be, leaving a gap between the door frame and the wall of 1-1.5 cm. There must also be a gap between the door frame and the web at least 3 mm;
- width of the door leaf can be calculated, knowing the width of the doorway. Determined with the width of the gaps? Take their values from the width of the opening together with the width of the door beam. It is equal to 2.5 cm. Since the door frame consists of two parts, multiply all sizes that you will subtract by 2.
- try to pick up the sizes with the help of countdowns. To do this, add all the values described above to the size of the web. For example, you have a small apartment. You decided to put the door in a width of 60 cm. The width of the doorway should be 60 cm + 2x( 1 cm + 2.5 cm + 0.3 cm) = 67.6 cm. And this is the minimum width of the opening.


Now calculate the height of the door leaf:
- use the same method of countdowns. For example, you plan to buy a door with a standard height of 200 cm. Add to it the same three values, but not in a double size. Do not forget about the centimeter gap between the floor and the door. As a result, there will be 200 cm + 1 cm + 2.5 cm + 0.3 cm + 1 cm = 204.8 cm. The
- calculation should also include the height of the threshold. In this case, the height will be 200 cm + 2x( 1 cm + 2.5 cm + 0.3 cm) = 207.6 cm.
The calculations are useful for buying a door. If you want to depart from the standards, then order the door to the manufacturer according to individual sizes. The cost of the product will be higher, but it will fit perfectly into the bathroom.
Non-standard
There are often situations that the store specifies a standard size of 60, 70, 80 cm, and when you buy a door and self-measure it, it is found that the width of the door leaf is slightly larger. These unfortunate few millimeters can be critical, because the door will not pass in the opening, and it will have to expand by these millimeters. If you have already completed the walls with tiles, then this will be a serious problem. But even if there were no cladding yet, the complexities will not disappear anywhere. It is necessary to prune the tile, and this is even harder than to reduce the width of the canvas.

A few extra millimeters on the door are taken because of the veneer with which the canvas is decorated. But the problem can be not only in width, but also in height. And it would be nice if it was a couple of millimeters. Sometimes it happens that the height diverges from the declared height of 1 cm or more. You can reach the required size by cutting the door. However, this issue is not so simple in solution, since there are materials that can not be touched. If the door is made of MDF, then, cutting off a part of it, we ourselves will help to get moisture inside the canvas. As a result, the door will swell.

But if the canvas is made on the basis of a frame made of wood, then it's okay if we cut off a few millimeters from each edge. Only the place of a saw needs to be immediately treated with putty or varnish.
It is better not to use an ordinary saw, since the edge will still remain ribbed. It will have to be ground, putty. But a circular saw, working at high speed, is what you need, it is used by professionals. But if you have never worked with it, then your safety and the integrity of the product are compromised.

Thickness of the door frame - the nuances of choosing
It's not enough just to pick up the door, because the box dimensions also have an important meaning. It should fit under the opening, so you do not have to expand it, or, on the contrary, put the bar. If you have already completed the tiling, then this will be a real headache.
When considering finishing materials, the door frame should ideally fit under the opening. If it is already or wider than it, then it will be rather difficult to mount the platbands. There is also a nuance: the larger the thickness of the material of the door frame, the more moisture-resistant it is. So make a choice in favor of a thicker fabric, even if you like it a little less aesthetically.

If you are not too familiar with carpentry, then entrust the installation and selection of the door leaf and box to professionals so that you do not have to alter anything.

Self-Installing
If you decide to install the door without the help of specialists, follow a clear sequence in the execution of all stages of work. If the door and the box were bought separately, then we need to assemble them, so the work will be easier. And in general, better buy a ready-made version, suitable for the size. Assembling the construction is not difficult:
- All the details of the box and door are laid out on the floor.
- Around the door, start collecting the box in turn. Drill the holes for the fasteners, trim and measure everything that is needed so that the box is completely ready for further installation.
- After all this, safely put the box in the opening.

Now remains the most important thing - the installation of the door:
- First try on how the box enters the doorway.
- Place the box in the opening and secure with wedges. At this stage, you can edit some nuances.
- Check that the box is correctly positioned with a plumb and level.
- Fasten the box to the dowels or anchor bolts. Ideally, after installing the wedges, you should mark the locations of the fasteners and drill the necessary holes. Through them, holes in the opening are marked, and the box is removed. In the wall holes are drilled, into which it is necessary to insert dowels. The box is again put in place and is already fixed completely. The hinges cut into it, and then they hang the door.
- To ensure that all seams are hermetic, they should be approximated by a third, beginning from the bottom and gradually moving to the top. About 24 hours the foam will dry up.


Separately consider the process of inserting hinges and hanging the door:
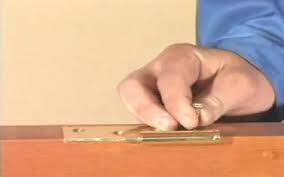
- Two hinges are usually cut, but if the door is thick and heavy, then it is advisable to use three. First, the marking is done: the loops are applied to the canvas and are drawn with a pencil.
- A cavity is cut in the canvas, equal to the thickness of the loop.
- Loops are fastened to self-tapping screws. How many holes are in the loop, so many self-tapping screws are needed. Usually the upper loop is fixed to 150-200 mm below the top of the door, and the lower one - by 200-250 mm above the bottom of the door.
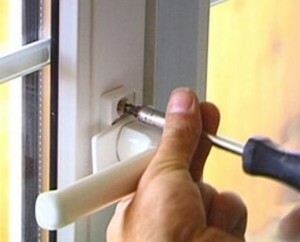
- Once the hinges are secured, place the lock on the door.
- Insert the door into the opening and straighten it 4 mm from the bottom and 2 mm from the top. The width of the gap is the same. Check the level with the correct installation of the door and mark on the box where the hinges will be located.
- The door is pulled out of the box, and on the door frame the same grooves are made as on the door.
- Now it is possible to make the final hinge insertion.
- After the foam has hardened, it is possible to produce a decorative finish, that is, put trim and cut excess foam.