Windowsill - is a necessary element of the window. Since the frame is always thinner than the wall in which the window opening, the outside and inside walls are projecting parts. The upper and two side parts after installation of windows and covered plastered putty or plastic plates. The lower edge protruding into the room closes the window sill, and the outer - the tide.
Installation of the sill can be held by hand. This may be necessary in the case of fresh replacement windows or else if the old sill has come into disrepair and must be replaced. And in fact, in both cases you need to first select how a new product will be installed to replace the old sill.
The choice of the sill
All the products that you can find on the market are divided into three broad groups, depending on the material from which they are made:
- stone. Most durable, long-lasting and expensive. Stone sill - this thing forever. The old houses were replaced with concrete stone, which does not go to any comparison with natural material. Patterns of natural stone itself makes this piece of furniture an object of art. This class adjacent to the surface of the artificial stone - a little less, of any color and not less strong.
- wooden. This extensive class covers how unsightly boards, painted with white paint, and the noble panel. Quality wooden window sills never made from pine. On it are noble oak, ash, beech as a last resort. Toning and varnishing give the product a noble kind. Wooden window sills capricious in care, but allow to beat any architectural form.
- plastic. The most affordable and most common option. At the same time a good PVC window sill as strong behind the wood, but it is much easier to clean. He is not afraid of moisture and temperature extremes. However, such characteristics can boast only expensive and quality window sills. Cheap versions are easily scratched, yellow and even fragile.

Before installing the sill need to decide on its width (depth).
The narrow window sills do not take place in the room. If the sill is for you - it is only a decorative element, a masking part of the wall, the smaller the width the better. This is a plus, if radiators located under a window sill not prevent lifting of the heated air mass and the circulation of warm air.
A wide window sill good that it is possible for something to deliver. For example, in the small kitchen of the sill can easily make the bar. If the window is located low, you can realize the dream of many - to make of the sill place to relax.
Making a wide window sill, it is possible to put a mattress with a pillow and settle with a book or a cup of tea to watch the street atmosphere. However, it should be remembered that if the wall of the house is not very thick, will need additional brackets to distribute the weight.
A wide window sill almost inevitably close the battery from the top. If it is planned as a place for recreation, you have to come to terms with it. A possible ordering sill provided with ventilation slots edging. They do not violate appearance of the sill, but allow the warm air from the radiator to rise and circulate, warming the room during the cold period.

How to install a window sill - step by step guide
No matter from which made the window sill, but if it's quality is set, will serve more than one year. On the contrary, an erroneous installation is able to spoil the expensive designer item.
important factor: Sill should not just cover the bottom protruding part of the inner wall, but make the edges into the slots in the walls. To create grooves in the walls, you can use a hammer, gently When drilling sections of the wall, or a special chisel on stone - so work longer, but be careful. Zapasshis necessary tool, you can start.
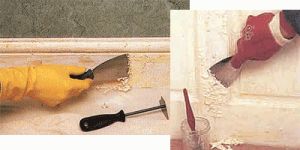
Step 1. Clean the bottom and side slopes of debris, dust and previous coatings. Hollow hammer or chisel groove beneath the side edge of the sill.

Step 2. Place the sill and set it on a level with the help of wooden wedges. The window sill must stand directly under the frame of PVC profile. Having loaded the windowsill bottles with water fill the space beneath it with foam.

Step 3. After drying the foam, cut the excess, and the junction of the sill to the frame process the thin strip of sealant. On the lateral ends of worn linings-corners and grooves hollowed plastered.

As you can see, nothing complicated in self-installing the sill there, follow the simple instructions and you will succeed, without spending money on a challenge to master.
2017-2018. Copying of materials is possible without preliminary negotiation in the case of a direct hyperlink to our website.


