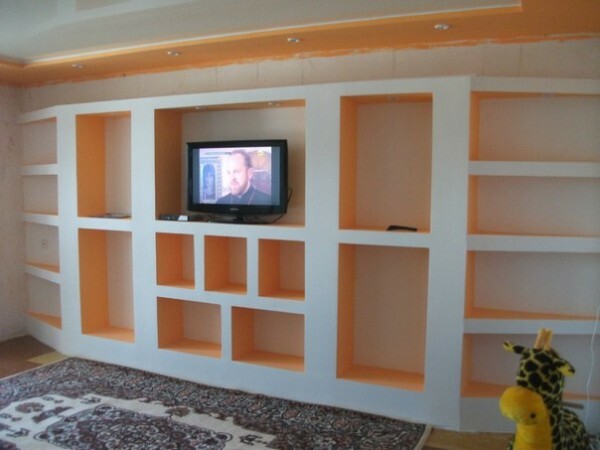
Shelves and shelves - it's not in wardrobes and cupboards, which could accommodate all desired. It is still quite roomy furniture, but in a different way. Shelves is an open type of shelves of different sizes, which is designed to store shoes, books and magazines, potted plants, etc.
This type of furniture many functions, it can diversify even the most ordinary room. In addition, such a rack, you can easily do yourself, if will approach this process with all the responsibility.

Materials for manufacturing
Make a shoe or a flower (or book) you can stack the following materials:
- metal (Here need special tools and skills, not suitable for beginners or experienced artists too);
- vine plaiting (Original version, again, requires certain abilities and skills of weaving, choose an expensive and high-quality material, not to shelves rassohlas or lost form);
- wood (Easy material to work with, which makes it possible to create any masterpiece furnished).
Rack colors
Joining parts of the rack is necessary in special grooves. The advantage of this method is that you do not need to worry about screws, nails, bolts, and other devices, you simply gather whatnot as a designer.
But at the same drawback of this type of construction in its instability, because over time, the wood can crack and become loose product.
So think about the purchase of expensive processed material, that did not happen, and use reliable fasteners.

classic bookcase
To create a classic trohpolochnogo rack, you will need the following:
- slats of wood 3,5h0,5 cm (2 m length) - 6 pc;
- strips of wood 2x2 (2 m length) - 2 units;
- fasteners, nails (25 and 40 cm);
- sandpaper.
The assembly process:
- Cut wood slats on thin sections 60 cm everyone. Then they drank so as to obtain 18 cm;
- Of the remaining strips (those that 2x2) Were cut into four racks 70 cm;
- Saw out planks 2x2 bars that are equal 23 cm (2 need of such bar);
- Begin assembly. To do this, two racks so that they stood facing each other. Mark the spots with a pencil, which will then be mounted shelves;
- Think about how far apart are placed shelves;
- Thin strips (all 6 items) Connect together at the end part via brusochkov. So you get three massive shelves;
- Strip the ends of sandpaper;
- Collect the entire structure (it may be necessary on the part of aid to keep the shelves). Fix all the nails on 40 cm;
- Place the rack on a flat surface and look at it, all the attachment points should be solid, if somewhere there is a gap or slack, then tighten up. You can now process the rack stain, paint and varnish.
This rack is suitable not only for flowers, it can be used as a shelf for books, magazines, shoes, jewelry, etc.
shoe shelves
Another variant of the universal rack. The name "shoe" is purely formal, you can use this piece of furniture for any interior design purposes.
You will need:
- chipboard;
- glue;
- screws, SCREW, edge tape.
How to assemble a bookcase shoe - step by step guide
Step 1. Of your existing materials can be collected as a normal straight whatnot and angular. The ends may thus also be rounded or straight. First, make a layout (all sizes are calculated individually) and cut chipboard shelves.

Step 2. Sand the surface of the cut edges.

Step 3. For bonding the edge of the wood and use hot iron. All small roughness and unevenness that you still remove the sandpaper.

Step 4. Assemble the rack from the available pieces. Fasten all fastening materials. Inspect the product, check how much it is strong, it is necessary to precisely on the ground or floor.

Next, you can only bring to mind the appearance, color, varnished and add some elements or decorated.
2017-2018. Copying of materials is possible without preliminary negotiation in the case of a direct hyperlink to our website.