Contents
- 1 Where to start?
- 2 CASING INSTALLATION
- 3 CASING INSTRUCTIONS
- 4 Once again about fastening the cushions
Door casing is installed with one purpose, close the gaps that result from the installation of the door frame in the opening.
Before you find the answer to the question of how to install the platbands on the door, you need to understand the rules for selecting trim cases and familiarize yourself with the technology of their installation.
Where to start?
 In order to install the platbands on the door, you need to select them correctly. To do this, it is necessary to select a cashier by width, texture, color.
When choosing the color of the casing, give preference to the one with which the door leaf is finished.
When choosing the width, try to select the platbands, the installation of which harmoniously closes all gaps.
By the way, gaps are always formed when installing the door frame in the doorway. They can not escape anywhere. It is impossible to make a box that is installed absolutely exactly in the doorway. More precisely, it is possible to make both an accurate box and an aperture measured to a millimeter, but the costs will be quite high. Is it necessary?
It's cheaper to close the resulting gap with platbands.
Various materials are used for the manufacture of casings.
Platbands can be made of wood, MDF boards, made of plastic, covered with veneer or laminated.
Let's try to figure out how to properly install the trim for the door.
 To install cashier, proceed after the completion of the whole repair.
 The operation of installing the clypeus is finished and is performed with the installation of plinths or after it. It is akin to fastening cornices, in the sense that it is performed after all the finishing works have been completed.
Installing the casings
To install the clypeus was clear to everyone, we will break it into several stages.
Preparatory stage
It is necessary to check the smoothness and flatness of the walls adjacent to the door aperture. With a large curvature, the walls must be leveled. And it is necessary to do this.
Warning! Aligning the walls, closely monitor their mutual arrangement. The walls should not only be leveled, but also located in the same plane on both sides of the opening.
Non-observance of this recommendation results in small gaps between the platbands and the wall.
Clysters can hide irregularities and cracks up to 3 mm. But to close the irregularities over 3 mm with the help of platbands no longer succeed. Knowing how to fix cash out properly, you can hide all the irregularities and gaps.
The use of clypeus not only gives the room an aesthetic appearance, but creates a complete room.
The installation of clysters in importance can be compared with the installation of skirting boards or nailing cornices.
Required tool

A few words about the tool used.
When installing the casing, the main problem is fitting the mating parts at the desired angle. Platbands are installed either at a right angle, but most often at an angle of 45 °.It is best to use a chair.
For sawing the material, a crosscut saw is used. It provides a smooth cut of the clypeus from any material.
But cheap models of machines have a backlash and an error therefore the chair for installation of platbands with own hands is more preferable From auxiliary tools you will need a pencil, ruler, square, level, plumb line.
Choosing the right material for the trims

When selecting trims, pay attention to the material structure.
The appearance of the casings must match the pattern on the door. Since various materials are widely used for the manufacture of casings: wood, plastic, MDF boards, it is not difficult to find the platbands under the doors.
Installed platbands can be covered from the outside with a laminated film, painted, varnished, glued with veneer.
Platbands are available in various shapes, allowing you to solve extensive design problems.
When buying it is very important to check the trim for curvature and curvature.
Rules for installation of trims
The rules are for those who want to learn how to properly install the platbands for interior doors.
When installing trim, it is necessary to ensure that the parts are joined without gaps.

The simplest version, the installation of casings simple rectangular shape.
In the final analysis, it is only necessary to ensure the right angle joint of the mating parts.
Most casings are produced in a more complex shape and are joined at an angle of 45º.
Attention! To ensure the required angle, it is recommended to use a special device called a chair.

Step-by-step installation of cushions
Below is a step-by-step instruction on how to fasten the cash register to the interior doors.
First the platbands are installed on the side with which the door opens to itself.
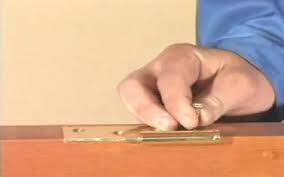
- 1. Take two pieces of side casing, attach them to the box.
- 2.Clear the bottom of the corner. It is marked 5 mm above the door frame.
Warning! Do not forget that you need to correctly mark the left and right cuts.

- 3.Remove the platbands at an angle of 45º.
- 4. Install the platbands on the door frame. Constantly check the distance between the platbands. To control this size is best cut off a given length of the bar. The distance in the top and bottom of the nailed trims should be the same.
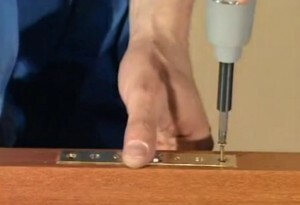
- 5.Nalichniki fastened with nails, in which bitten hats or special hot nails. Before fixing the platbands, apply a marking of the fastening points in steps of 0.5 m to them.
Warning! The platens are nailed, having retreated from the edge of the box by 5 mm.

- 6. To ensure better adhesion of the casing with the door frame, glue should be applied to the inner surface. For these purposes, silicone transparent sealant is perfect.
- 7. Now you can proceed to install the top clypeus.
Cut the standard piece of clypeus into two equal parts, cut one piece from one edge. Attach the workpiece to the hammered casing and check the coincidence of the sawed corner. Mark the second edge of the workpiece, cut the corner and insert the clypeus between the vertical casing.
- 8. It remained to nail the upper clypeus to the box for the same technology as the side.
- 9. Go to the other side of the door and follow the same procedure.
The places of the deepening of nails are waxed under the color of the doors.
You have got acquainted with the material how to install the platbands for interior doors, understand the principles and the sequence of installation in more detail will show the video.
But a few useful tips will not hurt you:
- 1.There are telescopic platbands, the fixing of which is done with a special slot. The slot is inserted into the groove of the dock or the door frame.
- 3. There are cases when platbands of the same size can not be used, because cashing can not be set in width. In this case, it is not recommended to cut the casing over a width more than ¾.
- 4. The upper casing is installed after securing the two vertical casing.
- 5. The construction market offers a casing of various shapes: curly, semicircular, carved or drop-shaped.
- 6. Cashiers are available in standard sizes in cm:
ШxТxВ;where W is the width, T is the thickness, and B is the height.7x1x210.
A few words about the capital

The capitel is called special door trim, the main function of which is to decorate the doors.
Such platbands are made of MDF or wood sheets. The installation of the capital makes the doors rich, having a finished appearance.
Once again about fixing the platbands
Above it was told how to fasten the cash on the interior doors, with the help of what related materials. But that's not all.
Platbands can be fastened not only with nails.
For fixing the platbands, liquid nails, self-tapping screws are used. There are also special fastenings, called "beaks".
Use of finishing nails allows you to subsequently dismantle and replace the platbands. Nails should have a flat, narrow hat. The length of the nails should be 1.5 cm longer than the thickness of the clypeus, usually 4 cm. The step of fixing with nails is recommended to be equal to 0.5 m.
Liquid nails are called glue, intended for fixing the clypeus. The glue is applied to the clypeus, which is pressed against the door frame, aged for several seconds. This method of fixing eliminates the traces of attachment.
Self-tapping is more reliable. In the marked casings, holes are pre-drilled, and grooves are drilled under the hats.
Special fasteners, called "beaks", are easy to use, create a beautiful view.
Conclusions:
- select trim frames according to the structure and color, similar to the door leaf;
- the upper clypeus is installed after securing the side frames;
- use nails, glue, screws to fasten the trims.
How to install platbands for interior doors without nails video
How to install trims on the door video tips