Installation frame for gypsum board. Types of profiles and types of fixture designs. The marking, installation of rails, hangers and vertical profile constructions
Table of contents
- 1 Types of profiles and types of fastening structures
-
2 The sequence of work
- 2.1 marking
- 2.2 installation guides
- 2.3 Partitioning and installation of hangers
- 2.4 Installation uprights
- 3 What many do not speak or do not know
- 4 Summing up
Due to its versatility frame method plasterboard fixing widespread.

The design of crates under the drywall
He has a number of obvious advantages:
- Metal profiles with mounting systems allow you to easily and quickly complete frame assembly for the plasterboard on any surface. (Cm. also the article Profile for drywall: features).
- Skeletons are resistant to pests, do not rot or warp from moisture and temperature extremes, have a long service life.
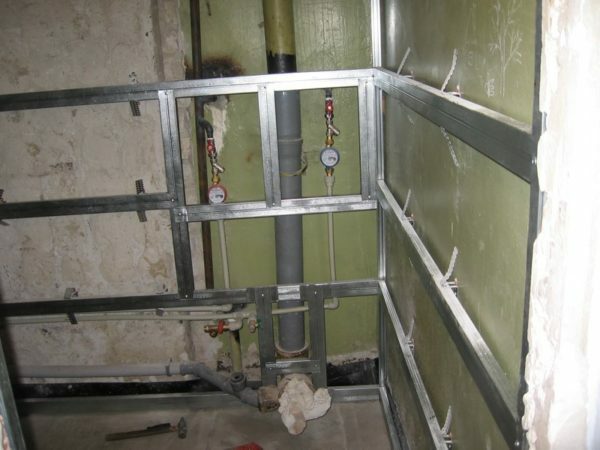
- The frame allows to obtain additional space in which to hide the wiring heating pipes and water supply, wiring, and other communications.
- The extra space can be used for placing insulation and soundproofing.
- Also it allows you to hide all the defects of the walls and ceiling. The result is a perfectly flat surface.
In this article we will not focus on how to properly mount the plasterboard on frame Planking. The use of wood for this purpose in most cases, is not justified.
Types of profiles and types of fastening structures
The following types of profiles are used for the installation:
- Guide Mon from size 28h27, 50x40, 75h40 and 100h40.
- PS rack with sizes 50x50, 75h50, 100x50.
- Ceiling PP 60h27.
- PU-profile 31h31.

Types of metal strips
There are several types of structures.
Let us consider them in more detail:
- Type S625, where the foundations of the frame using the guides PN or NP 75h40 100h40. A couple of them are installed rack 75h50 SS or SS 100x50. This type of construction for a single-walled cladding.
- The design type guides S626 Mo 50x40 can be used 75h40 Mo or Mo 100h40. Together with them is attached PS 50x50, 75h50 SS and SS 100x50. Used this design for a multi-layer cladding.
- Structure S623, as the rack is used ceiling PP 60h27Which is mounted in a pair of the guide PN 28h27.
The sequence of work
marking
The first marking is performed, which allows to determine the exact position of all the design elements.

In the photo layout guides
- On the floor is held parallel to the line - a border, indicating the front wall of the plane.
- Indentation size - sum of the width of the space between the wall and the profile, which will include communications + + guiding profile thickness drywall thickness.
- On the indent value is also influenced by the wall roughness. It is important to achieve a minimum distance, because it affects the amount of living space.

The space between the frame and the wall
- Once carried out the line that defines the face of the drywall, you must mark the line of the front side of the chassis. It is parallel to the first line, deep into the frame at a distance equal to the thickness of the sheet.
- It is necessary to project a line indicating the front side of the structure on the ceiling. You can use the plummet, which is installed directly over the line in several places and mark the ceiling checkpoints.
- By connecting these points by a straight line, we get an upper bound crates.
installation guides
Installation begin with fastening rails PN to the ceiling and floor on marked earlier lines indicating the limits of the front side of the chassis. The guides are fastened with dowels, nails. attachment points must be located at a distance of less than 1 m. (See. also the article Decorating the living room with plasterboard: features).

Mounting rails
Important! Fixing rail hangers to the floor and the ceiling walling recommend a gasket in the form of a tape. Racks that are abutting to the walls, and must be fixed through seals. For this purpose, a special tape made of a foam material.
The fastening systems S625 and S626 dowels for fastening should go in increments of not more than 100 cm. Each profile must have at least three fixing points.
Partitioning and installation of hangers
When the rails are installed and secured, proceed to the installation of hangers that are designed to fix the rails.
- Pre-defined and can label mount installation location PS profiles. When marking is important that the distance equal plasterboard panel width between the centers of the profiles.
- Fixing direct hangers are also performed by the dowel-nails. Hanger attachment points are located along a line along the rack profile. The distance between them should not exceed 1.5 m. Do not skimp on this, fixing the price is not so great, it will pay for itself the reliability and long service life.
- In the absence of direct hangers they can make with their hands from a ceiling profile PP. To this suspension length is calculated, which is formed as a sum of twice the distance from the wall to a furring + plane section width. When the length has been determined, it is cut off the metered piece.
- On the resulting interval from both ends of the delayed distance corresponding to the distance from the wall to the batten plane, and the incision performed sidewalls. As a result, we obtain an analogue of the standard suspension, made with his own hands.
Tip! If you want to increase the rigidity, instead of directly to the suspension mounting, it is best to use the so-called "boot".
Installation uprights
- When set lower and upper guides them with a necessary step inserted rack profiles.
- If in the future the wall surface of the planned stoning tile rack SS should be set in increments of no greater than 40 cm.

Installation uprights
- The spirit level or plumb them expose vertically. After that is secured with self-tapping screws to press the puck to the guide. For this purpose, suitable screws 10-15 mm long with a drill or without it.
- Performed the final fixing of the SS to the straight suspension, this is done using self-tapping screws to press the puck. Protruding over the front plane of the frame hangers are folded to the side.
What many do not speak or do not know
Install rack-mount substation in the guide should not vraspor and with interference, and with a certain gap. Substation length must be 10 mm lower than the height of the room. If the house is exposed to seismic or seasonal fluctuations, close to the subway or other source of vibration, the length of the profile should be reduced by at least 20 mm above the height of the room.
In order to properly mount the frame to the drywall under soundproofing, it must be separated from the wall. This can be done by using special strips of foam material or vibration control mounts discussed above.
If a finished room has high ceilings, to give the necessary frame stiffness further between the body of the SS set horizontal jumper. To further enhance the rigidity of the structure, the horizontal bridges must be fixed at the middle of the sheet.

additional jumper
In the course of mounting frame, consider the location of objects and furniture, which are planned to fix on the wall. In such places additional set suspensions and transverse profiles.
Summing up
Now that you know how to set the frame. In order to more accurately understand the technological and practical issues on our website provides detailed photo and video instruction, in which you will find the necessary information on the question. Good luck!