Two-level ceilings of GCR: step by step guide for self-study
Table of contents
-
1 Step by step description
- 1.1 Step 1: Mark up the ceiling under the first level
- 1.2 Step 2: Collect the frame
- 1.3 Step 3: The frame is sheathed with plasterboard
- 1.4 Step 4: Apply the layout below the second level
- 1.5 Step 5: Putting the frame
- 1.6 Step 6: sheathe the second tier
- 1.7 Step 7: Perform a rough finish
- 2 Output
How to make a two-level ceiling of plasterboard without hiring builders? Let's look at the technology and you'll see how everything is simple. And as a bonus I sign for incremental algorithm, following which you can arrange beautiful ceilings in your home or apartment

Make a ceiling for the forces of each handyman
Step by step description

The process of mounting a two-level tensioning stream includes several steps:
Step 1: Mark up the ceiling under the first level
At first are building a conventional false ceiling, which begins with the installation of markings:
| illustrations | Description of work |
 |
Indicate the level:
|
 |
Application arrangement lines bearing profiles. Retreat of 100 mm and a wall repel the ceiling parallel lines at 600 mm. |
 |
Marking the location of hangers. Upon receipt of the lines to make a mark in increments of 50 cm. Tags apply perpendicular to the lines that all suspensions were placed parallel to each other. |
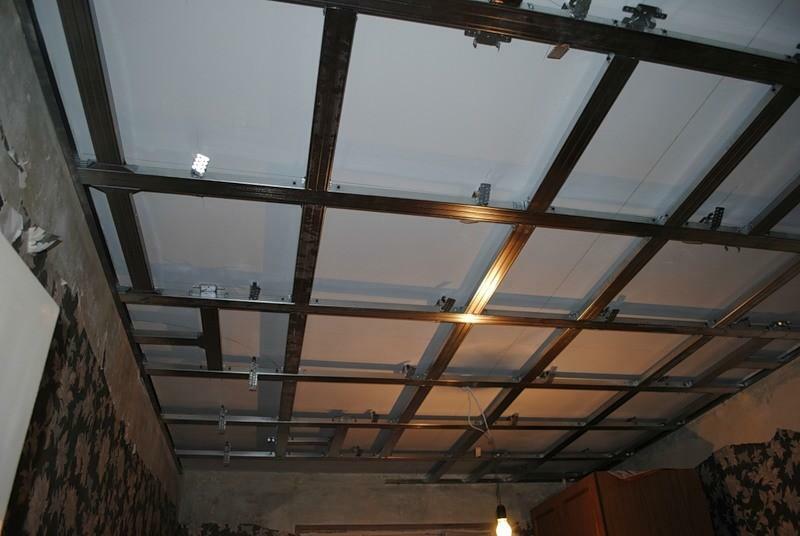
Step 2: Collect the frame
Now you can start the installation of the first level of the frame. Work is carried out as follows:
| illustrations | Description of work |
 |
Preparation of materials. For frame assembly you will need:
|
 |
Installation guide:
|
 |
Installation of hangers. Fixing is carried out also by means of dowel-nails. During installation, be sure to align the direct suspensions according to the marking on the ceiling. Under the guiding profile and direct hangers is enclosed sealing tape. It dampens vibrations, protecting the ceiling cracks and is soundproofed. |
 |
Installing PP Profile:
As a result, it should turn the frame with horizontal and perfectly flat surface. |
 |
Installing the crossbars. Between mullions jumper from the same PP profile. For their fastening use the tees. Jumper mounting step should be 50 cm. |
Step 3: The frame is sheathed with plasterboard
first level frame plating process itself plasterboard (gypsum boards) the simple and intuitive - lists are applied to the frame and are fixed with screws. However, this procedure requires adherence to certain rules:
- Follow the step screws. Optimum space in between them is 25 mm;
- Observe the optimal distance from the edge. Screws should not be closer than 10 mm from the edge, increase the distance is not worth;

Hat screws needed a little deepening
- Correctly screw the screws. Fasteners should be positioned perpendicular to the drywall. Hat screws need a little utaplivat, so they do not interfere with putty. At the same time make sure that the cap is not broken through the layer of cardboard, otherwise the screw will not fix sheet;

On the ceiling should not be cross-shaped joints sheets
- Correctly position the sheets on the frame. The circuit arrangement of plasterboard sheets must be such as to avoid any cross-shaped joints. In addition, make sure that all joints were in the profile;
- Do not attach sheets to the guide profile. Fixation sheets to PNP profile leads to cracks in the ceiling.
Headliner for use 8,0-9,5 mm thick sheets.
Another important point - cutting drywall sheets, with which you will encounter during their installation. This procedure is carried out as follows:
| illustrations | Description of work |
 |
cut the cardboard:
|
 |
We break the sheet. The gypsum thus break along the cutting line; |
 |
Cut the cardboard from the back side:
|
To cut out the details of the FCL curved shape, you can use the jigsaw. After plating the frame is necessary to make holes for the light fixtures. For this use an electric drill of suitable diameter with a crown.
Step 4: Apply the layout below the second level
Installation of the second level also begins with the markup. Operation is as follows:
| illustrations | Description of work |
 |
Determine the level of:
|
 |
We outline the contours of the second level. Generally, contours are curved lines. To gently put them on the ceiling, you can use templates. |
Step 5: Putting the frame
Now you can begin to assemble the frame. Instructions for the implementation of this work is as follows:
| illustrations | Description of works |
 |
Preparation of materials. Before placing the frame of the second level, Prepare the same profiles as for the first frame. The only crabs and suspensions, as a rule, are not used. |
 |
Production upper cam guides. To obtain a curved track profile, follow these steps:
|
 |
Installation guide profile. To secure the profile on the ceiling, use the special anchors for drywall. In areas, where the PP profiles, use self-tapping screws. |
 |
Mounting the guide of the second tier to the wall. Align the profile for marking and attach it to the wall with screws. |
 |
We produce hangers:
Such lengths to do so, so you can fix them at the top of "snake" in increments of 25-30 cm. |
 |
Installation of hangers. The resulting crop «CD-shki" insert into the guide profile and secure with screws. |
 |
Mounting the lower guide:
|
 |
Installing the support rails:
|
The height of the two-level ceiling is chosen depending on the overall height of the room. Do not make too much difference between the levels, if the low room.
Step 6: sheathe the second tier
Now you need to perform the installation of plasterboard with their hands, observing the rules set out above:
| illustrations | Description of work |
 |
Preparation of the end strip. Cut strips of 6 mm thick plasterboard. The width of the strips must match the height of the second tier. |
 |
Fastening strips GKL to the ends. Obsheyte frame ends, fixing screws prepared strips. If the bend radius is too small, the rear of the bands need to make cuts in the cardboard. |
 |
frame paneling below:
|

The ceiling of GCR can be combined with a film stretch ceiling
In this two-level ceiling installation is completed.
Step 7: Perform a rough finish
Now you only decorate the ceiling surface of the drywall. Work is carried out as follows:
| illustrations | Description of work |
 |
Preparation tools. For finishing the ceiling drywall you will need:
|
 |
Padding:
|
 |
Grouting. In areas where no factory chamfer, bevel cut off about 5 mm wide. |
 |
Reinforcement stitches:
Thus reinforcing all seams. |
 |
Reinforcement of internal corners. The angle between the first and second layers must be reinforced as follows:
|
 |
Preparing the joints:
Similarly, and prepare the joint between the first and second tiers. |
 |
Mounting of arch corners. All exterior curved corners stick arched corners using a putty. |
 |
Shpatlevanie. Now you can start putty two-tiered ceiling with his hands:
|
 |
Grinding surface. Powertrowel ceiling grid with grit P80-P120, to get rid of irregularities. |
 |
Padding. Treat the surface of the primer scheme described above. |
 |
The finish coat. Now, two-story ceiling is necessary to cover the finishing putty. Apply the smooth even layer 1-2 mm thick. |
 |
Finishing grinding. Powertrowel all minor irregularities grid P150, making a circular motion. |
To finish shpatlevanija use plaster polymer-based (acrylic or latex). Its price is slightly higher than the plaster, but it is much better to bear, to achieve better results.
That's all the information on how to make a two-level ceiling of GCR. Upon completion of this work, you will only paint it or cover other finishing materials.
Output
Now you can create high-quality two-level ceiling with your hands without the help of professionals. Additionally, check out the video in this article. If some of the nuances you do not understand - ask questions in the comments, and I will gladly answer.