SIP panels - types of products and the technology they use
Table of contents
- 1 Types of SIP-panels and their characteristics
-
2 The working process
- 2.1 Materials and tools
- 2.2 The construction of the base
- 2.3 construction of walls
- 2.4 Installation of partition walls and gables
- 3 Output

Construction of houses from SIP panels - the process quick and does not require construction equipment
What is a SIP-panel and how fast to build a house of these items? The technology is so simple that you can just a week to collect the building. And it does not need special equipment and professional skills of the builder.

SIP panel - a ready module that can be installed on a prepared base
Types of SIP-panels and their characteristics
To begin see what is an active material. Abbreviation SIP (Structural Insulated Panel) came to us from the English language. In Russian SIP stands for structural and insulation board.
In fact, this sandwich panel, which is located inside insulation - polystyrene. In contrast to the foam it has higher strength and is not subject to combustion, which is very important. On both sides of the insulation sheeting is adhered, which may be different. The thickness of the outer layer varies from 8 to 12 mm.

An example of one embodiment of products, clearly showing the panel structure
The panels can be of three types:
| Illustration | product Description |
 |
Panel based on DSP. In this kind of manufacturing the cement-bonded plate is used as an outer finish. This material has high strength and durability. The surface is very easy to putty, plaster or trim in other ways. The products have a distinctive gray color on which they are very easy to distinguish. |
 |
Panels based LSU (magnesium oxide wallboard). This embodiment is made with the use of sheets of glass, known for their durability and longevity. When assembling the obtained flat wall, which is very easy to finish. |
 |
CIP panel based on OSB (oriented strand board). This type of plate is also called OSB in English abbreviation. They are made of wood stuzhki, stacked in different directions and impregnated composite structures. This gives the product strength and durability. To date, this option has won the greatest popularity among developers due to the ease of processing. |
Apart from the material production of the top layer, the plates are even a number of important indicators. Let us examine them:
-
The thickness of the heat insulating layer. The most common variant 3: 100 mm, 150 mm and 200 mm:
- The panel of 100 mm is used for the construction of interior partitions in the house;
- Panel 150 mm is ideal for exterior wall;
- The panel of 200 mm is used as floor panels, although it can be put on the wall, if your area is very severe winters;

Here is a comparison of thermal conductivity materials, as you can see, even 100 mm polystyrene have excellent insulating properties
- The thickness of the outer sheets. It ranges from 8 to 12 mm. I recommend using a slab with the sheet material of thickness 12 mm. They have high hardness, the surface is less susceptible to deformation and withstands high loads without damage to the structure;
- The size of the elements. Standard values are 125h250 panel 125h280 and 125h300 cm. overlapping elements may have a length of up to 7 meters. But the feature of the production of SIP is that you can order the items of your size. It will cost a bit more expensive, but you will have boards of a certain size, and will only collect them;

This standard SIP panel, but can be ordered in other sizes elements
As for the cost, it depends on the manufacturer, the thickness of the insulation and the outer sheets. The average price of a standard panel 1250h2500 mm is about 3000 rubles. That is, a square meter will cost about 1,000 rubles.
The working process
For simplicity, I will break the work into 4 stages:
- Preparation of materials and tools;
- The construction of the base;
- Walling;
- Mounting the upper wall and gables.
Materials and tools
The following materials are used for:
| Illustration | Description of material |
 |
SIP panels. They are the major building blocks. The calculation is made on the project at home. Floor used thick plates, medium for walls. Partitions can be made of frame, reduce the cost of this project. |
 |
strapping timber. With it, the elements are connected and are set in position. Also need other lumber - boards, beams for ceilings and walls inside the frame. |
 |
perforated mounting. It is used for fast and reliable connection elements. Corners and timber support not only accelerate the working process, but also increase the structural strength. |
 |
Anchor bolts. With their help, the flooring under the floor will be attached to the foundation. Fastener length should be greater than the thickness of the panel and strapping timber 60-100 mm, since the fastening will pass through these elements. When using panels 225 mm thick anchor should be at least 300 mm. |
 |
Screws. several options will be used - for fastening the plates together suit embodiment 40 mm. For mounting plates are used through screws 220 mm in length. |
 |
Professional installation foam. Her we will use to connect all the elements, so you need to stock up on at least a box of foam. It is better to buy a professional, not a consumer version had a much lower cost. |
 |
Bituminous mastic. It will be used for the base treatment. This provides reliable protection from moisture. |
You can purchase ready-made kit houses from SIP panels. The kit is everything you need to design buildings, you will collect all of the constructor of the detail diagram. The cost of such a set can range from 400 000 to 2 000 000 rubles depending on the project size and structure.
The tool for house construction:
- Building level and pencil;
- screwdriver. The instrument further equipped bits desired configuration;

Screwdriver allows you to quickly tighten the large number of screws
- drill. It will be used to drill holes in the base under the fixture base panels. The kit must be drilled of appropriate diameter and length;
- Gun foam. Will cause a lot of staff, so choose a high-quality and reliable tool with adjustable flow;

Gun Foam allows you to apply makeup quickly and economically
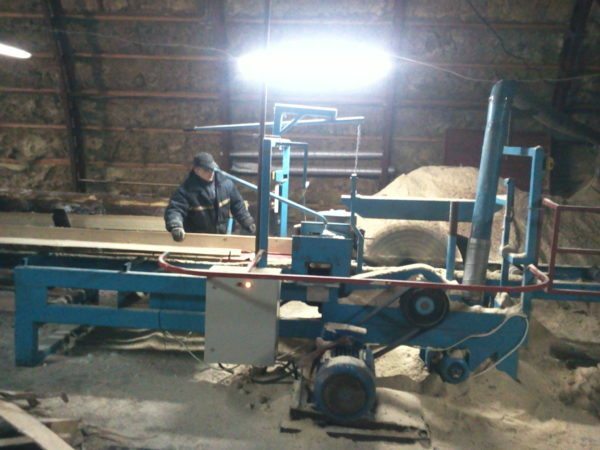
- Power saw or chainsaw. If you want to cut the sandwich panels, that can not do without this tool. If it is necessary to cut only the bars, it is possible to do a circular saw.

Electric saw to cut the panels allows CIP and the bar very quickly and efficiently
The construction of the base
I will consider the work from the moment when the foundation is already built, and scored the required strength. That is, you have to fill it in advance.
The base houses from SIP is going well:
| Illustration | Description stage |
 |
The lower part is treated with mastic. Work is performed maklovitsej brush. We should be very careful to put structure on the whole area, so that there is no unprocessed area. |
 |
Stacked first elements. Deadline is aligned with the foundation. At the end of the next applied over the entire length foam. It is distributed in zigzag movements as shown in the photo. Do not spare the staff - it will not only provide the adhesive, but also seal the joints. |
 |
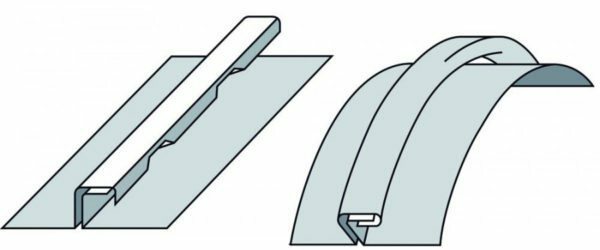
The panels are joined. It is important to carefully and accurately combine elements and insert connection bar into the groove as close as possible. You can tamp elements, but be sure to substitute the spacer to prevent damage to OSB boards. |
 |
The compound is further fastened with screws. They screwed indented 2 cm from the edge with a pitch of 20-30 mm. Fasteners can be positioned at a slight angle. Hat should recessed into the surface. |
 |
Desirably seal elements and on the lower side. It does not always work, but if you have access, do not be lazy and tighten the screws at the bottom. |
 |
At the end portions of plates applied foam. Also cut strapping lumber to length for installation on the edges. |
 |
Beam glued to the end. Element is carefully inserted into the groove and pressed tightly against the entire length. |
 |
Bar further fastened with screws. They screwed every 30 cm along the perimeter and provide extra reliability of the end portions. |
construction of walls
This part of the work is carried out as follows:
| Illustration | Description stage |
 |
Determined the optimal location for strapping timber wall panels. To do this, it is best to use a template that is easily done with his own hands from the panel piece. So you can quickly and accurately set the start unit. |
 |
Bruce secured. Primary fixation is carried out by means of screws. They are arranged with a pitch of 50 cm, the length of the fasteners must be thicker bar 30-40 cm. |
 |
Drilled holes for anchor bolts. Bruce drilled drill, metal or wood. Further work is performed drill on concrete. To control the depth of drilling, to drill can stick masking tape or adhesive tape to the right place. |
 |
Set and twist anchor. It is very simple: the anchor is hammered until it stops, and then it must be tightened. You can use a pipe wrench or any other suitable size. |
 |
At the lower end of the first member is applied to polyurethane foam. It is necessary to bring the panel to the mounting location and already there to apply the foam. |
 |
The panel is placed on the installation location and is aligned with the level. It is important to expose the first element perfectly flat since it will serve as a reference for the other parts of the structure. |
 |
The element is fastened with screws. They are screwed into the bar in increments of 15-20 mm. It is important to arrange them so that they came in the middle of the bar, so provided the highest stiffness mounting. |
 |
Bar is attached to the adjacent side. It's all made in the same way as in the case above. It is important to exactly set the item and fix it firmly with the anchor bolts. |
 |
Foam is applied to the compound. The composition is distributed at the bottom end, and also at the place of joining two plates. This joint should be handled with particular care to seal the connection and prevent heat loss through this site. |
 |
The second element is joined to the first. He aligned to the level, and then fastened with screws. |
 |
Corner connection further sealed by long screws. Used fasteners 220 mm long. They just twist through one of the panels and tightening the angles are very reliable and durable. |
 |
In place of the windows location desired height slabs placed. It's all in a similar way:
|
 |
Fixed plate above the window opening. It's all easy thing to expose the element smoothly, and then secure it with screws. This step is best done with his assistants. |
 |
Openings reinforced corners. In the corners are placed reinforced fasteners and self-tapping screws are screwed. |
 |
Here is the finished wall. All openings are strengthened, the walls are exposed evenly. Compounds are fastened with screws, and after curing the foam it will serve as a very durable glue. |
 |
The upper ends of the closed strapping timbers. It's all done in the same way as in the cases above: first, apply foam and then screws are screwed to ensure reliability. |
Installation of partition walls and gables
This step looks like this:
| Illustration | Description stage |
 |
constructed partitions. Optionally use sip-panel can be built carcass structure. This reduces the cost of the project, so if you want to save, use this solution. To design can be used as bars and interconnected boards. |
 |
The beams are mounted on special supports. It is important to secure the structure, as it will bear the load of the roof slab. |
 |
All cracks and joints are sealed with foam. It is better to do at once, as long as you can get to all the sites and warm design with maximum efficiency. |
 |
On the prepared foam panel is applied. Then the composition is distributed not only at the ends, but also in places that will build on the wall partitions. Try to distribute the foam on all the areas that come into contact with other elements. |
 |
Plates are fastened with screws. Work is performed with both the outside and the inside. Step mounting location - 20-30 cm. Before twisting, always make sure that the plates are joined tightly. |
 |
For partitions fastened to the long screws. You must attach the panels to the side walls and partitions, which are held under the item. Long screws may be positioned at a distance of 50 cm from each other. |
 |
constructed gables. They're going the way and the wall, the difference is that it is necessary to combine elements of different configurations. In order to strengthen the openings and connections, use the perforated corners with ribs. |
 |
If you have an attic floor, you can close the roof SIPs panels. This requires a frame structure, but you get Insulated loft immediately. |
Output
Using this overview, you can easily choose the structural and insulating panels and build the house of them correctly. Videos in this article will help you understand the topic better. If something is unclear - ask in the comments.