Mirrors - an interesting element of the interior, which can visually improve the space of the room, but can also spoil the design when used improperly. In this article we will try to understand the peculiarities of mirror wall decoration, we will consider the use of such surfaces in rooms of different purposes.
Contents
- What are the mirror walls
- The mirror functions in the interior of the room
- Visual expansion of the space
- Interior addition with interesting details
- Splitting effect
- Where not to use mirror walls
- Mirror wall in the interiors of different rooms
- Mirror finish in the bathroom
- Mirror wall in the interiorkitchen
- Mirror design in the interior of the hallway
- Mirrors in the living room
- Mirror finish in the bedroom
- Types of materials for the bedroommirror finish
- Mirror tile
- Mirror wall wallpaper
- Mirror wall sticker
- Mirror wall paneling process
- Preparatory work
- Selection of glue and mounting of mirror tile
- Mirror wall in the interior of the apartment. Video
What are the mirror walls of the
A mirror wall is called a vast area of a vertical surface, trimmed with reflective material. Mirrors in this case can be a virtually integral seamless web, and can be a series of individual elements. Mirrors are fastened in various ways: with glue, special clamps or a prefabricated frame. Let's see in more detail what detail of the interior can be called a mirror wall:
- composition of several mirrors, enclosed in frames or without them;
- surfaces, finished with mirror tiles or covered with mirror wallpaper;
- doors of sliding-door wardrobes, screens;
- walls, decorated with mirrored panels;
- mirror columns;
- facades of furniture, cabinet walls or shelving, finished with a mirror material.
Mirrors that are used in interior decoration, differ in appearance. For example, the surface of such a material can be clean, and can have a sandblasting pattern, can be corrugated or smooth. There are mirrors with the effect of aging or without it, individual elements are enclosed in frames or represent a homogeneous surface of tightly fitted parts.
As for the material of execution, the modern finish is presented in the sale of ordinary glass mirrors or flexible, made of acrylic.
When creating a mirror wall in a room, one must take into account the curvature of the working surface. If the base is flat enough, then special glue is used for mounting the cladding. On the curved mirror wall it is better to install with the help of fasteners or in advance to mount the frame.

Mirror functions in the interior of the room
Visual expansion of the
space Many people know that the reflective surface can visually expand the area of the room and make it lighter. This is especially true for owners of small apartments or narrow rooms. In such a case, a well-positioned mirror wall can become a real "wand-rod", which, although it does not add extra space to the room, will certainly make the home more cozy and not so cramped.
Tip: To make a small room lighter and more spacious, the mirror should be placed so that it reflects the window. The room itself is desirable to decorate in a light color scheme.
Mirror surfaces involuntarily attract the eye, sometimes it causes some discomfort. In such a case, it is recommended to trim the upper parts of the walls with reflective materials. This will be enough to visually expand the space, at the same time, the reflection will not catch sight. You can decorate the wall with mirrors from the ceiling to the floor itself, for example, behind the back of a bed, an armchair or a sofa, in a hallway or in a corridor.

Interior supplement with interesting details
In bright and spacious rooms there is no need to resort to tricks and visually increase the area. Nevertheless, even in this situation, the mirror will not become an extra design element. Separate small details will give the interior elegance, refinement, a note of luxury. In this case, you can use special mirror stickers on the wall or simple mirrors enclosed in frames.
As accent details, the mirrors of unusual shapes, decorated with drawings or ornaments, look spectacular. When decorating the interior in this way, it is important to remember that the mirror surface should reflect the minimum amount of furniture, otherwise the mirrors will act on the psyche irritatingly. Use them better in rooms where the number of interior items is minimal, and the walls themselves have a low-key finish and a matte texture.
Splitting effect
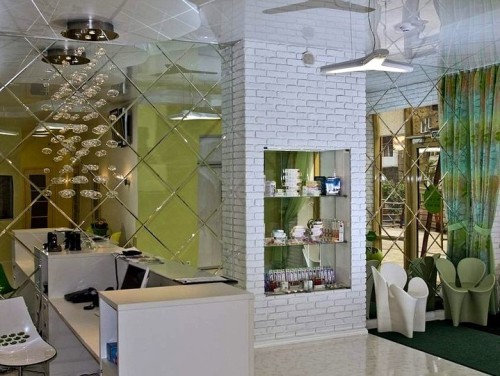
Mirror elements can be a non-integral web, but a collection of separate fragments. Such a crushing effect makes it possible to achieve a visual increase in space, but at the same time, reflecting surfaces will not act on the occupants as an irritant.
The gaps between mirrors in such a design are different. In some cases, the distances are equal to the dimensions of the mirrors, no less impressive are the narrow gaps between the wide mirrors and the wide distances between the narrow elements. For each of these options there is a certain scope. Equal intervals look good in small rooms, where there is a problem of insufficient space. Wide mirrors with small spaces can be placed in a spacious room, and narrow reflecting surfaces, located at a great distance from each other, perfectly emphasize the light interior.
Having formed the wall in one of the ways described above, you will create an original and unusual interior object that will have many interesting effects:
- reflect light like a lot of prisms;
- combines the coatings of different textures and reliefs;
- look original and non-standard.

Where not to use the mirror walls
Unfortunately, the mirror wall as a decoration of the room can not always be used. Consider several options when it is better to abandon such design:
- In a narrow, long and poorly lit room, a mirror wall can only spoil an already imperfect interior. The wardrobe with mirrored doors, installed along one of the walls in a narrow living room, will only reflect the opposite wall. The result: the impression of an elongated tunnel littered with furniture.
- Do not decorate the wall with a mirror, located in front of a door, desktop or bed. Reflection in such cases will be constantly diverted from work or prevented from falling asleep.
- In smaller bathrooms, it is also not advisable to trim the walls with a mirror material, especially in the case of a combined bathroom. First, to look at yourself, sitting on the toilet - pleasure is doubtful. Secondly, in the damp rooms to which the bathroom belongs, the reflecting surface will have to be constantly taken care of, tirelessly wiped off from the dried drips and stains. In addition, in a dark, poorly lit bathroom, a mirror finish does not help achieve the effect of visual expansion of space.
- The mirror wall opposite the other is the same - another example of the unsuccessful use of such material in the interior. The result of this finish will be an endless maze of reflections, which after a short time will start to act on your nerves.

Mirror wall in the interiors of different rooms
Mirror finish in the bathroom
Spacious bathroom with good lighting allows you to safely use mirror finish. In this case, the mirrors can be designed as part of the wall, and the entire surface of it. It is very important that there is enough light in the room, therefore, before installing the lining, care should be taken to install the luminaires.
Mirror tile above the sink will replace the usual mirror. It looks pretty good mirror wall in front of the bathtub or shower, but not just opposite the toilet. Reflective elements can be decorated with drawings or facets, which only adds to the attractiveness tile.
Remember that mirroring in the bathroom requires frequent maintenance. Fortunately, traces of splashes and droplets can easily be wiped off with the usual detergent for glasses.

Mirror wall in the interior of the kitchen
Many modern designs provide for the creation of mirror walls in kitchens. The reflective surface looks beautiful on non-basic surfaces. For example, with mirror tiles, you can draw an accent wall or a kitchen apron.
In a large kitchen, where the working area is located separately, the mirrors can be used for finishing the dining area. Only reflective details should be located at the top of the wall or where you will not see your own reflection.
To make the kitchen lighter, mirrors should be placed where they will reflect the windows. As in the case of the bathroom, it is often necessary to look after the reflecting surfaces in the kitchen. To finish the contamination is not so fast, it should not be used to decorate the walls near the stove or sink.

Mirror design in the interior of the hallway
In narrow and oblong hallways the mirrors should be used neatly. If you arrange them along two opposite walls, you can get a maze of reflections. Someone will like this effect, but to many it gets on your nerves. In the corridor of this type of mirror material, it is desirable to trim only fragments of walls. To bring more light into the room, it is better to place the reflecting surfaces near the lamps.
Owners of spacious hallways need not worry because of the incorrect application of mirror finish. In this case, reflecting tiles can be made whole walls, from the ceiling to the floor. In the hallway you can arrange a wide wardrobe with mirrored doors.
In the interior of the hallway, a mirror ceiling looks very original, which not only expands the space, but also multiplies the light emanating from the sconce and lamps. The use of mirrors in the hallway is quite common, since such decoration performs not only decorative, but also practical functions.

Mirrors in the living room
Mirror panels on the living room wall will perfectly refresh and decorate the interior. Facing of this kind can be used in the most unusual and unexpected places. In addition to walls or ceiling, mirrors are often decorated with arched doorways, niches, columns. Decorated in this way, these architectural elements are rightfully becoming the central accents of the interior. As for the finishing material itself, it is also possible to show imagination, for example, by making a mirror canvas from small mosaic details or from different in size and shape fragments. Mirrors can be enclosed in picture frames, and can have a beautiful ornament.
Reflective materials are decorated not only by architectural details, but also by furniture facades. Sliding wardrobes, countertops of coffee tables, doors, side walls of cabinets are far from complete list of places where mirror finish can be used.
From the mirror tiles on the walls of the living room you can create original panels or paintings, laying out of the mosaic the most incredible patterns.

Mirror finish in the bedroom
The bedroom, in which the interior has a mirror wall, looks luxurious, elegant and elegant. Reflective elements in such a room make the atmosphere more mysterious and intimate. And since it is in the bedroom most often used original and interesting lighting, it becomes possible to play with the refraction of the rays.
Reflective surfaces are most often located at the head of the bed or on the ceiling. In the bedroom, it will also be appropriate to use a wardrobe with a mirrored door. You can tile the wall in the area of the dressing table or a table for toiletries. Mirrors near lamps and chandeliers will also come in handy.

Types of materials for mirror finish
Mirror tile
For interior decoration of rooms most often used mirror tiles. To date, this material is represented by two types:
- Tile based on expanded polystyrene. The outer surface of this cladding is covered with a special paint consisting of microscopic metal particles. It is this paint that provides a mirror effect. The advantages of this tile are considered to be a light weight, thanks to which the installation is easy. For cladding the surface, it is sufficient to glue the material. The second advantage is a low price. The third advantage is that it is impossible to break such a tile. The minus of such finishing is the worst decorative qualities in comparison with a similar material made of glass.
- Mirror tiles made of glass are considered to be a more expensive type of cladding. It weighs much more than polystyrene foam, so it needs to be mounted on more solid and sturdy fasteners. Sometimes for installation of glass elements dowels or nails are used, and sometimes a special frame is created. Care should be taken during installation and operation, as the glass is easily broken. But the decorative qualities of this material are very high, the finished surface is smooth, smooth and attractive. Glass mirror tile is resistant to scratches and any chemicals, it is not afraid of temperature fluctuations and moisture, and care of the material boils down to simple rubbing of the glass with detergent.
One of the types of mirror tiles is a tile with a facet. Facet is a decorative bevel along the edge of the glass part, which forms an additional facet. These facets beautifully refract light and play with highlights. A tile with a facet is used as isolated elements or laid on the surface with an integral cloth.
Mirror tiles require careful and careful installation. If the lining is a solid surface, its individual elements must be mounted with minimal gaps. To perform such work qualitatively, it is better to use the services of professionals. But those who are confident in their abilities, can try to execute the process on their own.

Mirror wall wallpaper
The modern construction market offers consumers innovative material - mirror wallpaper. The most important advantage of this kind of cladding is its exceptional decorative properties. Decorated in this way, the interior shines with splendor and luxury, looks expensive, stylish and representative. It is impossible not to pay attention to another plus - through the mirror wallpaper can not break through any listening devices.
You can not afford such a finish, as the price for it is quite high. In addition, you can glue wallpaper only on an ideally aligned wall. If even the smallest irregularities remain on the surface, the reflection in these places will be distorted, which will be very noticeable. Mirror wallpapers weigh much less than tiles, but more than paper analogs, so they are recommended to glue them on strong adhesive compounds designed for heavy wallpaper. No care is needed for the material, but it should be handled with care, as the lining is unstable before scratches.
Mirror wallpaper is produced by applying the finest aluminum foil to the roll base. For additional protection and greater glossiness, the foil is covered with a clear varnish on top. The advantages of such a material include its rich assortment, represented not only by various drawings, but also by a color palette.
If you handle with a mirror wallpaper neatly, they will last for many years. Although this finish and is afraid of scratches, it is resistant to moisture and ultraviolet.

Mirror Wall Stickers
An alternative to expensive metal wallpaper can be more affordable mirror stickers. On sale, such labels are presented in a variety of sizes and shapes, and if used correctly, you can create a unique design that almost does not give way to the interior with wallpaper.
Unfortunately, the stickers with a reflective surface can not perform the functions of full-fledged mirrors, because the reflection in them turns out somewhat distorted. But such stickers are no worse than mirror tiles, will bring additional light into the interior and cope with the functions of visual expansion of space. The decorativeness of such finishes is also at an altitude.
Stickers can be applied in any interior of almost any room, regardless of its stylistic execution. For example, such elements of decorative finishes will look very successful in the interior of a strict classical style, dominated by the lack of simplicity and form. Mirror stickers will "revive" the room and "rejuvenate" it a little.
In the interior of the bedroom, mirrored stickers will also be appropriate, especially if placed from the head of the bed. However, such details can decorate any corner of this room. If it is a question of a children's bedroom, for its interior it is possible to pick up stickers of corresponding forms. On the wall in the children's room you can paste butterflies, different animals or fairy-tale heroes, sea creatures, etc.
No less elegantly mirrored stickers will look like in the bathroom. In this case, the labels can also be selected in accordance with the subject matter.
The modern construction market offers a wide range of products of this kind. Stickers made of acrylic glass are considered to be the most high-quality and durable. They are attached to the wall with a special adhesive tape and with careful handling serve for many years. One of the advantages of the material is that it can be glued to almost any substrate: plaster, wood, wallpaper, tile, etc. A cheaper analogue are vinyl stickers. They are not as durable as acrylic stickers, and by decorative qualities are much inferior to their expensive counterpart.
One of the functions of mirror stickers is the reflection of the most attractive interior details. This principle should be guided when choosing the location for the arrangement of the mirror composition. Successfully placed stickers favorably emphasize features and winning features of the style in which the room is decorated, complement the interior with new colors.

The process of finishing the walls with mirror panels
Make a mirror wall in the room with your own hands. Consider this process using the example of using a mirror glass tile.
Preparatory work for
The basic requirement for the work surface is its evenness. Mirror - a unique material, because it can emphasize the defects of the base at times better than any paint or the thinnest wallpaper. The slightest irregularities on the wall will make the reflection distorted, "broken".In addition to smoothness, other requirements are imposed on the surface: dryness, cleanliness, sufficient roughness to ensure adhesion to the finishing material. Let's consider the step-by-step preparatory process:
- The working base is first cleaned of all excess: fragments of the old cladding, dust, dust, nails and dowels, solution rushes, etc. After that, the surface is covered with an antiseptic and primed.
- When the primer dries, the wall is leveled with rough plaster. After the solution has solidified, the base is again equilibrated and polished to smoothness.
- All the dust formed during the work is removed, and the wall is once again primed. If the surface can not be leveled with plaster for any reason, it is better to use drywall sheets for this purpose.
Buying a mirror tile, you need to take into account a small stock, because during the work on the glass can be formed chips and cracks, and the possibility of marriage, too, is not excluded. Even before the installation, the mirror tile should be spread out on the floor as it will be subsequently fixed to the wall. Since individual parts can differ from each other by 1-2 mm, having fitted the tiles on the floor, they must be mounted on the wall exactly in the same sequence.
A set of tools for laying a mirror tile includes the following:
- diamond glass cutter or tile cutter;
- glass drill bit;
- building level;
- plumb line;
- notched trowel;
- rubber spatula;
- ruler and square;
- double-sided adhesive tape and paint tape.

Choice of glue and mounting of mirror tiles
For wall finishing with glass mirror tiles, ordinary tile glue will not work, because it darkens amalgam. Fortunately, special silicone-based adhesives or epoxy resins can be found on the market. Among their components there is no acid that spoils the amalgam. Glutinous mixtures based on cement, as well as universal sealants for wall covering with mirrors can not be used.
We will describe the process of mounting the mirror tile step by step:
- First, the adhesive is applied to the wall with a layer of up to 1 mm and is leveled with a notched trowel. The area of application should be equal to the size of one tile. If liquid nails are used as a glue composition, then the glass on the back should be glued with a double tape.
- After applying the adhesive to the wall with the same composition, it is necessary to cover the back side of the tile, and then sprinkle it with a thin layer of sand to ensure better adhesion of the lining material to the base.
- The first row in this case always lies horizontally. The leveling of the masonry is checked by the building level. Between the individual elements are observed smooth seams, which are made with the help of plastic crosses. If the surface is perfectly flat, tiles can be laid almost without gaps, but if there are small irregularities on the wall, it is better to make the seams wider. This will help break the reflection into fragments and distortion will become invisible.
- If the glue dries quickly, the tile can be stacked in several rows at once. But if the mixture freezes slowly, for example, if you use liquid nails, then before mounting the next row you need to wait until the previous one dries.
- For facing of those places where the whole tile does not come, the material can be cut to the desired size. For this, a diamond cutter is best suited. The resulting edges should be sanded with a bar or fine-grained sandpaper.
- The adhesive dries completely after about 4-5 days. After that, the intertwining seams must be filled with a sealant or colorless silicone. When this work is done, the gaps between the tiles are first glued with a paint tape, then furrows are cut in it, and then they are filled with sealant. After that, the adhesive tape is peeled off, and the tile is cleaned with a rubber spatula and a cloth.


