Content
- Necessary materials and tools
- Marking the mounting points of the guide profiles
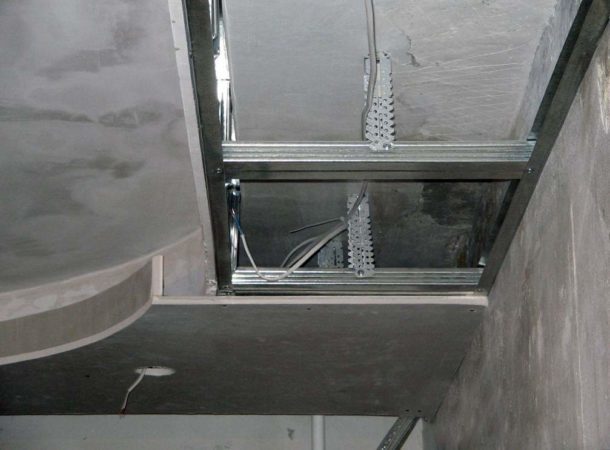
- Mounting the frame of the box
- Gypsum plasterboard casing
When repairing an apartment, you may need to hide in some way various communications that spoil the appearance. The builders who built houses in the Soviet period did not really care about the interior of the room. Sewer pipes, risers and wiring components can hopelessly spoil the impression even after the most expensive repairs. The best solution to this problem is to make a special box that will hide all these elements. It can be made of plywood, plastic, wood or chipboard, but most often they make gypsum plasterboard boxes. This is a very convenient and versatile material. How to make a box of drywall? There are no particular difficulties here.

In addition to ease of installation, drywall has another very important advantage over other options: a box made of gypsum plasterboard is suitable for fixing any finishing materials. That is, the design can be performed in the same style as the rest of the surface, as a result of which it will not stand out against the general background.
In addition to masking functions, the box can be used to place hidden lighting fixtures, design multi-level ceilings, various ideas for interior decoration.

Necessary materials and tools
In order to make a box of drywall for pipes or lighting devices, you do not need any special tools. This will standard set when working with GCR:
- Measuring tool: tape measure, plumb line, square and level.
- A screwdriver or drill having such a function.
- Hammer drill.
- Scissors for metal.
HELPFUL INFORMATION:GKL sheet - what is it? Dimensions and thickness, types of material

The surplus remaining after the repair may well be suitable as a material, unless this affects the quality of the constructed box. Before you assemble the box from drywall, you will have to purchase the missing materials. You will need:
- Guide and rack profile. Marked with UD and CD, respectively. The exact amount and footage of the profile will help determine the drawing made at the design stage of the box.
- Drywall. Which one to choose: ordinary or moisture resistant? The latter must be used in damp rooms, such as a bathroom or toilet. In addition, condensation may form on pipes filled with liquid. Moisture-resistant drywall used in the construction for the box, will guarantee that the design will last a long time and will not be covered with fungus or mold. And for the ceiling box in a normal room, erected to accommodate hidden lighting, a normal GCR is quite suitable.

- Fasteners: dowel nails, small metal screws (popularly referred to as "seeds", "bugs" or "fleas") for fastening profiles, screws for attaching drywall.
The frame structure can be assembled from a wooden beam. But in this case, all the elements must be impregnated with an antiseptic solution, paying special attention to the joints and sawn ends. This greatly complicates the work, so it is preferable to use a metal profile. To fix the gypsum board to the frame of the timber, wood screws are used.
Marking the mounting points of the guide profiles
Drywall box can have three or two sides. The constructions of the second type are placed in the corner, which not only facilitates installation, but also significantly saves the space “eaten” by the box.
The marking of vertically oriented structures is usually started from the floor, and then transferred to the walls. Horizontal baskets - start from the walls, then mark the floor and ceiling.
HELPFUL INFORMATION:Drywall glue: which one to choose?
The dimensions of the erected box should be selected in such a way as to provide a gap between the drywall and pipes of several centimeters.
Note! If materials with fixed sizes, such as tiles, will be used for decoration, it is better to adjust the width of the box to fit them. This will help to avoid unnecessary operations for cutting and fitting elements to the desired size.

Mounting the frame of the box
Work sequence:
- Using a tape measure and a square, a contour is drawn on the floor for installing the guides.
- To transfer it to the ceiling, use a plumb line.
- Corresponding points on the floor and ceiling are connected by drawing lines on the walls. For convenience, you can pull a thread between them.
- Guide profiles are fastened with dowel nails.
- How to make the angular part of the frame forming a protruding rib? There are two options. You can assemble this element from two guides by placing them at right angles. The second option is more economical: instead of the second profile, elements with a length of 100-120 mm are used, screwed to the base surface at the locations of the horizontal jumpers.
- Jumpers are necessary to give rigidity to the structure, not so many are needed on the box: two or three on each side every 120 cm.
- An angular element made in this way is inserted into the guides on the floor and ceiling and is fixed by “bugs”.
- The same "bugs" are attached to horizontal jumpers from the rack profile. Correct installation is controlled by level or plumb.

Gypsum plasterboard casing
After mounting the frame, you can begin to mount drywall. There is nothing complicated in this, but it is important to take into account some nuances:
- Preferably, the box consisted of whole strips of drywall, rather than individual fragments.
- All joints of the cladding elements should be located on the surface of the profile.
HELPFUL INFORMATION:How to glue drywall to the wall
Cutting drywall for the box is as follows: one side is marked exactly according to the dimensions of the frame, the second should be larger to close the end of the first. You can initially cut out strips with a margin, and cut off the excess after fasteners. But this leads to a greater consumption of material.

- Strips of drywall with a width of less than 50 mm are cut with a joiner's hacksaw. Wider fragments can be separated using a paint knife: first an incision is made on one side of the screwed to the drywall box, by pressing the strip breaks along this notch, and then a layer of cardboard is cut from the other side.
- After fixing the casing, the surface is plastered.
When installing boxes, one must remember that it is necessary to maintain free access to locked communications for their repair and preventive maintenance. Therefore, in the constructed box must be present doors, with which you can safely get to the counters, stopcocks, inspection doors. Otherwise, if necessary, you will have to disassemble the box. The size of the cut-through windows should ensure the convenience of servicing communications. As a rule, such hatches are placed on the front side of the box, and they can be masked with the help of external decoration.

EXPERT SITE
Tsugunov Anton Valerevich
Master Station Wagon
- Since 2003, I have been engaged in the repair and decoration of premises.
- Over 100 completed objects.
- I appreciate the quality, more than the quantity!
Personal page >>>
Friends!
I offer you the service "Friend Builder"
As this site develops, subscribers and visitors are turning to me more and more often asking for help with advice on various issues of repair and decoration.
Questions are sometimes asked very complex and interesting. You can’t write an article for each situation, so I decided to advise you individually.
Thanks to you, friends, a new direction of my favorite work has been born - share your experience and benefit everyone who is undergoing repairs!
Get a one-time consultation from me >>>
Order full apartment repair support >>>