Content
- Why GKL?
- Cons of plasterboard ceiling in the bathroom
- Features of the use of GKL for the ceiling in the bathroom
- Materials and Tools
- Frame installation
- Installation and processing of drywall
The ceiling is the most striking part of the interior of any room, including the bathroom. It should be not only smooth and beautiful, but also practical. This can be achieved easily, quickly and with minimal financial costs using plasterboard sheets. Let’s take a step-by-step look at how to mount a plasterboard ceiling in a bathroom.

Why GKL?
Like any other, this material has its pros and cons. Advantages of using a drywall construction in a bathroom:
- A fairly simple installation, accessible even to a novice master.
- To install the ceiling does not require special expensive tools. Uses the usual materials that can be found in any major hardware store.
- In the space behind the new ceiling plane, you can place spotlights or hide elements of forced ventilation there, which is especially true for a bathroom or a combined bathroom. If necessary, a heater or sound insulation can be placed in this space.
- Drywall is compatible with all finishes. The simplest solution is to cover it with waterproof paint of the chosen color.
- Finally, from GKL it is possible to create not only flat, but also multi-level designs, integrating them as organically as possible into the interior of the bathroom and achieving the uniqueness of its design. Some interesting design solutions are presented in the photo.

- Squares on the ceiling

- Figured construction

- Combination of GKL duct and glossy stretch web

- Rounded shapes

- With hidden backlight
Cons of plasterboard ceiling in the bathroom
Of course, there are disadvantages:
- False ceilings reduce the height of the room. Minimum thickness profile used when mounting the frame.
- Drywall, even if it is moisture resistant, is not intended for constant contact with water. The design of the ceiling requires careful finishing after installation to prevent moisture from entering under its surface. This can lead to the formation of mold or fungus under its plane, which will inevitably entail an early dismantling and repair. Therefore, putty and close up the seams must be very carefully.
HELPFUL INFORMATION:Tool for drywall works: marking, profile fastening, cutting and installation of gypsum plasterboard
Features of the use of GKL for the ceiling in the bathroom
When planning to create a plasterboard ceiling in a bathroom, you need to consider several important nuances:
- In a room such as a bathroom, only moisture resistant drywall. It is quite easy to distinguish it from the usual one: the sheets are painted green and have the mark GKLV.

- The suspended ceiling frame is made of galvanized metal profile. It is more resistant to moisture than wood.
- The base plane under the ceiling surface is carefully treated with an antiseptic solution.
- If you plan to mount any massive interior parts, then the frame is reinforced in advance in these places.
-
Knauf 60%, 111 of votes
111 of votes60%
111 votes - 60% of all votes
-
Volma 13%, 24 vote
24 vote13%
24 votes - 13% of all votes
-
Giprok 12%, 22 vote
22 vote12%
22 votes - 12% of all votes
-
The one in the store 12%, 22 vote
22 vote12%
22 votes - 12% of all votes
-
"Magma" 4%, 7 of votes
7 of votes4%
7 votes - 4% of all votes
Total Votes: 186
Voted: 153
15.03.2018
×
You or from your IP have already voted.Materials and Tools
After the necessary measurements are made and a drawing is made, you can stock up on material. It will be required:
- Moisture-resistant drywall.
- Guide and ceiling profile.
- Direct suspensions for leveling the ceiling.
- Fasteners: dowel-nails, metal screws.
- Self-adhesive sealing tape.
- Reinforcing fiberglass mesh.
- Putty and primer for drywall.
HELPFUL INFORMATION:Drywall seam tape: perforated paper and sickle
Important! In a bathroom it is impossible to use gypsum putty, which is afraid of moisture. Suitable waterproof cement or polymer mixture.
As already noted, the work does not require a special or rare tool. You will need:
- Hammer drill with the right drill.
- Screwdriver. Very useful special bitdesigned to work with drywall: it limits the depth of screwing. This allows you to not rinse the material during installation.
- Scissors for metal to cut the profile.
- Putty knife, brush and roller for sealing joints and drywall primers.
- Paint knife.
- Marking and measuring tool: tape measure, level, square, pencil.
Frame installation
After preparatory work, consisting in the removal of loosely attached elements of the old coating and the application of an antiseptic, the following markings are made:
- At a selected distance from the reference plane, the location of the guides is plotted using a level.
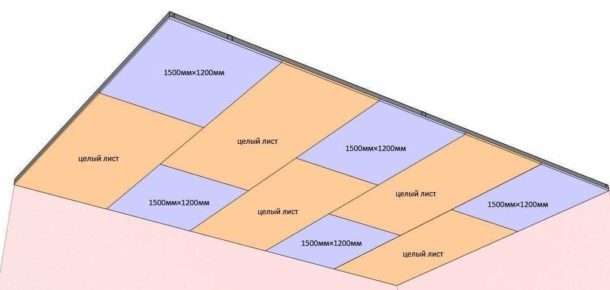
- The mounting points of the supporting profile are marked. The step between these elements should correspond to the size of the drywall, usually it is 60 cm.
If the bathroom is small, then it is not necessary to make perpendicular jumpers. The rigidity provided by the GCR fragments is sufficient.
- On the fastening lines of the supporting profile, the installation points of direct suspensions are marked.

After marking, the frame is going to:
- The plane of the guides adjacent to the wall is pasted over with a damper tape. After that, they are mounted using dowel nails in increments of 40-60 cm.
- Holes are drilled in the ceiling and straight suspensions are attached.

- Support profiles are cut in length and inserted into the guides. It is recommended to make them smaller than the required size by 1-1.5 cm. After that, they are fixed with metal screws.
- Monitoring the level of the position of the bearing profiles, fix them with direct suspensions. This fastener has a number of holes: the screws are screwed into one of them, after which the protruding parts of the suspensions are bent to the ceiling.
- If necessary, perpendicular jumpers are likewise mounted.

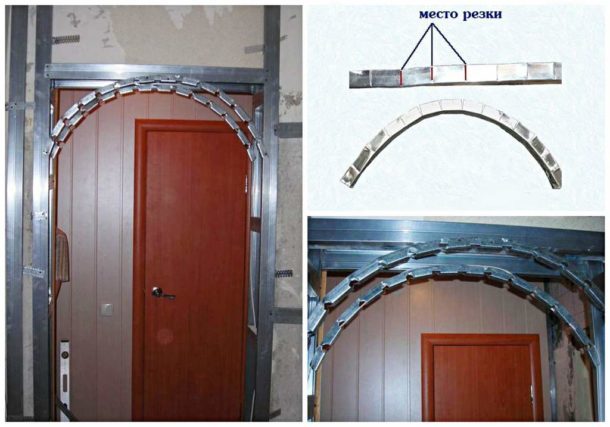
You can connect profiles to the grid using the following method: the jumper is cut 2 cm larger than the required size, after which the side shelves are removed at its ends and the tongue is unbent. It is fixed with self-tapping screws to the supporting profile. For reliability, crab connectors can also be used.
HELPFUL INFORMATION:Drywall screwdriver bits: with and without limiter
The frame assembly is described in more detail in this article.
Installation and processing of drywall
After completing the assembly of the frame, they stretch the necessary communications and prepare the fastening of lamps or other devices placed in the cavity of the ceiling. After this, drywall is attached:
- Fragments of the necessary sizes are marked and cut. It is easier to do this with a paint knife: cardboard is cut on one side, then the sheet breaks neatly along this line and cardboard is cut on the other.
- In the places where the GKL pieces are joined, with the help of a paint knife or an edge planer, bevels are made at an angle of 45 °.
- Sheathing elements are fastened with screws to profiles in increments of 20–25 cm. They should be joined exclusively on the surface of the profile.

After finishing the installation of drywall, carry out the processing of the resulting plane:
- A reinforcing mesh is glued to the seams. You can put a little putty on the joint and press the mesh into it.
- Putty gap is sealed flush with the plane of the ceiling.
- After the mixture dries, the seam is rubbed with fine sandpaper. Sealing rules for joints and videos, see here.
- Holes formed by self-tapping heads are also sealed and rubbed.
- The entire surface of the ceiling is primed twice with a universal composition. The second layer is applied after the first has completely dried.
As the putty is fully set, the ceiling can be painted or otherwise finished. For painting, the surface must be puttied with waterproof putty in several layers. Read how to do it right. here.
Accuracy and attentiveness at work will ensure the quality and durability of the plasterboard ceiling in your bathroom. The installation process is clearly shown in the video.

EXPERT SITE
Tsugunov Anton Valerevich
Master Station Wagon
- Since 2003, I have been engaged in the repair and decoration of premises.
- Over 100 completed objects.
- I appreciate the quality, more than the quantity!
Personal page >>>
Friends!
I offer you the service "Friend Builder"
As this site develops, subscribers and visitors are turning to me more and more often asking for help with advice on various issues of repair and decoration.
Questions are sometimes asked very complex and interesting. You can’t write an article for each situation, so I decided to advise you individually.
Thanks to you, friends, a new direction of my favorite work has been born - share your experience and benefit everyone who is undergoing repairs!
Get a one-time consultation from me >>>
Order full apartment repair support >>>