Content
- Drywall ceiling construction with backlight
- Types of luminaires for plasterboard ceiling
- DIY do-it-yourself GKL ceiling
- Top level frame
- Mounting the backlight box
- GKL frame sheathing
- Installation and connection of hidden lighting
A great way to give the interior a special twist is to use various lighting effects. For example, the backlight built into the ceiling significantly raises it and gives the room depth. Most often, such a backlight is used in conjunction with drywall constructions, which allows you to create original shapes and visual effects. Let's try to figure out how to make a ceiling from drywall with your own hands.

Drywall ceiling construction with backlight
To begin with, it should be noted that the backlight in plasterboard ceiling structures can be implemented in two ways:
- Open. This is the easiest option for self-assembly, in which a hole is made in the plasterboard design, into which the lighting device is inserted. In this case, it is imperative to take into account the weight of the device (it should not be more than 10 kg).
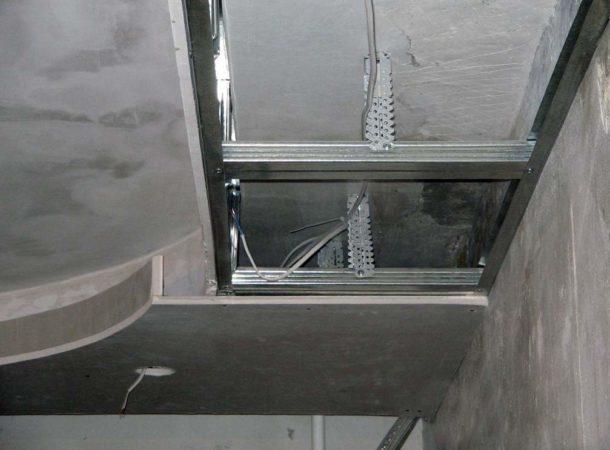
- Closed. This method involves hiding lighting fixtures in a specially prepared niche located between the layers of the first and second levels of the plasterboard ceiling. Moreover, the light in this case is not directed to the floor, but to the ceiling surface. Due to its reflection from the ceiling surface, it is easy to achieve a beautiful effect of diffused lighting.
The following is a diagram of the box for highlighting the drywall design.

To create a niche for highlighting, you need to use two types of profiles:
- PN (UD) - directing ceiling profile. It needs to be fixed to the surface of the walls, ceiling, to the center of the frame and to the side (if there is one).
- PP (CD) - bearing profile. It is more rigid, due to which, from this profile, racks and jumpers for attaching GCR are made.
If the backlight box is too wide, the supporting profiles must be strengthened with suspensions. They can be attached both to the main ceiling and to the first profiles.
HELPFUL INFORMATION:Repair in the room: where do we start?
Plasterboard ceiling not always has only straight edges. Very beautiful false ceilings are obtained if the lights are used in ceilings of various shapes. These can be wavy lines, a circle or an ellipse in the center and other interesting options.

Types of luminaires for plasterboard ceiling
You can decorate your plasterboard ceiling with various types of lighting:
- Spotlights. Such lamps are used as an addition to the main lighting. They will perfectly perform the task of zoning a room, highlighting its individual parts or will become a replacement for a night lamp. Also, these lamps are often used as emergency lighting. This type of fixtures is easy to mount on a drywall sheet yourself.
- Chandelier (regular or LED). The choice of chandeliers for lighting a room in specialized stores is huge. You can easily choose the option that suits the interior of your apartment. In this case, you won’t have to change the wiring, but keep in mind that the chandelier will be mounted on the ceiling itself and slightly reduce the height of the room.

- Daylight lamps. One of the most affordable and easy to install lighting option. Such lamps have significant advantages, for example, they are economical to use and have a long service life.
Fluorescent lamps give a cold light, so they are not recommended for use in living rooms.
- Fiber optic luminaires. With the help of fiber optic fixtures, the most interesting lighting effects are achieved, for example, landscapes of the starry sky or imitation of space. But this lighting option is more suitable for apartments with high ceilings. Installation of fiber optic fixtures is carried out only by specialists - it will be very difficult to do it yourself without the necessary skills and knowledge.
HELPFUL INFORMATION:How to stick baguettes on the ceiling

- LED tapes. Using LED strips is the most popular way to illuminate a ceiling structure from several levels. They are very easy to install, their service life is long, while they are economical and not too expensive. In addition, an LED strip installed around the perimeter of the ceiling will illuminate the room evenly and brightly, so that such illumination is more effective than ordinary chandeliers.
- Neon tubes or neon cords. Neon tubes provide lighting through a mixture of inert and luminous gases in their cavities. They, like spotlights, are used in combination with the main sources of light and are mainly used to illuminate individual sections of the ceiling and highlight areas.

When choosing a ceiling lighting, it is worth considering not only their power, but also color. When combined with the main lighting, the backlight may well differ in a bright, unusual shade, depending on the interior and purpose of the room.
DIY do-it-yourself GKL ceiling
Now let's figure out how to make drywall ceiling by yourself.
Top level frame
Installation of a multi-level ceiling from drywall with backlight begins with the installation of the original frame:
- A line with an indent from the walls of 10 centimeters is planned along the perimeter of the ceiling.
- The start profile is fixed along the intended line.
- The carrier profile is inserted into it and fixed with suspensions. The distance between the mounts should be about 40 centimeters.
- To make this design more rigid, between the rigid (bearing) profiles it is necessary to install jumpers that are made of a rigid profile.
The frame is sheathed with gypsum plasterboard. The first level of the flow structure is completed. At this stage, it is already possible to mount an open ceiling light.

Mounting the backlight box
For hidden lighting, a special niche is mounted:
- At the first level, the boundaries of the second level of the ceiling structure should be drawn.
- The guide profile is fixed according to the marking.
HELPFUL INFORMATION:Vibro-suspension for drywall: how to choose, do it yourself and mount
Those profiles that are mounted to the ceiling should be directed shelves down, and at the walls - shelves towards the opposite wall.
- Suspension racks are made of the supporting profile. Their number is determined by the size of the ceiling: for every 100 centimeters, 2 suspensions must be used.
- The racks are inserted into the guide with the pristine side and tightly fixed with self-tapping screws.
- The next step is to make jumpers from the ceiling profiles. Their length is equal to the length of the lower part of the niche, and the number should coincide with the number of racks, suspensions.
- Jumpers are inserted with the shelves up in the guide against the wall and fixed with screws. The suspension stand and the second end of the workpiece must also be fastened and form a right angle.
- The protruding sections are drowned out by the trimmed parts of the ceiling profile inserted inward. Thus, you should get shelves for setting the backlight.

GKL frame sheathing
The next step is the lining of the frame with thin plasterboard sheets:
- The GKL strip is attached to the niche shelf.
- The vertical part of the box is closed with sheets attached to the hanging racks and the ceiling guide.
- The horizontal part of the niche is sheathed.
- The GKL strip is attached to the front of the box - it is behind it that the backlight will be hidden.

Installation and connection of hidden lighting
To install the LED backlight, you should adhere to the following rules:
- Tapes with LEDs are cut into pieces only according to the marks on them.
- Tapes are connected by both LED connectors and an ordinary soldering iron.
- Fastening to metal parts should only be carried out with insulating material.
- In no case should you mount the backlight under voltage.
The final step is to finish the ceiling. For this, putty and primer are used. At the end, such a ceiling can be glued with wallpaper, painted or finished with textured plaster.

EXPERT SITE
Tsugunov Anton Valerevich
Master Station Wagon
- Since 2003, I have been engaged in the repair and decoration of premises.
- Over 100 completed objects.
- I appreciate the quality, more than the quantity!
Personal page >>>
Friends!
I offer you the service "Friend Builder"
As this site develops, subscribers and visitors are turning to me more and more often asking for help with advice on various issues of repair and decoration.
Questions are sometimes asked very complex and interesting. You can’t write an article for each situation, so I decided to advise you individually.
Thanks to you, friends, a new direction of my favorite work has been born - share your experience and benefit everyone who is undergoing repairs!
Get a one-time consultation from me >>>
Order full apartment repair support >>>


