How to make a frameless hangar - 5 phases of construction of light arch structures
Table of contents
-
1 The principle of the manufacture of frameless hangars
- 1.1 Features of the application
-
2 Construction of frameless hangar
- 2.1 Step 1: preparation of tools, equipment and materials
- 2.2 Step 2: The foundation arrangement
- 2.3 Step 3: production of arched sections
- 2.4 Step 4: Assembling hangar
- 2.5 Step 5: Wall insulation
- 3 conclusion

Construction of the hangar will cost much less the simplest garage.
Want to quickly and inexpensively build a garage or utility room on the site? I'll tell you how to make easy frameless hangar with his hands using a minimum amount of building materials. You will also learn about all of the positive and negative qualities of arch hangars.
The principle of the manufacture of frameless hangars
Frameless arched hangar - it's easy prefabricated indoor facility, which is based on individual spans a semicircular shape in the form of an arch. Wall and ceiling hanger formed in a single self-supporting structure made of corrugated metal profile.
Construction technology frameless hangars is as follows:
- Construction of the foundation. In a selected area of land planning work carried out and then filled with finely recessed strip foundation. By reinforcing frame mounted foundation base constructions for mounting arch spans;
- Production spans. Each element of the arch span is made individually from rolled galvanized steel directly on the construction site. Then they fastened on the ground in the whole modules of 3-4 pieces. For these works use a variety of special tools;
- Installation of arch spans. Assembled modules are installed on one foundation, and fasten to base constructions using screws. After that, they joined together the entire length of the profile using the Folded rolled machines;
- Mounting of end walls. The rear wall is typically sutured vsploshnuyu direct galvanized profile. The front wall aperture is set to the target base plate. The sides of the front wall and sutured profile and on vertical frame strut hung door wing;
- Sealing and insulation. Joints arched spans and the foundation in the bottom of a waterproofing bitumen processed and filled with concrete mortar. If required, the finished insulated hangar one of the methods described below.

Door bearing carcass is mounted on its own foundation, and is not attached to the arches of the hangar.
Along with the manufacturing techniques described there are hangars collapsible model. They all arched section consists of several modular elements. They gather on the spot, and then joined together by bolting
Features of the application
Most often in the hangars equipped manufacturing or warehouses, covered markets and car parks, as well as the mass cultural and sports facilities (stadium, ice rink, tennis courts and so on.).
In the private sector of light metal hangar can also be used:
- Garage - the most common variant. And it can be used not only for cars, but also for a large truck or agricultural equipment;
- Commercial space. For those who are engaged in business in the hangar can organize its own production. This will place it closer to home, and save on rent production space;
- The attic floor. Frameless arch technology allows for short time to build on insulated attic over any house with a flat roof. This design has a small weight, so do not have a significant load on the building itself;
- Pig farm or barn. Private farmers can adapt it as a chicken coop, barn or pigsty, and also as a seasonal storage for grain crops, vegetables or fruits;
- Recreation and Leisure. In cold regions and a long snowy winter, insulated inside the hangar you can equip a children's playground or sports or even an indoor swimming pool.

Frameless construction technology has almost unlimited scope.
If we compare the frame hangars and frameless arched structures, the latter are more positive qualities in terms of construction and further operation of:
Benefits:
- High strength. Due to the ribbed profile of arched spans, such constructions possess high rigidity and good self-supporting capacity, so they do not require an additional frame. Despite the seeming ease, they have the following specifications:
- The maximum span width - 30 m;
- Maximum length of the hangar - is not limited;
- The maximum allowable wind speed - 200 km / h;
- Maximum snow load - 450 kg / m 2;
- operating temperature range - from -50 ° C to +50 ° C.
- Durability. Due zinc coating metal, the lack of through mounting holes and sealed rebate arched segments, such structures do not require additional waterproofing, and their current operating period of not less than 30 years;
- Easy to assemble and dismantle. Frameless hangars are lightweight, so it can be installed on small recessed strip foundation in any type of soil. Spans of small size can be set manually by a few people. If necessary, such a structure can be easily dismantled.
- Logistics and speed of construction. All arched elements are produced directly on the construction site. This significantly reduces the cost of shipping materials. By the time of frameless arched hangars are being built in several times faster than any other structures of this size;
- Energy efficiency. If we compare identical in floor space with a rectangular shape and arched spans the arch always has a smaller internal volume. This reduces costs for heating and air conditioning.

Due to the smaller of the heated space, for heating the arched hangar requires 30% less heat than for a building with a flat roof.
Disadvantages:
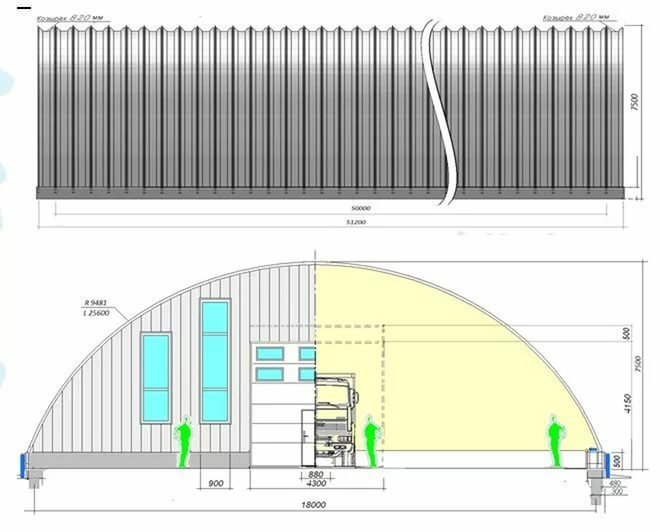
- The presence of dead zones. Semi-cylindrical shape of the arch is not very convenient for production or storage facilities with a large-sized machinery, or with rack storage system. In such cases, on the edges of the half-cylinder form the unused space.
- Large height of the arch. The height of the arch in frameless designs is typically 40-50% of the diameter of the cylinder conditioned. This means that when the width of the hangars 24 m, the height of the middle point will be 10-12 m. In most cases this height is not necessary, moreover, it will lead to unnecessary losses of heat.

Technology frameless hangars can even be used for the construction of town houses.
If necessary, the arch hangars can install skylights, opening shutters for ventilation, additional doors or gates, as well as heating or air conditioning system air.
Construction of frameless hangar
Step 1: preparation of tools, equipment and materials
In addition to the usual set of plumbing and gardening tools, special equipment is required for operation. I must say that the price of these machines is very rather big, so they do not need to buy, and it is better to take a few days to rent.
Tools and equipment:
| Illustration | Set of tools |
 |
Equipment for use with the profile:
|
 |
Tools for foundation works:
|
 |
Tools for installation:
|
materials:
| Illustration | Description of work |
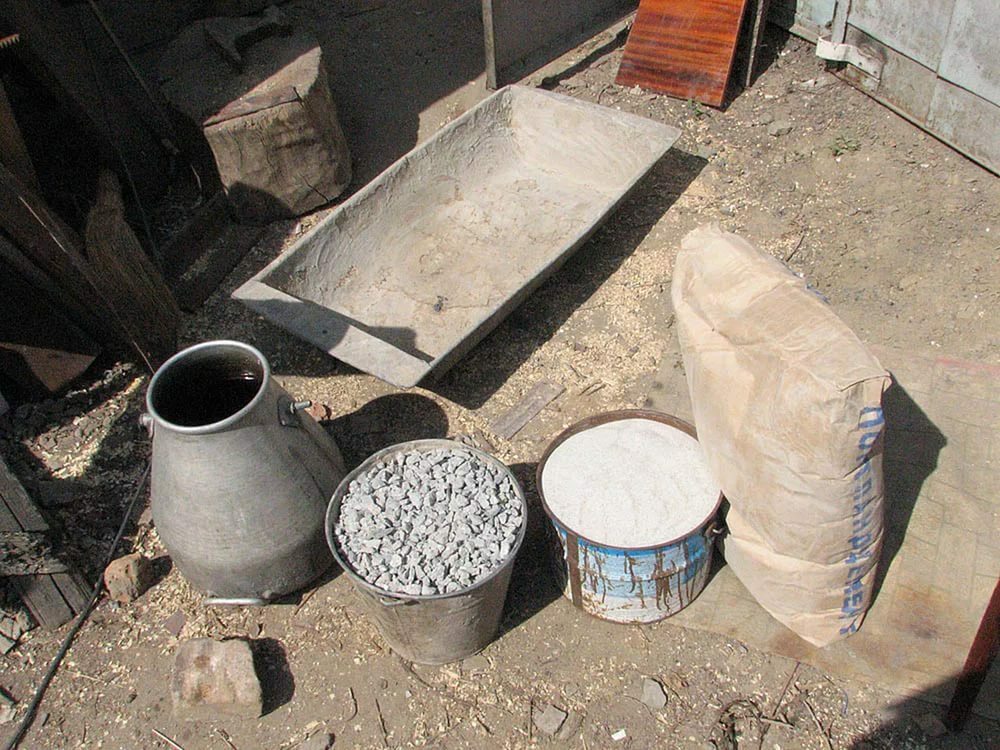 |
The components of the concrete mortar:
During the construction of a large hangar, I recommend to buy ready-mixed concrete in the mixer motor. |
 |
Steel metal:
|
 |
Fasteners and auxiliary materials:
|
Step 2: The foundation arrangement
During the construction of pre-fabricated hangars mortgages brackets are cast into the mold together with the foundation. The rest of the production of finely recessed strip foundation is performed by the classical scheme:
| Illustration | Description of work |
 |
Planning work:
|
 |
Adjustment of inset:
|
 |
Installation of the reinforcing belts:
|
 |
Pouring concrete:
|
 |
Formwork Removal:
|
 |
Angle bracket:
|
When erecting small hangars, embedded designs can not immediately be poured into the foundation. In this case, out of the corner brackets are secured with anchor bolts to the upper plane of the basement after the concrete pour.
Step 3: production of arched sections
During installation of frameless arched hand sheds, each arched profile mounted separately. If the installation is performed by a crane, then for acceleration operation they are collected from the individual sections of the profiles 3-5 each. The manufacture of such sections is performed in three steps:
| Illustration | Description of work |
 |
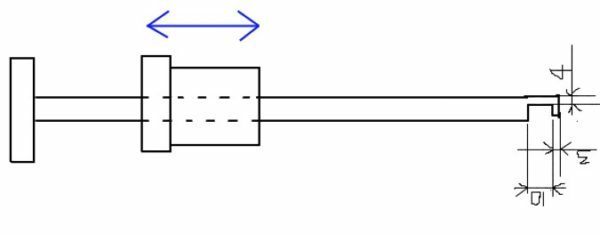
Sizing:
L = S / 2h2,85, wherein:
For example, it is necessary to determine the length of the arch profile for hangar 18000 mm width. According to the above formula we obtain 18000 / 2h2,85 = 25650 mm. |
 |
Step 1: profiling galvanized sheet:
|
 |
Step 2: rolling profile:
|
 |
Step 3: Folding arched section:
|
Step 4: Assembling hangar
To install the arch span widths up to 16 meters and up to 7 meters in height, you can use portable collapsible timber. Construction of hangars height of more than 8 meters is more convenient to carry out using a crane or telescopic lift:
| Illustration | Description of work |
 |
Rigging:
|
 |
Fixing profile to the foundation:
On the lower photo shows the view from inside the hangar. |
 |
Compound profiles:
|
 |
Gates mounting:
|
 |
Mounting of the front and rear wall:
|
 |
Sealing the bottom of:
|
Step 5: Wall insulation
Below is a short instruction on warming frameless metal hangar. This can be done in one of three ways described:
| Illustration | Description of work |
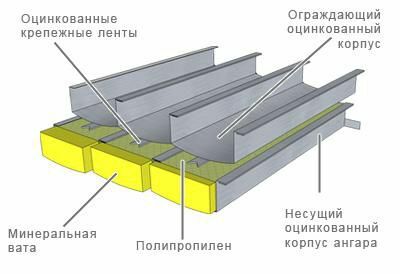 |
Method 1: a double casing with mineral wool insulation. Such a method is considered the most effective, but at the same time more expensive:
|
 |
Method 2: insulation of mineral wool and CLADDING trapezoidal sheet. This method can be used for thermal insulation of any of the already constructed hangar:
|
 |
Method 3: inner spraying polyurethane foam. This option is suitable for any hangars. Its main advantage - a protection against the formation of condensation on the inner walls:
|
Polyurethane foam is destroyed by ultraviolet radiation, so it can be used only for internal insulation.
conclusion
Now that you know what the hangar and it is being built. Mounting get much cheaper and faster than the construction of any other buildings of the same size. I recommend to view the video in this article, but all your questions can be discussed in the comments.