With the creation of tack in the technique of patchwork decorating the interior of the kitchen, even a novice can handle Quilting - a unique technique of sewing. Patchwork is a technique for creating objects of everyday life or paintings with the help of rags of cloth or knitwear. It's easy to create a composition in patchwork style. According to authoritative masters, even a beginner can easily make potholders or other small things for the house.
-
- makes the picture in the style of patchwork sewing their own hands
- Mitts style patchwork own hands
- Basic techniques of patchwork
- Technique lyapochiha and checkerboard
- Quilting: technique( video)
- Quilting( photo)
makes the picture in the style of patchwork sewing their own hands
Create a picture in the style of patchwork any person. Such crafts can be used to decorate a children's room or kitchen. Create pictures in the style of patchwork sewing preferably on a foam. You can create compositions on paper. Everything is limited only by your imagination.
Before creating a patchwork picture, you need to create a template for the future composition on paper. After that, cut the workpiece and apply it to the foam. Next, draw the base of the drawing with a pencil, and make small grooves in the foam( not more than 1-2 centimeters).
 To create a pattern in the patchwork technique, you need to prepare a sketch and use it to cut out the flaps of the fabric of the desired color.
When creating a patchwork pattern, follow the following algorithm:
- First, Tissue. After that, cut out the parts of the appropriate size from the fabric. Do not forget to leave small allowances.
- Lubricate the fabric with glue.
- Gradually fill the cloth with scraps of cloth.
- After the drawing is ready, you can color the background with acrylic paints.
If you create a three-dimensional canvas for kids, you can decorate a picture of the different beads or lace.
Mitts style patchwork own hands
Many people are familiar with "Ashet Collection", which since 2009 is translated into Russian. A series of these magazines set out master classes and various news in the field of needlework. In the journals of this publication, multiple variations of the manufacture of tacks for the kitchen are set forth.
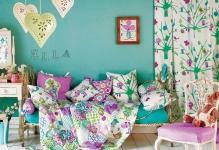
If your kitchen in classic or rustic style, you can sew potholders using techniques of patchwork. Such a product will look extraordinary and beautiful. In addition, stitches, sustained in patchwork style, are very practical.
Before starting to create a tack, select the suitable fabric. It is advisable to give preference to natural cotton materials. In order to avoid shrinkage during the manufacture of tacks, you need to wash and iron the fabric.
 Stitches made from cloth flaps most organically look in classic or rustic interiors
The process of creating the tack is as follows:
- First you need to cut out four different colored squares from the pattern of fabric.
- Next, cut each square into equal triangles.
- Sew two triangles of different colors. Repeat this procedure for all shapes.
- Collect the resulting details in a square.
- Make a material for the wrong side of the tack. To do this, cut out the square of the required size.
- Attach the underside of the product to a square made of triangles.
- Before sewing both sides of the tack, put a layer of sintepon or batting between them.
- Sew the wrong side of the product to the front.
- Stitch the edges of the part.
- Sew a stitch made from a single-color fabric pattern to the finished tack.
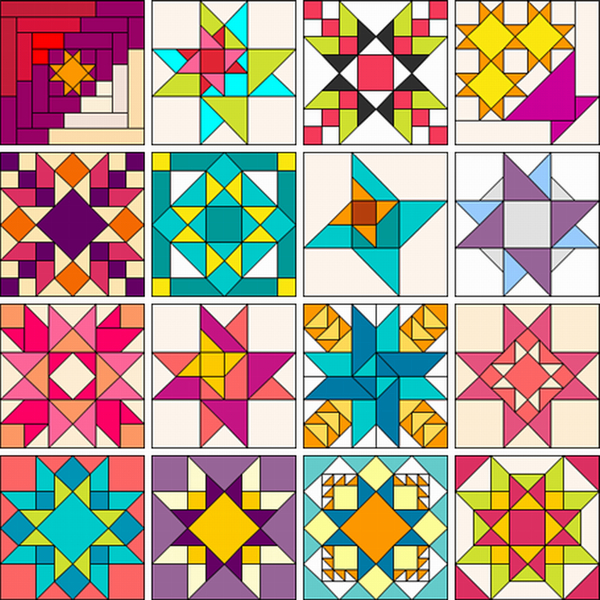
Basic techniques of quilting
There is a quick patchwork program. It is called the patchwork corners. With the help of this technique, you can create a variety of panels, vests of knitwear and toys. To do this, you need only stripes of monophonic tissue.
 Training in the manufacture of patchwork products is better to start with the technique of quick squares
The "corners" technique provides 3 ways of folding the shred:
- The first method is the simplest. It is perfect for beginners. This method involves folding each square diagonally inside out.
- The second way is to bend the fabric inside out. After that on the workpiece, you need to turn the corners.
- The third method is suitable only if you use thick fabrics. This method involves cutting out rectangular patches. After that, the workpiece should be folded on the wrong side for 1-2 cm and ironed. Further, the corners are bent to the midline of the rectangle and the part is again ironed.
A good technique of patchwork is "quick squares".The teaching of patchwork technique begins with the study of this method.
If you want to make shreds with this technique, follow the following algorithm:
- First you need to cut two strips with the same width.
- Stitch the stripes, and smooth out the resulting seam with an iron.
- Cut out the third strip. Its width should be the same as the width of the two stitched strips.
- Attach the resulting strip to two stitched faces. Sew all the stripes.
- Divide the resulting blank into equal squares, and cut them out.
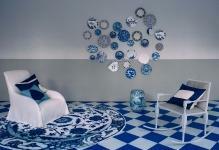
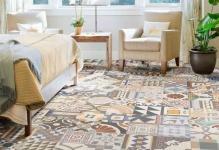
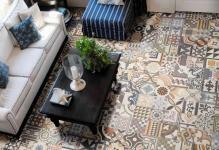
 The technique of Russian squares is well suited for creating carpets and other accessories for interior decoration.
If you want to create an unusual carpet or other piece of furniture, the "Russian square" technique will be perfect for you. The products, sustained in this technique of patchwork sewing, will give your interior depth and multidimensionality.
Assemble the scrap in the "Russian square" technique in the following order:
- Cut out the square that will serve as the base.
- Then iron it with an iron.
- Attach a small colored square to the center of the square.
- On each side of a small square, sew up strips.
- Iron the workpiece.
- Attach a triangle made of fabric to the edges of the strips and attach it. The dimensions of the triangles should be determined taking into account the perimeter of the canvas. Remember that every little thing plays a huge role. Even one incorrectly chosen size can negate all efforts.
- Repeat this procedure until you fill the entire substrate.
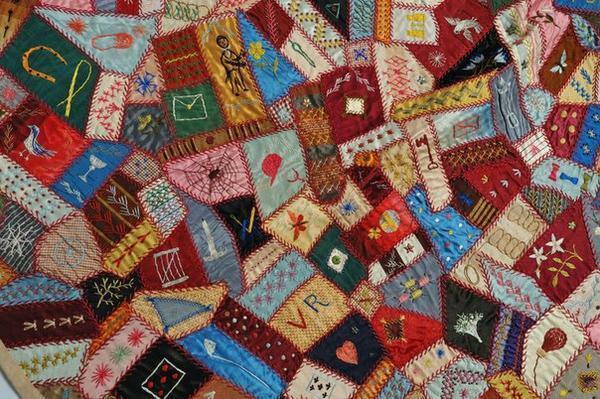
A well-known method of patchwork is a well technique. The first lesson of any handicraft circle begins with the study of this technology. This technology provides for the creation of a square base, to which the strips of cloth are sewn, which are called "logs".The scraps must be of different sizes."Logs" must first be tied to the edges of a square base.
Technique of a Bumblebee and a Chessman
The technique of a lasso appeared during the peasantry, when our country was poor, and people had to sew clothes from scraps of cloth. This technology involves sewing strips of fabric in rows. Each shred should be sewn strictly in the middle of the cloth, and then bend the corners of the material. If you decide to use the technique of a bum, you can use as a basis circles or squares of cloth.
You can create a blanket or bedspread in the style of patchwork using the "chess" technique. If you decide to use this technique, choose fabrics of different texture.
Since ancient times, patchwork in the technique of a bum was used to create clothes
When creating a product in the style of "chess", adhere to the following algorithm:
- First, make a template in the form of a square.
- Divide the workpiece into 16 equal squares.
- Open 8 squares of dark fabric and 8 of light.
- Take 2 squares of different colors, attach them to each other with the front side, and staple. Repeat this procedure with all the squares. As a result, you should get 4 bands.
- Sew all the strips together.
Quilting: Techniques( video)
Working in patchwork style is a pleasure. Using the technique of patchwork sewing, you can make absolutely any product. To learn the technology, you do not need to learn any secrets from experienced masters or attend master classes. It is enough to adhere to some rules and choose suitable fabrics. Products made in patchwork style are the beauty and uniqueness of your home. Dare!
Quilting( photo)