Contents
- 1 Wall preparation
- 2 Methods of self-gluing
- 3 How to calculate the required number of wallpapers?
- 4 Technology of pasting wall paper
Repair is an opportunity to transform your home, significantly change its design, interior. In this case, one of the main functions in decorating the interior is wallpaper. In many respects about the quality of their pasting, you can not only evaluate the owner of the apartment, so to speak, to its true worth. And on this depends and the overall picture. But before deciding the question "How to paste wallpaper?" You first need to decide on the walls.
Preparing the walls

Choosing wallpaper
In many respects, the quality of the gluing depends on the original purpose of the room and the customer's requirements, if the repair is not done for yourself. So, if the premises will be used for auxiliary purposes, and no quality requirements are imposed at all, then old technologies can be used here. Partially wresting the old wallpaper, anointed the wall and the sheet, and glued it. But if the repair is done in a cultural room or for yourself, then you will not be able to paste wallpaper as any of your own conscience. Then it is necessary to resort to the help of professionals, to hire workers and so on. But if there is no extra money, then in principle it's not so difficult to paste wallpaper by yourself. The first step is to prepare the grounds.
It is from the original surface that the quality of the finishing works depends. If the wall is uneven, then these irregularities will be clearly visible on the wallpaper. This should be taken into account.
To properly paste the wallpaper first thing you need to align the walls. This can be done with plaster, putty, with gypsum cardboard and so on. After leveling, the surface should be primed. This can and should not be done if the wallpaper is light. For example, paper. But today glass-fiber, non-woven or vinyl is increasingly used. They, as a rule, belong to the class of heavy wallpaper, so they require a reliable and very solid base. Plus, with subsequent repairs, there will be no problems such as chipping the putty layers when removing old wallpaper.

Choose glue
If the same wallpaper is light, then instead of the ground you can use the same wallpaper paste. Simply previously smeared them with a wall and dried.
To paint wallpaper with your own hands in a qualitative way, especially for fiberglass, fiberglass or nonwoven, you need a clean and smooth surface without any stains or protrusions. After all, even after applying a few layers of paint, these spots will still appear. Therefore, the surface must be 100% plastered. At the same time, it acquires an ideally white color, becoming an excellent springboard for further work.
So, the surface is prepared and impregnated abundantly with soil. We will further understand how to glue qualitatively wallpaper with your own hands.
Methods of self-gluing
For the entire history of mankind, various versions of wallpapering have been developed. The choice, of course, of a particular method depends on the availability of one or another instrument. Consider the most effective way when even one master can handle this job. But for its successful operation, the following tools will be required:

Preparing the necessary tool
- Stationery or mounting knife with sets of blades. They must be purchased with a calculation of 1 package per room.
- Ruler, it is better to use a flexible one in a plastic casing. They were specially invented to perform such works.
- Level. One of the most important tools in the arsenal of any master. In early technologies, a plumb line was often used, but because of the inconvenience of using it, they stopped using it. The level is still used for horizontal elements, so why not use it for vertical ones.
- Pencil.
- Sponge or cut from clean gauze or any other non-dyed fabric.
- Bucket for glue.
- Roller for applying glue with medium pile.
- Smooth rubber roller is narrow for sealing joints.
- Wide smooth roller for leveling the wallpaper and letting air out from under them.
- Brush for wallpaper if it is pasted with soft materials.
- Roulette.
- Often, skilled craftsmen use a conical roller for more effective leveling of wallpaper.
So, having found all the necessary tools and having purchased the necessary number of wallpapers, you can get down to business. To beautifully paste wallpaper, you need to correctly calculate their number. This can be done according to special tables based on the fact that with a ceiling height of 2.5 m from one roll, 4 sheets of cloth are obtained without drawing a pattern. Correctly calculate the number of wallpapers will help a free construction calculator.

This moment plays a big role, since there may be a shortage of 1 roll at the end of the whole work. And the remaining pieces for gluing the sections of the walls above the windows and doors prove to be unsuitable.
How do I count the required number of wallpapers?
In fact, everything is pretty simple. It is necessary to measure the parameters of the walls of the room being repaired to determine their area. Further, from it subtract the area occupied by the doors and windows. Plus, add some stock. And if the wallpaper with a picture, it is better to consider 1 tube - 3 sheets. The width of the tubes can be different and is indicated on the package, as well as the length.

Counting the number of wallpapers
To ensure that the technology of wallpaper gluing is observed, and the canvases are not peeled off after a year, it is necessary to read the instructions in the manual for the glue to be used. At the same time on its packaging it will also be written, for what types of wallpaper it is intended and how to get divorced. This is an important and decisive moment, so you should read the recommendations and instructions.
It is necessary to remember if you are too lazy to read the instructions that 1 pack of glue should be diluted in 1 bucket of water( 10 liters).At the same time it should be cold, and when adding glue it is necessary to stir constantly and intensively. This will allow it to swell well and do not form lumps.
Technology of pasting wall paper
Ideas for wallpapering different masters may also differ. For example, someone prefers to start from a corner with a twist of 1-2 cm, and someone starts from the window. In fact, everything depends on the specific case.
Wall wallpapering begins by cutting the required number of sheets. It's best done immediately, because then it will be uncomfortable because of dirty hands. It should be understood that the geometric parameters of the room may be different from the ideal, and that the figure does not go uphill or to the basement, it is necessary to determine the amount of deviation of heights at different points. The received value is recommended to be added to each sheet in the form of a stock, after gluing it is safely cut with a mounting knife. Each sheet should be twisted in the opposite direction and put for a while at the wall for which it is intended. This will help not get lost when sticking.
It is also recommended to sign each sheet with a pencil, without strongly pressing on it. This will help to keep order when combining complex drawings.

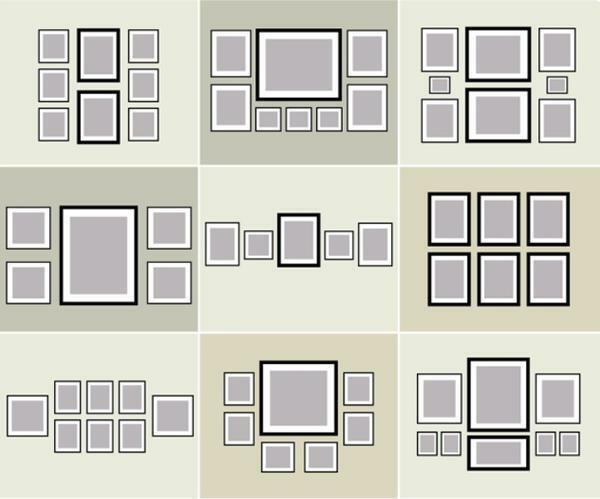
We make the scheme for gluing wallpaper
The subsequent wallpapering continues with the application of the present adhesive on the sheets and walls. Some types of wallpaper do not need a preliminary wall impregnation. This is written on the wallpaper package.
There are different ways to glue wallpaper, but the principle is one: you need to spread the glue and glue it evenly. Usually at this stage, many have problems, related to the premature sticking of the canvas to the wall, then to yourself and so on. Therefore, it is advisable to follow the technology:
The adhesive should be applied in a thin and even layer. Then the sheet can be folded with the impregnated side inward along the floor and once again in half. And leave it to soak for no more than 10 minutes and at least 5.
Apply a few sheets at a time, or as many times as you can paste and smooth. When applying glue to the wallpaper after each sheet, you should thoroughly wipe the surface from the adhesive, because the front side of the next sheet can be damaged. It is also not recommended to fold the pieces with a pile, because as the glue is applied to each sheet, the edges of the lower ones are impregnated, which only worsens their quality.

Apply glue
The order of wallpaper gluing in the general plan does not change. Therefore, in the next step it is necessary to take the first plaster sheet and attach it to the wall, accurately orienting its edge over the leveling mark and seam between the ceiling and the wall. After that, release the bottom of the sheet and gently stretch it to the floor.
Next, using a smooth and narrow roller, the edge of the sheet is rolled up from the top down. Here, it is better not to overdo it, and then with strong pressure, dents can be formed, which will remain visible after drying. Then, using a wide roller, air is pushed out from under the sheet from the rolled seam to the side. With the help of a spatula, the creases formed can be smoothed.

We roll the edge of the sheet with a smooth roller
In order to paste the wallpaper itself beautifully and qualitatively, we must strictly follow the instructions and perform all operations accurately and slowly. The next sheet is put end to end without any gaps and rolled out in the opposite direction.
All the stored stocks are safely cut off with a mounting knife, with each blade being recommended to break off the blade so that it is always sharp.