Content
- The nuances of laying tiles on a wooden base
- Preparing the subfloor for laying tiles
- Creating an insulating layer
- Intermediate layer between tiles and wood: options
- Preparing plywood and edging board
- Bulk floor
- Dry screed (GVL)
- The order of installation of tiles on a wooden surface
- Conclusion
The base for tile is most often a cement screed, but sometimes for various reasons it cannot be made. Is it possible in this case to lay the tile on a wooden base? And if so, how to do it, because wood and tile are poorly compatible materials? The answer will be this: it is possible, but only if the surface is thoroughly prepared and special technology is followed. Let's find out how to put the tiles in the bathroom on wooden floors with your own hands in accordance with all the rules.

The nuances of laying tiles on a wooden base
The tree is subject to deformation, it can dry out and swell, and these properties do not contribute at all to the creation of a high-quality and durable tile flooring. Due to the lack of static, the adhesive will crack, and the tile will lag behind the surface. Therefore, it is necessary to create an insulating damper layer or to give the base greater rigidity.
When it comes to wooden floors in the bathroom, it is important to take care of protection from moisture, leading to the formation of mold and mildew, rotting boards, deformation of wood. Ceramics is a reliable protection against moisture, if the base is properly prepared, and then the seams are treated with high quality.

After installing the tiles on a wooden base, you need to be prepared for the following problems, which can be eliminated only before laying the finish coating:
- surface deflection when the step between the logs is more than 0.5 m or when the thickness of the rough floor is less than 20 mm;
- backlog of tiles from the base;
- a creak that a layer of ceramics will not rid of.
We will analyze the process of preparing the base and laying the tiles in stages.
Preparing the subfloor for laying tiles
USEFUL INFORMATION:Tile bathroom waterproofing: which is better?
Before working with tiles, the surface condition is assessed.
- Decorative coatings in the form of linoleum, laminate, etc. are removed.
- Old waterproofing is replaced. The protective layer must be of high quality.
- Particular attention is paid to the inspection of the rough floor, which is made of cheap wood.
- Logs are made from high quality wood treated with antiseptic agents. You can not change them, but you need to check.

Tiles are not laid on the dilapidated floor, since the creak will not be eliminated, and the tiled coating will always be at risk.
The procedure for preparing a wooden base:
- Complete dismantling with removal of coatings, fair and rough floors. Dismantling is time consuming, but to get good results it is necessary to do this.
- The base is leveled.
- Disassembled floors are treated with a deep penetration antiseptic and a flame retardant. The layers are applied several times with complete drying. If the floor is concrete, you need to treat the surface with a primer and putty the cracks.

- Sheet piles are disassembled and replaced if wear is detected.
The distance between the logs should not exceed 0.5 m. The tree may not withstand the load and the floor will bend. If this distance is greater, it is necessary to add lags, the optimal step is –0.4 m.

- In the presence of distortions, the structure is leveled with a screed or through the use of linings for logs.
Under the lags, waterproofing should be laid: roofing material, polyethylene or special films that do not allow moisture to pass and prevent the formation of condensation on the surface.
- The space between the base and the lags is filled with small expanded clay. It serves as a heat and sound insulator, and also absorbs excess moisture. A clearance of 5 cm is left on top for ventilation. It is necessary to ensure the exit of air from the underground space.
- The basis for the tile is a board or thick waterproof plywood. Varnish or paint is removed from old surfaces. A gap of 3-5 mm is left between the boards to compensate for deformations from moisture. The floor is leveled with a grinder, cracks are putty.

USEFUL INFORMATION:Washing machine siphon for washing machine
Creating an insulating layer
The rigidity of the screed or tile adhesive is much higher than the wood used as the base. Therefore, between the tile and the floor is a layer that compensates for the movement of wood, as well as forming a waterproofing layer.
When using a special multifunctional film, the shock-absorbing layer should be laid with the hard side to the tile, and the elastic one to the boards. In order for them to breathe, the material must allow vapor and air to pass through, but block the penetration of moisture.
Waterproofing may be roll or liquid.
- The solid material is rolled on the floor and fixed with tape.
- Drying oil or latex impregnation is applied to a wooden surface and immediately put the masking net.

The damper against the movement of wood can be an elastic substrate of glue, on which the tile is attached.
Intermediate layer between tiles and wood: options
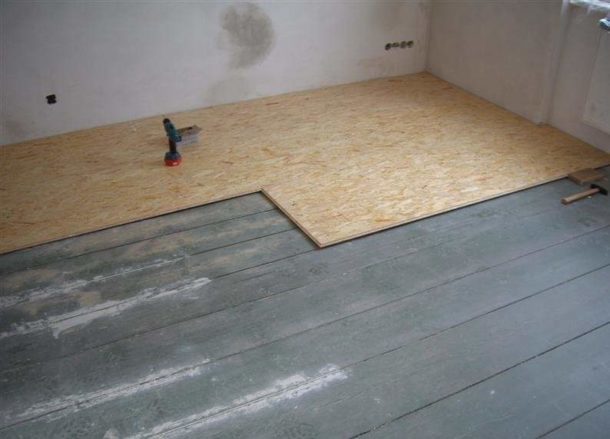
It is not recommended to lay the tiles directly on the wooden floor. The flooring may warp and crack. There should be a rigid base under the ceramic tile, which is used as one of the following materials:
- plywood, OSB;
- self-leveling mixture;
- gypsum fiber.

Preparing plywood and edging board
When laying tiles on wood without additional stabilization of the base as a layer that will compensate fluctuations in the parameters of wood, a special glue with elastic properties that last after hardening. Suitable compositions Lacrysil, Liokol, "Kreps", "Ceresit". Before applying the glue, grinding and sealing of the joints with putty will be required.

Laying on plywood boards or OSB boards will increase the reliability of the base, although it is recommended to use the same epoxy-polyurethane compound as glue.
Bulk floor
For a tree, dry, self-leveling mixtures compatible with it are selected. They lack casein - a substance that destroys the structure of the tree, and there are fibrous additives to improve adhesion.
- The perimeter is pre-glued with a damper tape to the height of the fill and tile.
- A prepared mixture is applied to the thoroughly cleaned floor. The layer thickness is 2.5–5 mm.
USEFUL INFORMATION:How to restore a cast iron bath with your own hands at home (video)

- While the composition is liquid, air bubbles are removed from it using needle rollers.
Tiles on such a base are laid in the same way as on a conventional screed.
Dry screed (GVL)
First, gypsum fiber is laid on the boards, and tile is mounted on it. There are no wet processes near the tree, which prevents it from getting wet. The ideal option is “Knauf-superfloor” from GVL.
- GVL slabs are laid on a flat subfloor floor with the displacement of adjacent strips in a checkerboard pattern.
- Their connection with each other is carried out using locks with the application of glue or sealant on the protruding parts.
- After laying each block, the gypsum fiber sheets are attached to the floor with self-tapping screws.
- Before fixing the tiles, a primer is applied to the GVL surface, which must be compatible with the composition of the adhesive.

The order of installation of tiles on a wooden surface
The sequence of actions will be as follows:
- Perpendicular lines are drawn from the middle of the walls, and the center of the room is located.
- The floor is laid out with tiles using crosses and the building level. The evenness of each element is checked. Laying starts from the side opposite the door.
A direct layout scheme makes it possible to save on trimming, and a diagonal one - to correct the curvature of the floor from diverging trapezoid opposite walls.
- First of all, all solid tiles are laid out. After the glue hardens, when it is already possible to walk on the floor, the tile is cut and mounted at the adjoining places.

Conclusion
Floor tiles - the best solution for the bathroom. It can even be used on a wooden floor, if you properly prepare the surface of the base. It is important to make it durable, even and with reliable protection against moisture. All the details of the process are in the video below.

EXPERT SITE
Tsugunov Anton Valerevich
Master Station Wagon
- Since 2003, I have been engaged in the repair and decoration of premises.
- Over 100 completed objects.
- I appreciate the quality, more than the quantity!
Personal page >>>
Friends!
I offer you the service "Friend Builder"
As this site develops, subscribers and visitors are turning to me more and more often asking for help with advice on various issues of repair and decoration.
Questions are sometimes asked very complex and interesting. You can’t write an article for each situation, so I decided to advise you individually.
Thanks to you, friends, a new direction of my favorite work has been born - share your experience and benefit everyone who is undergoing repairs!
Get a one-time consultation from me >>>
Order full apartment repair support >>>