Content
- What are the problems of laying tiles on a tree?
- Revision of the old coating
- Foundation preparation
- The base of the boards
- Lightweight screed
- Plywood base
- Laying tiles
The vast majority of apartments, especially those built during the Soviet period, were equipped with wooden floors. But for rooms with high operational load or high humidity - such as corridors, kitchens, bathrooms, showers, tile floors are more suitable. Ceramic tile (tile) surpasses wood in durability and practicality. It is much easier to keep in perfectly clean condition. But will the tile lie on the wooden floor if you do not want to disassemble it? Or is there no way to do this?

What are the problems of laying tiles on a tree?
The device of tiled floors requires a perfectly flat, motionless base. The tree is sensitive to changes in the microclimate of the room: it swells with excessive humidity, dries and shrinks when used at high temperatures. Such a base is not suitable for tiles: it will crack or begin to “walk”. When using a small tile, cracks will go along the seams between the floor elements.

In turn, the wood is also uncomfortable under the ceramic layer. Wooden parts, devoid of natural ventilation, will become much more unusable under the influence of dampness and microorganisms.
But modern materials and appropriate technologies make it possible to create an intermediate layer that allows laying tiles on a wooden floor.

Revision of the old coating
Before choosing a method of preparing the base for laying tiles, it is necessary to conduct a thorough examination. It is on the condition of the old floors that the sequence of future work will largely depend.
In no case can not be laid on newly erected wooden floors. They need to be given a minimum of two to three years to shrink. So in new buildings you can’t put a tile on a tree. You must either wait or completely dismantle the floors and design a fundamentally different foundation, for example, a concrete screed.
USEFUL INFORMATION:Foam floor screed
It should be noted that the tile coating is laid for a very long period. Therefore, you must be absolutely sure that the elements of the old coating will last no less. It makes no sense to start fussing with the tiles, if in the near future it will have to be opened because of rotten base elements.

Professionals insist on a complete overhaul of old floors to find and replace all defective items.
Be sure to check the status lag and the distance between them. It should not exceed 50 cm, otherwise the base may not withstand the severity of tiles, glue and other materials.

Strong boards without visible defects can be used, but first you need to free them from the old coating: paint or varnish. There are several ways to do this:
- Mechanical - clean the coating with an abrasive tool: sandpaper, sanding machine, grinder with a special nozzle.
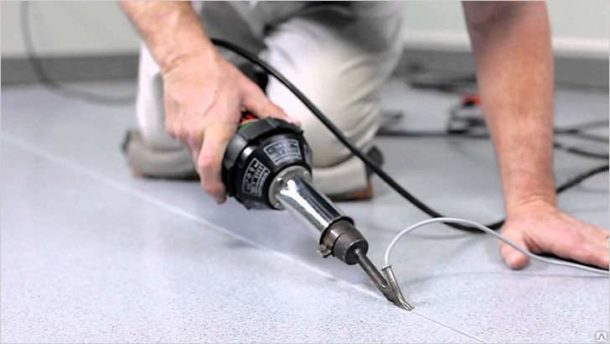
- Thermal - heat the paint with a building hairdryer. It will swell and be easily removed with a spatula. Some masters manage to use an ordinary blowtorch for these purposes, but we must remember the possibility of fire.
- Chemical - remove varnish or paint using various reagents. But the tree, saturated with them, will emit unpleasant odors for a long time, so this method is used very rarely.

Foundation preparation
So, you should carefully disassemble the wooden floors, assess the condition of the lag. Replace defective ones, add additional lags if necessary, fix them securely and align.
All elements of the wooden floor structure must be treated with an antiseptic. After it dries, you can update or replace the insulation. This can be a layer of expanded clay, mineral wool slabs or another type of thermal insulation. When laying, the recommendations for using the selected material must be followed.

Between the boards of the subfloor and the insulation it is necessary to leave a space of 5 cm to create natural ventilation.
USEFUL INFORMATION:Repair in the room: where do we start?
When mounting the flooring back, it is not necessary to fill the boards closely, but leave a gap of a few millimeters between them so that the tree can breathe. A gap of 10 cm is left between the floor and the walls. Then it can be repaired with mounting foam.
The course of further work depends on the chosen method of preparation of the base. The main ones are a lightweight screed device, use of plywood or polyurethane adhesives.
The base of the boards
- The boards are impregnated with a latex-based waterproofing solution. Without waiting for it to dry, lay on the floor a painting reinforcing mesh. In the future, it is additionally fixed with self-tapping screws.

- A layer of a solution consisting of sand (2 parts), water glass (2 parts) and water is applied to the floor surface. All components must be mixed thoroughly.
The tile is fixed with a two-component polyurethane adhesive. It retains plasticity after hardening, so that it provides not only reliable fixing of the tiles, but also compensates for small vibrations of parts of the floor base.

Lightweight screed
The meaning of this method is to create a solid and even base, not connected to the walls and wooden floor. Such a floating design will ensure the integrity of the tiles. The optimum thickness of the screed is 30 mm: a smaller one will not give sufficient strength to the base, a larger one will significantly increase the weight of the floor.
- A waterproofing layer is created. It can be roll material: glassine, bitumen paper or even thick polyethylene. Often use waterproofing mastics or warmed drying oil. In this case, reinforcing with a fiberglass mask is used.
- A damper tape is glued around the perimeter of the room between the floor and the wall.
- A thin metal mesh is attached to the waterproofing layer with self-tapping screws.
- The screed is poured 30 mm high.
You can use a regular solution of cement and sand, but it is better to use self-leveling mixtures: they dry much faster, and it’s more convenient to work with them.

- After solidification, the screed is primed, and then the tile is laid in the same way as on a conventional concrete base.
USEFUL INFORMATION:How to repair a parquet floor with your own hands
Plywood base
Plywood sheets are used to create an even and durable base for tiles. at least 10 cm thick. It is better to cut them into 4 parts. Laying is carried out in compliance with the following recommendations:
- After impregnating the base with an antiseptic and laying the waterproofing layer, the plywood is fixed in a checkerboard pattern.
- A compensation gap of 5 mm is left between the individual elements. In the future, it can be repaired with sealant or polyurethane foam.

Plywood is also subject to thermal expansions, therefore, a compensating gap between the individual sheets is needed. And also a gap of 10 mm wide is left around the entire perimeter of the room.
- Plywood is fastened to the base with self-tapping screws on wood, recessing the hats deep into the material, in increments of 15–20 cm.

- The resulting surface is processed by the grinder along, across and obliquely. Then primed.
- A waterproofing layer is formed from latex impregnation, a paint net and a solution of water glass.
- The tile is attached to polyurethane adhesive.
Plywood can be replaced with moisture resistant gypsum board or gypsum fiber boards. The technology will not differ much, but it is worth using components designed specifically for these materials.
Laying tiles
On wooden floors, tile is laid in the same way as on a concrete base:
- Laying starts from the middle of the room or from a far corner opposite the entrance.
- With lightweight screed or gypsum boards, it is recommended to use cement adhesive solutions, on plywood or boards - two-component polyurethane adhesive.

- Glue should be prepared in small quantities and in strict accordance with the manufacturer's recommendations.
- The correct installation of each tile is immediately checked by the building level.
As a grout, it is better to use mixtures containing silicone. This will increase protection against moisture on the wooden base.
Excess glue or grout is removed from the surface of the tile immediately with a wet rag. Do not let them dry.

EXPERT SITE
Tsugunov Anton Valerevich
Master Station Wagon
- Since 2003, I have been engaged in the repair and decoration of premises.
- Over 100 completed objects.
- I appreciate the quality, more than the quantity!
Personal page >>>
Friends!
I offer you the service "Friend Builder"
As this site develops, subscribers and visitors are turning to me more and more often asking for help with advice on various issues of repair and decoration.
Questions are sometimes asked very complex and interesting. You can’t write an article for each situation, so I decided to advise you individually.
Thanks to you, friends, a new direction of my favorite work has been born - share your experience and benefit everyone who is undergoing repairs!
Get a one-time consultation from me >>>
Order full apartment repair support >>>