Content
- Materials for work
- Pipe preparation, planning and layout
- Frame mounting
- Plasterboard sheathing
- Box finish
- Important points
Repair in the apartment concerns each room, the bathroom in this case is no exception. Modern plumbing equipment is compact and aesthetically pleasing. However, in apartments of Soviet times there are old bulky pipes and risers that cannot be moved to another place or completely removed. In this situation, a plasterboard box in the toilet comes to the rescue. This design looks neat and fits perfectly into any chosen room style.

Materials for work
For the manufacture of the box, you can use any sheet material, as well as lining and PVC panels, but gypsum cardboard is especially popular. It is easy to use and does not limit the choice of materials for finishing.
For work, you should use moisture-proof drywall to avoid damage to the material from exposure to high humidity in the toilet and from condensation formed on the pipes.
To mount drywall, it is necessary to prepare wooden bars or

In addition to the main building material, you will need the following set of tools:
- Pencil or marker for drawing a contour.
- Tape measure and construction level, plumb line.
- A sharp construction knife for cutting drywall.
- Metal scissors for profile cutting.
- To attach the structural elements, you will need a puncher, a hammer and a screwdriver.
HELPFUL INFORMATION:Methods of attaching drywall to the ceiling: 3 ways, cost
Do not forget about fasteners:
- dowel nails for attaching structural elements to the wall, floor and ceiling;
- self-tapping screws “bugs” for joining metal profiles (they will not be needed if you have cutter);
- self-tapping screws for metal or wood for mounting gypsum plaster on the frame (depending on the material selected).

Pipe preparation, planning and layout
To answer the question of how to make a box of drywall for pipes in the toilet with your own hands, it is advisable to study the drawings and schemes of similar designs in order to better imagine what you should be able to do and follow the recommendations specialists.
Attention! Before starting work, you need to inspect the pipes. Existing defects and breakdowns must be eliminated without fail.
If the pipes are connected by welding, then the box can be solid. Threaded pipe connections need regular inspection, in which case the pipes must be freely accessible.
Important! Do not tightly close valves, counters and filters.

The quality of work largely depends on proper planning:
- Before proceeding with the installation of the duct box, you need to measure the walls and openings and draw a drawing on paper.
- The dimensions of the box should be minimal so as not to occupy a large space in the toilet. In this case, from the pipes to the walls of the box, you need to maintain a distance of about 10 cm.
If condensation forms on the cold water pipes, it is necessary to put on them cases from the made foam polyethylene or to paint with a special heat-insulating paint. If this is not done, even moisture-proof drywall can suffer over time.
- The contour of the future structure is marked on the floor, then transferred to the ceiling. To facilitate this process, a plumb line will help.
HELPFUL INFORMATION:How to make drywall figures on the ceiling and walls (10 photos)

Frame mounting
The sequence of work will be as follows:
- Along the contour, which is marked on the ceiling and on the floor, guide profiles are installed.
- Vertical racks are attached to the walls.
- At the junction of the elements on the ceiling and on the floor, the protruding edge of the box is installed.
- The rigidity of the frame is achieved by installing transverse profiles between the vertical elements. The distance between them should not exceed 30 cm. These cross-pieces will serve as a place of fastening of drywall sheets.
- On the plane that will be directed towards the entrance, a viewing window is mounted.

Plasterboard sheathing
After assembling the frame, they proceed to its skin.
- Take measurements from each plane of the frame, transfer them to drywall and cut strips. The edges of the cut strips must be cleaned with sandpaper or peeled with a planer.
- For attaching drywall sheets to the frame, self-tapping screws and a screwdriver are used. The distance between the fasteners is not more than 25 cm. Screw the screws at a right angle.
- To inspect the pipes in the toilet, a door is equipped in the partition.

Box finish
Putty and finishing, which are carried out in a certain sequence, will help to give the finished look to the pipe box in the toilet:
- The first step in the mounted structure is the processing of joints. To do this, they are first primed, and then sealed with a starting or special putty using a reinforcing tape - paper or sickle.
- After the joints dry, a primer layer is applied on the box plane.
- The edges of the box are decorated with a plastic or metal corner, which is glued to a thin layer of putty, and then covered with a putty mixture. After drying, the corners are carefully ground.
- The entire surface of the structure is covered with putty in several layers, each time you need to wait for the complete drying of the material.
- The dried surface is wiped and ground.
HELPFUL INFORMATION:Frame from the profile for drywall: sheathe walls, assemble partitions and structures
For finishing the box can be used tiles, wallpaper, water-based paint. The main thing is that the style of finishing the box in harmony with the rest of the repair in the toilet.

Important points
To summarize, we can highlight several important points that should not be neglected when installing a pipe box in the toilet:
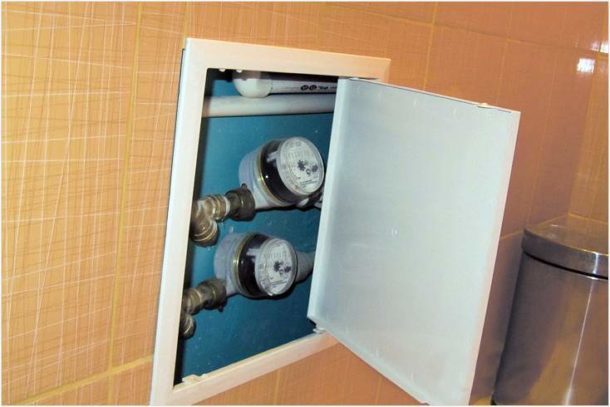
- In places that require periodic inspection, you need to cut a window. On it you can put a special door on hinged frogs.
- Doors are also needed in areas where there is a meter or valve.
- The approach for periodic revisions is best done on the front of the structure. The door for any equipment can be mounted on the side panel of the box.
- Pipe joints may need repairs, so it is important to leave a clear passage to them.
- If the pipe bends are located beyond the edge of the box, then the hole for them is cut a little more. Subsequently, the gap between the pipes and the duct is filled with expanded polystyrene foam so that the vibration of the tubes is not transmitted to the duct.
A self-made toilet box in the toilet will not only hide unattractive pipes and risers, but also give the room a beautiful, finished look.

EXPERT SITE
Tsugunov Anton Valerevich
Master Station Wagon
- Since 2003, I have been engaged in the repair and decoration of premises.
- Over 100 completed objects.
- I appreciate the quality, more than the quantity!
Personal page >>>
Friends!
I offer you the service "Friend Builder"
As this site develops, subscribers and visitors are turning to me more and more often asking for help with advice on various issues of repair and decoration.
Questions are sometimes asked very complex and interesting. You can’t write an article for each situation, so I decided to advise you individually.
Thanks to you, friends, a new direction of my favorite work has been born - share your experience and benefit everyone who is undergoing repairs!
Get a one-time consultation from me >>>
Order full apartment repair support >>>


