With the use of a warm floor in the bathroom, the comfort of living increases, the humidity decreases, and the air temperature is maintainedin this room it becomes easier. In most bathrooms and bathrooms the flooring is tiled. And since the material is cold enough, the additional heating of the floor will be only a plus.

Now the floor is not something exotic - it can be installed in any bathroom. Such a heat source will become an obstacle to the development of a fungus and mold in the bathroom. You will not worry about the health of the household, and the sprays that come to the floor will dry up quickly. Particularly comfortable floor heating in the period when the central heating is switched off, and the air temperature is low.

Heat will come from below, providing a comfortable microclimate in the bathroom. The hiddenness of the system from views is considered an advantage compared to even the most modern radiator, which takes away the free space, and does not decorate the room. In addition, you will save resources, which is especially important for a private home. Truth initially will have to spend on the arrangement of the system, but all the expenses can be called justified.
What kind of floor heating should I choose?
When you decide to make a warm floor in the toilet or bathroom, you need to decide on the type of system.
For the insulation of the bathroom floor, a special electric cable or an electrical element of a film type is used, as well as a water coolant. In all cases, the system provides for the presence of a temperature sensor and a thermostat.

Note that the water floor option is a good choice for a private house in which autonomous heating operates. Such a warm floor is practically not installed in multi-storey buildings, because it is forbidden to connect to central heating( additional load may become a factor leading to a malfunction in the heating system), and installing a separate boiler is expensive. Therefore, for multi-apartment buildings, the use of electrical systems is more often recommended. Many prefer the infrared option, as it does not require raising the floor level.

Pros and cons of
varieties As already mentioned, all varieties of warm floors can be divided into 2 types - electrical( cable and film) floor and water. We will discuss the features of each, assessing the merits and shortcomings.
Water
The water-heated floor is an eco-friendly warm floor that heats up gradually and does not damage the tile. It uses hot water and requires the installation of a special pump responsible for its circulation. The costs for it are relatively low, if compared with the electric one.
The downside is the need for authorization for installation( in an apartment building, the installation is not allowed), as well as the possible risk of leakage.

Electric
The electric warm floor is easier to install by placing a heating cable or film covering under the tile. You can handle the installation yourself. It is often chosen for heating a small area. Such a floor can be used for a very long time. When installing it, you do not need to think about central heating, so the electric floor is suitable for any room.

The disadvantages of such floors is the lack of ecological compatibility, the impossibility of laying the heating cable in the location of sanitary ware, as well as the possible deformation of the tile, as a result of rapid heating of the floor.
Having chosen a film version, you do not have to lift the floor and do the screed. And since the heating elements are not connected in series( as in the cable subspecies), but in parallel, even if one strip is burned, the function of the warm floor in the room will be preserved.
Peculiarities of installation: "pie" of the warm floor
The surface must be well cleaned and level( only minor irregularities are allowed).To ensure that the insulation layer is not deformed, a solution of sand and cement is usually used for leveling, which is applied in a thin layer.


Before starting work, you need to find out if the installation of a warm floor in the bathroom in the building is permitted. If it is planned to build a screed, the materials laid on the cleaned substrate are used, which serve as steam and waterproofing. They can be represented by bulk and roll materials, as well as lubricants.
If the filling material includes bituminous components, , then the bitumen should be allowed to dry thoroughly before laying the heat-insulating foam polystyrene material.
As a heater use rigid mineral plates, cork, expanded polystyrene or special foil. When stacking them, it is important to avoid the formation of gaps and cracks( if they penetrate the solution, this will cause the formation of temperature bridges).
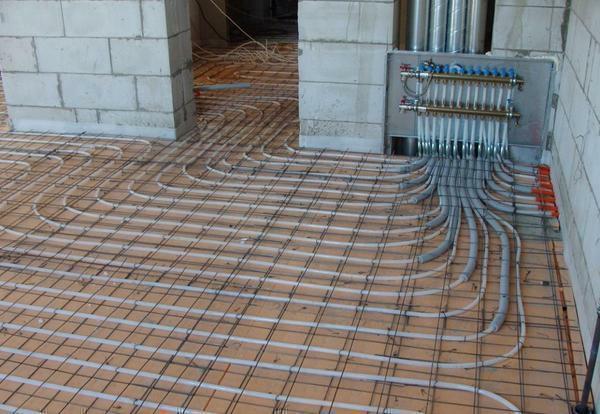
Installation of a water-heated floor
The first task will be the replacement of iron risers, which carry hot water, plastic. After this, a scheme of the future warm floor( the location of the pipes) should be drawn up.

After laying the waterproofing, a rough screed is poured, located 5-7 centimeters lower than the final floor covering. To ensure that the screed does not crack, it should be watered 3-6 days.

After that, spread the foil and proceed to install the water floor. Checking the scheme, fix the plastic pipes with a pitch between their turns of 15-20 cm. After connecting the system to a feeder stand equipped with a control valve, water is turned on to check the operation of the installed floor.
The last stages will be the device of the second layer of screed and the laying of the finishing material.
Installation of the electrical cable
The first step is the creation of a cable laying scheme with the location of the sensor and thermostat. The scheme is applied to the plan, taking into account the circumvention of the plumbing fixtures and a certain step between the sections of the cable. This circuit must be retained after installation.
The next stage of work is thermal insulation. On a flat base( unevenness is permissible up to 7-8 mm), a heater is fitted, which is often supplemented with foil. If the base is uneven, make a concrete screed.

For installation of the cable it is convenient to use a metal grid on which it is fixed. Such a mesh will give the stiffness design, and also prevent the crossing of the cable turns. It is also convenient to use ready-made thermometers.

After checking the cable resistance, the electrical and thermal parts are connected close to the thermostat. When mounting the thermostat, place the sensor in a corrugated pipe and place it above the level of the screed.
Then, after checking the cable resistance, the integrity of all parts and the coupling, the foundation is poured with cement with a uniform distribution over the floor.
It is important to avoid the formation of voids in the screed, in order not to reduce the heat transfer and not cause local overheating. The thickness of this screed will be 3-5 cm. The system is switched on not earlier than one month after the screed is poured, otherwise cracks and cable damages may appear in it.
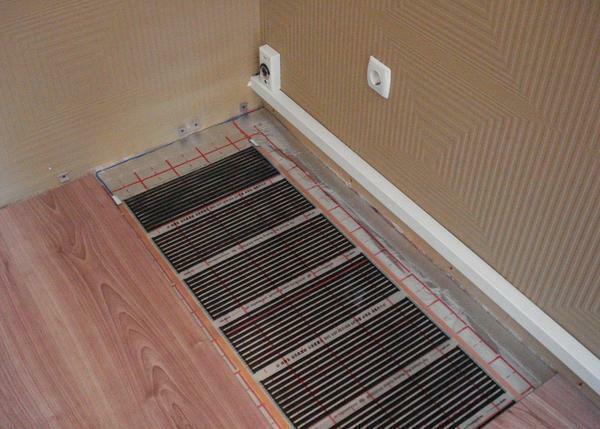
Mounting of the film floor
The film emits infrared radiation and is a strip with a width of up to 1 meter. Such bands are sold packed in polyethylene. If you want to cut material, this is done using the markings on the film. The film coating can be installed under any finish, and since the thickness of such a film is small, the level of the floor remains practically unchanged.

If the floor is mounted as an additional heating, then the film should be placed only on 40-50% of the area of the bathroom. The film is not stacked under furniture, washing machine, plumbing and other items. It should not be placed close to the wall - it is desirable to leave a gap of at least 10 centimeters.
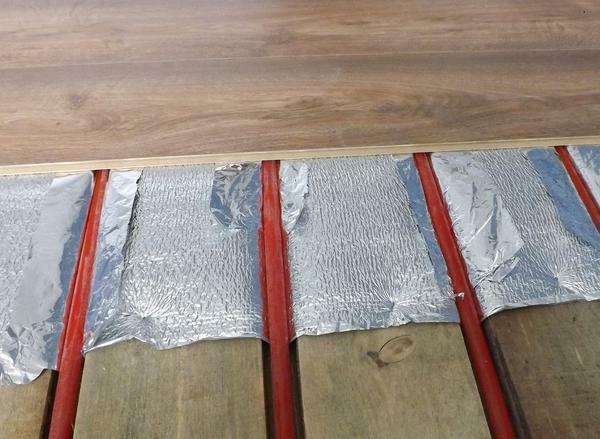
Compared with the installation of water and cable options, this sub-type of the warm floor is easier to install. That's why it is the most available for self-installation. After dismantling the old floor covering, assess the condition of the substrate. It is important to provide a horizontal surface of the base with irregularities up to 3 mm. If the differences are greater, the coating can be ground or filled with a self-leveling compound.

Next, you simply put the heating elements down with the current-carrying side in the right amount on the waterproofing material. Usually between the stripes leave an empty space of 5 centimeters. For fixing strips, a construction adhesive tape is used to prevent film shearing during operation. Cutting lines must be treated with bitumen insulation.
After connecting the sensor and the thermostat check whether the floor is working. To isolate the heating strips, you can use a wet method( install a screed) or a dry method( cover with a protective film).If a screed is used, the system is not turned on for a month.