Sawmill own hands: so simple that everyone can
Table of contents
-
1 All you need to know about the sawmill
- 1.1 Build a simple sawmill - Weekend design
-
1.2 How does the sawmill
- 1.2.1 sharpening your chain
- 2 To summarize

This is the simplest sawmill, which can collect the most - read on how to do it
You do not know what to saw wood on the board? I'll show you how going to the sawmill bus with their hands out of scrap materials. assembly instructions and drawings in this article simple and understandable. But before proceeding to the assembly bus sawmill find out what is generally accepted longitudinally cut logs.
All you need to know about the sawmill

homemade sawmill was used when cutting these boards - alternative instruments for such accurate and fast cutting with no
Sawmill - a mechanical device for cutting logs or boards on timber. Equipment, on the one hand, provides a partial cutting automation, on the other hand, ensures the accuracy of the cut. That is, you can set the parameters of thickness of the board, and they will be sustained over the entire length of cut logs.
| Illustration | Modification of the type of cutting tool |
 |
mahovye sawmill. Here, as the cutting tool using multiple webs set at a certain distance from each other. Cloths perform reciprocating motion up and down. In the motion paintings are a complex system based on flywheel eccentric. Each flywheel rotation around its axis - a single pass of the web. |
 |
Band sawmill. Here, as a cutting tool with a versatile metal strip with teeth. The tape is welded at the ends in the ring and is fitted on the two pulleys driven by a motor. The log is fed into a rotating belt and by varying the height of feeding logs regulated thickness sliced boards. Use of a steel strip allows for minimal cut thickness. |
 |
Circular saw bench. As used herein the cutting tool vertically or horizontally mounted drive gear. The technically sophisticated units using multiple discs. As a result, the rectangular timber can be made from timber is not four, but two passes. |
 |
bus sawmill. This is the most widespread equipment, since it is most often done by hand. As the cutting tool used tire chain, namely, a chainsaw or electric saw. The use of such equipment provides the sloppy cut and the greatest amount of waste. However, the equipment is chosen because of its cheapness. |
Which of these units can be assembled with your hands in your home studio? If desired, you can make any kind of sawmill except flywheel. But as the tire design - the most simple in execution, to tell about it.
Build a simple sawmill - Weekend design

Simplicity device that is not a log is fed through the movable trolley, and vice versa, the compact saw machine moves on a log
Before you gather from sawmill saws, a few words about the design that we have to do.

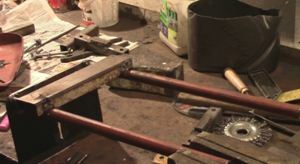
The photo shows basic elements of a mobile set-top box design sawmill
The basis of design - a bed with rails. On the frame is attached a chainsaw. The carriage with the supporting platform moves along the guide rails.
By moving the carriage and the support platform on rails, is adjustable relative to the tire position log.

View bus terminals on the back side fit - these terminals will provide not only the evenness of the cut, but also the safety of the saw
That in the course of sawing logs cut was absolutely necessary as it is possible to fix the saw firmly on the frame. This will be applied to the metal clips of the two blocks with bolt ties.
| Illustration | Description of action |
 |
harvested material. Would need:
|
 |
We make a frame. Of sheet steel cut rectangle 160 × 220 mm. The rectangle is marked center and the middle slit cut 10 mm wide and 90 mm long. |
 |
Drill holes for chainsaw Bus terminals. At a distance of 13 mm from each other, with an indent 10 mm from the edge, two through holes are drilled with a 10 mm diameter. The dimensions are chosen taking into account the size of most modern professional electric and gasoline saws . |
 |
Is welded to the frame rails. Steel tube with an inner diameter of 15 mm cut into two pieces of 380 mm length. Sections of pipe welds at the edges of the frame from the holes, so that between the centers of the pipes in the lower and in the upper part, the distance was 200 mm. Tubes need fastened to the frame vertically, since the accuracy of this cut will depend on the finished assembly. The joints must be of high quality, as the load on it will be great. |
 |
Prepare the nuts for fastening the frame. For fixing the frame do not use short screws as shown in the center of the photo, and elongated M8 nuts with weld washers on them. Do not buy new nuts. Let the price of nuts is low, but they are poorly cooked. Use the Soviet nut from old stocks . |
 |
Fasten bus elongated nuts. Remove regular short nuts that secure the tire, and screw the long screws, so that tipped the puck rested on the saw housing. |
 |
fasten base frame. A frame, as shown in the photo, set atop stranded elongated nuts. The nut is screwed M8 bolts through a conventional washer and through the lock washers. Firmly tighten the bolts to the saw on the frame is not swayed. |
 |
Making tire clamp. From pipe 25 × 30 mm cut into two pieces of 160 mm length. Indented end of 15 mm, to drill a hole 10 mm in diameter. As a result, between the centers of the holes should be 130 mm, i.e., a distance equal to the distance between the holes in the frame. |
 |
Making the presser plate. From the steel strip 8-10 mm thick, cut into two 50 mm plates. Each of the plates are fixed on the center of the nip between the drill holes. |
 |
Putting clip. Two parts of the clamp are collected, as shown in the image, two bolts 100 mm long M8. Nuts and washers are threaded through the profile tube and fixed with a nut. |
 |
We press the tire to the frame. One part of putting a clamp to the frame, so that the clamping plate is pressed against the tire. Another portion of the pressing impose feedback bus side. The entire structure is contractible bolts. As a result, pressure plate must firmly fix the tire, and the clamp must not touch the cutting chain. |
 |
Cut slide to slide. For this, the pipe section 2 ½ inches in length 70, cut longitudinally, so as to obtain four identical halves. |
 |
Prepare carriage base. For this purpose of channel 50 cut into 2 mm wide piece of 250 mm length. |
 |
We do seats for runners. For this purpose, the edge pieces prepared sill back down to 10 mm and with a cutting disc grinder perform depressions in the metal, so that they freely risen cut pieces of pipe. |
 |
Weld carriage and sleigh. We put the pieces of pipes in the seats and we catch at the place, that is, directly on the guides, and then penetrates the portion of connection continuous seam. |
 |
Drill a hole in the carriage. Mark up the center in the carriage rails. From the center to both sides measured from the 75 mm drill holes. As a result, between the holes should be a distance of 130 mm. |
 |
Putting the carriage on the rails. Both parts of the slider is pressed against the guide, as shown in the photo, and tightening bolts. |
 |
Cut profiled tube support pad. Because the square pipe 30 mm in accordance with the scheme, the following pieces of cut: 2 pcs. 400 mm; 2 pcs. 360 mm; 2 pcs. 460. |
 |
Weld based on the reference platform. Prepared pieces of profile pipes stacked in the desired order. Checking angles gon, we catch the joints, and then boil for a continuous weld. |
 |
we do handle. In accordance with the assembly scheme of the support pad, preparing handle. For this purpose, pipe ½ inch Gray and arches with a blowtorch. The prepared handle is welded to the assembled base. |
 |
welded carriage. We put the carriage to the support site. To do this, on the carriage and on-site mark up the center and spread so that the centers are aligned. We catch the carriage to the site. |
 |
Augmenting compound of the carriage and platform. Cut the steel strip triangular metal inserts. Amplifies and Compound carriage support pad, vvarivaya steel plate. |
 |
Prepared paint the details. We clean metal on the assembled structure, grind and paint the seams in a couple of layers on metal paint. This must be done so the metal does not rust. |
 |
A frame fastened to the guide and to clamp the saw.
|
 |
Install the carriage and bearing pad.
|
At this sawmill can be considered collected. It remains to find out how this device works.
How does the sawmill
| Illustration | Description of action |
 |
Fasten the ends of the strips restrictive. For this purpose, the ends are putting equal width plank, so that they coincide with the beam surface. Centered boards are screwed screw. With the help of level, align the tablet horizontally, and only after that we catch it even a couple of screws. Boards are mounted on both sides of the log. |
 |
Set on top of a log indicative board. Put the board so that it fell on the attached at the ends of boards. We catch laid on both sides of the board with screws. Wedges placed under the board of desired thickness to the board does not sag. We catch wedges across the board with screws. |
 |
Prepare sawmill. To measure the distance from the upper edge of the fixed board to the lower edge of the bounding plates. At the same distance along the guide rails shift support surface of the tire and fix the bolt setting. We put the machine to the end of the log. If done correctly, the tire should be placed just below the bounding boards. If so, turn the saw and cut. |
 |
Cut down croaker. We saw pass by the landmark from one end to the other timber. Despite the fact that the mini compact sawmill, observe safety. Namely, we use safety glasses and hearing protection. |
 |
Remove slabs and restraining devices. The previously described configuration and installation of restrictive boards only need to remove the slab - rounded uneven part of the log. After sawed slabs, dismantle restrictive level with wedges. |
 |
Cutting boards follow. For further cutting, the estimated board is not needed. Just bearing pad is placed on the end of the log and the saw is carried from one end to the other. |
sharpening your chain

The diagram shows the particular circuit for sharpening the transverse and longitudinal cutting
If the chain is sharpened by conventional cross-cutting, cutting the log along the entire length will be difficult. Moreover, the saw will consume a lot of gasoline.
In order to improve cutting efficiency, you need to resharpen the chain sharpening angle. This can be done in specialized shops, where, for example, professional stick drill.

The range of most manufacturers are chains of chainsaws and the tires are not only smaller thickness, but of greater length in order to cut a large diameter logs
A more effective solution would be not regrinding an existing chain, and the purchase of special tires and chains for longitudinal saw. Such tires and chains have a smaller thickness. Furthermore, the chain from the factory already sharpened at an angle of 10 °.
To summarize
Now you know, like going band sawmill with his hands. Also recommended for viewing video in this article. If you have any questions, ask them in the form of comments.


