Putting plasterboard with backlight - 2 full instructions plus a photo report
Table of contents
- 1 Methods ceiling illumination device
- 2 What should be the ceiling with lighting
-
3 Materials and tools for assembly plasterboard ceilings
- 3.1 classic ceiling device for LED spotlights
-
3.2 Build modern ceiling with minimalist design
- 3.2.1 How to connect LED strips
- 3.3 Install recessed luminaires
- 4 conclusion

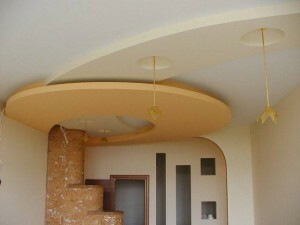
In the modern ceiling lights can act not only auxiliary, but also the main lighting
How to make plasterboard with lighting? I tell you in detail about how to build ceilings with lighting in a classic and modern style. After reading the instructions you will be able to collect a similar design at home.
Methods ceiling illumination device

An example of how combined plasterboard and tension backlit ceiling
Two ways of illumination devices for drywall ceilings:
- Installation of integrated luminaires a chuck placement and wiring in the gap between the roughing and finishing ceiling;
- Installing LED Tape in a specially provided niches.
Using the integrated lighting, can make spotlights, can not do without in the kitchen or in the office. LED lighting - is a more versatile option, as with the right approach it can provide not only comfort, but also an intense room lighting.
In some cases it is combined ceiling, in which the above methods the lighting device can be advantageously combined.

Backlight can be hidden in the ceiling of a sibling - the thing is, how it is omitted with respect to the overlap
What should be the ceiling with lighting
Construction drywall ceiling can be single-level or multilevel. And in fact, and in the other between the ceiling and the ceiling trim clearance remains sufficient to install a full integrated lamp.
| Illustration | Description lighting in the ceiling plasterboard |
 |
Integrated lighting. Installed between the roughing and finishing the ceiling. Using the integrated lighting, can make spotlights, can not do without in the kitchen or in the office. |
 |
Neon lights. Set intended for this niche. It is a versatile option that provides not only comfortable, but also the intense lighting of the room. To mount the LED strip is preferred to use duplex ceilings, as a side section on differential levels can be applied as a niche. |
 |
Combined lighting. Combined the ceiling, which are simultaneously used spotlights and LED strip. It is the most functional, but also the most difficult in the performance option. |
As combined plasterboard and stretch ceiling with lighting? And he and the other option has obvious advantages, but the stretch vinyl design can only be purchased on order, while the ceiling of plasterboard can be made with your own hands.
On the other hand, why plasterboard ceilings with lighting not combine with tension inserts made of vinyl or fabric?
Materials and tools for assembly plasterboard ceilings
Before you make a false ceiling with lighting:
- We carry out measurements of the perimeter of the room;
- Making drawing ceiling structure;
- We calculate the amount of material that is necessary to prepare.

Most of the tools for working with plasterboard is, in any home, but have to buy materials
Materials required:
- Drywall ceiling with not more than 9.5 mm thick;
- Profile ceiling;
- Self assembly for bearing metal for plating plasterboard sheet metal structures;
- Serpyanka sizing of joints;
- Latex primer;
- Plaster finishing gypsum-based;
- Latex paint.
Of the tools you need:
- Hacksaw with fine teeth undiluted for cutting sheet of drywall;
- Screwdriver with a set of bits;
If the installation of the ceiling of GCR their own hands for the first time, I recommend using a bat with a limiter that prevents the tug of self-tapping screws.
- Plate shears and pliers for the profile;
- Level and measuring tools;
- Plaster and paint tools for finishing.
classic ceiling device for LED spotlights

The circuit diagram shows the dimensions that will be used in the assembly of the two-level ceiling
The ceiling structure two levels is done. The first of them - this is a side of the perimeter walls, which is separated from the ceiling by 120 mm. The second level would be the concrete slab, which will have to be plastered.
Ceiling lighting elements can be arranged in the rim, as the 12 cm height sufficient for the cartridge spotlights.

At the inner perimeter of the collar extends a small niche in which to lay the tape LED.
| Illustration | Actions |
 |
perimeter markings and the ceiling.
If you are saving your time and have a laser level, you partition using this device and with colored thread .
Drill a hole in the center and drive to the dowels. Then you need to bind to the dowels and rope to its end tie a pencil. Turning a pencil, pulling the rope, you can draw a flat circle.
|
 |
Installation of the guide profile. For marking up, dowel-nails fasten the guide profile. |
 |
How to bend the profile? The contour of the circle, bend profile, and then to fasten. For this purpose the side walls incision every 25-30 mm and bend. |
 |
Installing skirting. Because drywall cut into strips 120 mm wide and fastened on the rim perimeter. |
 |
Installing in a side alcove. A similar width on the profile strip fastened in the niche for curtains, as shown in the photo. |
 |
Installation of reinforcing bridges. Strengthen installed drywall strip transverse profile pieces, which are attached to the main perimeter. Mount of cross webs external profile, which should run parallel to the profile, is fixed on the ceiling. |
 |
Mounting the horizontal bridges. Profile cut into the jumper, which strengthens the niche for curtains. On these bridges will then be attached strip of drywall. |
 |
Jumpers around the perimeter. Similar bridges strengthen bumpers made around the perimeter of the room. |
 |
Drywall in circles. Sheathed gypsum strip circumferentially made at the corners of the rectangle. |
 |
How to bend drywall? Bend the flat strip of drywall is easy. For this' mark on the surface of the parallel lines at a distance of 25-30 mm from each other. Along these lines, as shown in the image, a sharp knife an incision passing through the outer layer of cardboard and gypsum across layer. Next, the preform is folded by making an incision in the shape of a circle. |
 |
Marking a trim. On the outer plane of the curved strips of drywall mark up the rate at which the cut line will go. |
 |
instrument Council. For speed and ease of implementation of the markup recommend using a laser level. The price of such a tool to perform one-time work is unreasonably high. Nevertheless, it is possible to take the instrument out, but it is not so expensive. |
 |
Fitting the vertical holders. On the inner plane of curved bands mark up the rate at which will be attached a curved lower profile. Then, according to the markup, making the profile of the cross holder. |
 |
Installing the holders.
|
 |
Trimming vertical plating. Plasterboard strips fixed by circles are cut flush with the established profile. As a result, the assembled structure should look like the photo. |
 |
Installing horizontal bridges. Between the rounded decorative elements installed reinforcing bridges, cut from the profile. |
 |
plaster ceiling. Alignment Tab overlap and Stroebe putty. Plasterer align and overlap, laying the pre Grooves in the wiring. |
 |
Filing frame.
|
 |
The profile of the contour of the rim. According to the projection made by fasten the profile, as shown in the photo. Then trimmed flush with the drywall excess profile. |
 |
Completion of a GCR.
|
 |
Baguettes and opening fixtures.
|
Build modern ceiling with minimalist design
In this guide you will learn how to build a false ceiling with lighting for more modern interiors.

Wiring diagram, on which you can make a ceiling in the style of minimalism
The design shown in the diagram consists of three levels:
- The first. This perimeter wall, which is 120 mm away from the rough ceiling.
- Second. Located just behind the first level, the least removed from the ceiling, only 50 mm.
- Third. This center of the ceiling, which extends from the overlap of 80 mm.
LED strips can be positioned in a niche, which is made in the rim of the second level. Spotlights can be installed around the perimeter of the first level, as its most remote from the surface of the overlap.
| Illustration | Actions |
 |
perimeter markings. To make plasterboard, mark up the perimeter wall of the first level and a colored lace repel landmark. |
 |
Profile on the perimeter. According to the planned installation of the perimeter carry out a basic profile. |
 |
Partition.
|
 |
bypass angle. In one corner of the profile of collect that part of the frame, which is due to the peculiarities of the room. Incidentally, the photo shows the supporting frame at the site bypass angle. |
 |
The frame of the first level. The perimeter walls are collecting supporting frame for the cladding layer of the first plasterboard. |
 |
Sheathing first level. Sheathe drywall perimeter strip vertically. |
 |
The perimeter of the other levels. Under the scheme we make the ceiling layout and fasten the profile for the installation of the perimeter of the second and third level. |
 |
Sheathing the third level. Sheathe third level perimeter strip drywall immediately reinforcing structure section and the vertical webs. I draw your attention to the fact that it's time to bring out the wiring for lighting, because after this would be difficult .Montiruem transverse reinforcing webs on the second and third level. |
 |
Sheathing second level. By jumpers fasten the second level horizontal strip of drywall. Thus, we collect the perimeter of second (intermediate) layer. |
 |
Recess for backlighting. Sheathe plasterboard lower perimeter of the first layer so as to form a recess for illumination Bookmarks |
 |
Caulking Level 2. Sizing serpyanku technological gaps between the fragments of drywall and shpaklyuem. It must be done now, as then this space will be difficult to get. |
 |
strengthening niche. Additionally sheathed lower perimeter another layer of drywall to create volume and stiffen the structure. As you probably noticed, I do not specify the size of the niche for laying hidden lighting. This was done intentionally, as the dimensions of the niche better to calculate in accordance with the size of the acquired lighting. If used LED ribbon, the bottom recess edge flight should not exceed 30 mm . |
 |
Plating Layer 3. Sutured third level and bypassing angle. As a result, the entire ceiling must be sheathed. |
 The ceiling is lined and Sanding |
Putty and sanding. Shpaklyuem assembled structure in two layers with intermediate grinding. For grinding and leveling the finishing layer, do not use sandpaper and diamond mesh, fixed on a grater . |
 |
Painting works. Gruntuem prepared structure, and after drying a ground, painted. After painting can begin to install the backlight |
How to connect LED strips
The backlight on the basis of LED strip can achieve a uniform glow across the ceiling contour. No lamps do not provide such benefits.

A circuit consisting of power supply, RGB-controller, remote controller and tape
LED backlighting can be purchased ready to set or select the components separately. Packaging depends on the lighting scheme.

Installation diagram monochrome LED light for monochromatic light
In accordance with the operating features are two types of LED backlights:
- monochrome (Monochromatic) light in which all diodes are lit in one color and the only thing that can be adjusted, so it's brightness;
- multicolor scheme where on the tape present red, green and blue (RGB) LEDs.

Multi-color scheme much more complicated one-color, but they allow the controller to select different color combinations
To build the system of the LED strip will need a set of screwdrivers, scissors and soldering accessories.
backlight assembly rules:
- Chunks LED strip can be cut only by a special mark to the icon in the form of scissors;
- Connecting one chain more than two five-meter tapes from one power supply is not recommended, as it will be insufficient voltage;

Soldering contacts RGB-tape using the fixing clamp
- In the soldering process, try to safely lock pins as soldering place, because of the small diameter section lived, brittle;

Application Heat-as insulation
- Be sure to isolate the place spikes.
Install recessed luminaires

Crown - a tool without which it can not do, because otherwise make a hole with smooth edges can not be
For mounting spotlights need:
- Electric drill with a crown (Crown diameter selected according to the bore diameter of the fitting member);
- Sharp knife assembly for the purification of insulation from the wire;
- Narrow Phillips head screwdriver Fitting for the connection terminals (if such are used).

To the ceiling looked as carefully before lighting installation, wash your hands or use a clean cloth gloves
Manual installation of recessed luminaires:
- We determine the location of fixtures in accordance with the wiring pad;
- Making the ceiling markup center holes;

The holes in the drywall edges were smooth, on-site drilling stick masking tape
- Markings made on drill-holes;
In trade there are lamps with the pad with a bore diameter of 75 mm and 60 mm. We need to pick up the crown that will fit bore diameter of the selected luminaire
.

Notching insulation, be careful not to make the incision in the veins, as this reduces the wiring resource
- We derive the cable ends into the holes, and we clean the wire insulation approximately 1 cm;
- In accordance with the selected wiring circuit connected to the cartridge;

A good twist, wrapped with insulating tape is not worse than screw terminals
Wiring is done either by using special glue or the stranding, which isolate the tape.
- The wire to the connected cartridge is threaded into the ring with spring petals;

Install cover in the fitting hole
- Ring together with mixed by petals inserted into the prepared hole;
- The holder connect the light bulb;

Do not forget to screw the protective glass - it not only protects the lamp, but also diffuses the light
- The bulb is inserted into the ring and is screwed into the protective glass.
conclusion
Now you know what happens plasterboard with lighting and how to collect it yourself. If the article and proposed to her instructions were helpful, write about it in the comments. In addition, I recommend to view the video in this article.