SHARE
in social networks
In addition to the basic repair work, such as the walls and the ceiling have to deal with some minor complications, such as, for example, execution of the joints between the two surfaces. For this purpose, ideal decorative ceiling polyurethane moldings. Consider the ramifications of choosing this practical element, as well as recommendations for self-installation.

For registration of the joints between the wall and the ceiling used polyurethane moldings
Content
-
1 Types of moldings on the ceiling: a photo of decorative elements of different materials
- 1.1 Why buy a plinth made of polyurethane: Benefits
-
2 Ceiling polyurethane moldings: how to install correctly
- 2.1 How to cut the corner on the ceiling moldings
- 2.2 How to cut skirting boards on the ceiling: the basic principles of
- 2.3 How to glue the plinth on the ceiling: a detailed instruction for use
- 2.4 That the first glue: wallpaper or ceiling moldings
- 3 Ceiling lights LED ribbon under the baseboard: photo and installation instructions
- 4 Installation of ceiling moldings: prices for materials and professional installation
Types of moldings on the ceiling: a photo of decorative elements of different materials
In order to understand what a polyurethane ceiling cornice stands out from all the other options, consider what they are, depending on the manufacturing material.

Skirting serves as a finishing touch to the decoration of the ceiling
Wooden baseboard is widespread due to the availability of the material, as well as the possibility of fixing different ways: on the glue, with screws or nails. Most of these decorative elements are used in the interiors, where the predominant tree decoration.
Plaster moldings - one of the most beautiful, but at the same time and not cheap finishes joints between the ceiling and the wall. Width, as well as the variety of moldings are virtually unlimited, and therefore choose the option that is suitable for any interior design, it is easy. The connection is performed by means of putty. In some cases, additional skirting stained.
Foam ceiling moldings - the cheapest of all the options offered on the market. It is popular due to its availability, its low weight and extremely simple process mounting: using a special glue, which is sold in any hardware store, as well as putty. It is discharged at a rate of 2 m in length and from 6 to 10 mm in width.

With polyurethane skirting can arrange complex architectural forms
Polyurethane Ceiling quirk is superior due to its extreme flexibility. This property allows it to draw any complex design, where there is a smooth transition lines and columns. And if earlier for this purpose had to use plaster skirting, producing an extremely complex fit elements, but now the process has become much easier, thanks to the plasticity and ability to bend around polyurethane any form. Opportunities offered by the use of the material in the interior, are almost limitless.
Useful advice! Despite the fact that the polyurethane moldings looks great in combination with virtually any finishing materials, particularly often they use it in cases where the trim is made using vinyl stretch ceiling tiles or plastic panels.
Why buy a plinth made of polyurethane: Benefits
Buy ceiling moldings of polyurethane stands for many reasons. With a number of advantages, it can become an indispensable tool in the design of the original interiors, giving a complete view of the room. Consider a few basic advantages of using this variant:
- polymer which is used to make plinthIt has a high density and impact resistance to various factors;

Fillet vary in width and relief
- Chemical safety of this material has also been repeatedly confirmed;
- high flexibility allows to make out the premises with a complex configuration and use the plinth to finish construction of very different complexity;
- a cornice can be used not only to the ceiling, but also for the design of door and window openings;
- snow white fillet is ideal for any interior, but at the same time, its surface can be painted in any color that will match the color of the walls or ceiling, depending on your preferences;
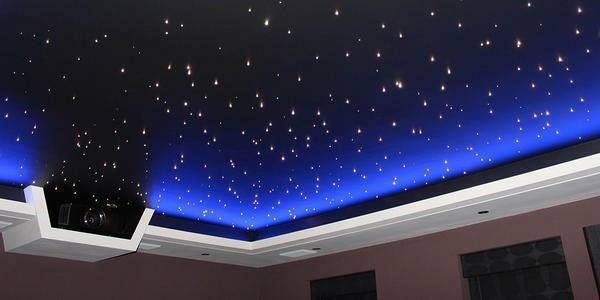
- it is possible to arrange a cornice lighting, and thus make the interior of something original, and later use it as an additional source of light.
Useful advice! You can buy a ready-made design of the eaves, fitted with lighting, but you can do everything with their own hands. So you perfectly decorate the room and can even change the visual perception.

Multilevel ceiling complemented by polyurethane skirting
Ceiling polyurethane moldings: how to install correctly
The profitability of using polyurethane ceiling moldings can not be questioned, especially since this material has a lot of technical superiority over others, such as the ability to withstand severe temperature changes from -60 to 80 ° C. That's what caused extremely long service life of the material.
For mounting this type of skirting easiest to use polymer cement, putting it on the edge of the profile. Thus the basic requirements that apply in this case, the adhesive mixture - high level of adhesion. This simplifies the task, as the ability to quickly solidify to fix elements allows quick and eliminates the need to hold the plinth for a long time, because to stand with their hands up, even for a few minutes is enough complicated.
At the same time, the use of quick-drying formulations complicates the work, as it requires precision and speed of work, leaving behind you the right to make mistakes and improper placement of the cornice. An ideal embodiment of the adhesive composition for adhesive attachment may become "Moment" or liquid nails.

Skirting board mounted with glue "Moment" or liquid nails
How to cut the corner on the ceiling moldings
In order to smoothly and beautifully cut corners flexible skirting boards, use a special device called a miter box. There are several openings, to accurately measure the angles 45, 60, 67.5 or 90 degrees. If you want to make the direct coupling it is necessary to use a stencil to 90 degrees. But for trimming inside and outside corners is most often used an angle of 45 degrees.
We consider in detail the step by step instructions for use of the circumcision flexible skirting angles:
- first of all, the item that you want to cut, you must insert in the miter box from the left side and press to the side. In this case, the part that will be located near the ceiling, must be located in the bottom of the miter box;
- in the stencil 45 degrees on the right side of the saw is inserted;
- when it comes to cropping adjacent profile, baseboard must be inserted on the right, but trimming performed in the direction from right to left. Thus it is obtained that the upper side to the lower corner is longer than the lower.
In cases where you need to perform adjustment of the internal angle, insert plinth in stuslo It must be on the left side, and produce cutting edge in the direction from right to left at an angle of 45 degrees. Then the bottom side turn out longer than the upper.

The correct position of the fillet in a special miter box
Useful advice!In order to avoid mistakes and unnecessary material consumption, before work is recommended to watch the video how to cut corners on the ceiling moldings. This simple video instruction will demonstrate you all stages of work.
Are often faced with the problem of the lack of necessary tools, namely Miter. In this case, you can go another way and do everything manually, on a flat surface (usually just on the table), are drawn two parallel lines. They marked up the square. From this square corners are held diagonally, forming angles of 45 degrees.
In order to make it easier to trim and has higher accuracy, you can use the materials at hand, for example, put on a diagonal line of a box or a wooden block.
Another difficult case, which often have to face - uneven angle which has no position of 90 degrees. In this case, the use of stencils is meaningless, because the elements you received still does not lay down a ceiling exactly. In such a situation it is necessary to take into account the characteristics of each corner individually, and produce markup on the ceiling.

Plinth trim scheme for the design of angles
Flexible moldings to the ceiling is applied directly to the place where it will be fixed, resting in its conjugate wall. On the ceiling and the wall is necessary to draw lines that mark the place fit the eaves to the surfaces. The same is repeated for the adjacent wall of the room. The upper point of intersection of these lines will be cut point and the lower point of intersection of lines - is the bottom corner profile.
To make an angle ceiling moldings, as well as in other cases, it is necessary to use the method of parallel lines or a miter box. That's just the direction of the cut will be different.
Useful advice! If you do not want yourself to figure out how to make the angle to ceiling moldings, you can buy corners for ceiling moldings, which are sold in the store. They are cheap enough, but the process of installation can greatly facilitate.
How to cut skirting boards on the ceiling: the basic principles of
Another issue worthy of attention - how to cut skirting boards on the ceiling corners. Despite the fact that the polyurethane lends itself well to cutting, to work with him and requires some caution. For this purpose, it is best to use a hacksaw or building knife, with which you can easily trim imperfections and protruding pieces.

Installation of a plinth with polyurethane stretch ceiling
To trim angle was as accurate as possible, try as much as possible to place exactly in the miter box profile, the width of the skirting board on the bottom and on the edge as possible was the same.
If you have to cut as manually, without using the miter box, try to distribute plinth so that it is placed evenly on both vertical and horizontal plane. In this case, you get the highest quality joint, without cracks and gaps.
As you can see, in the self-cutting profile is no big deal, and it is possible to do everything on their own, without the need for any help. The more so as the visual material you can always use the video, how to make a corner on the ceiling moldings.
How to glue the plinth on the ceiling: a detailed instruction for use
It would seem to understand how to glue the skirting boards on the ceiling, there is no need, for acquiring finished adhesive composition, you are almost completely rid yourself of the associated hassle. In fact, there are many subtleties that must be taken into account in the work to implement the attachment properly.

To glue the ceiling plinths with their hands
Of course, the glue profile on a perfectly flat and smooth surface is easy. But what if the wall is not smooth, or gluing ceiling moldings on the wallpaper? Consider all this in a step by step instructions.
The first step is to produce a surface preparation to mount fillet. It requires to carry out a thorough cleaning, removing all roughness, adhesive residue and so on. For this purpose, you can use a spatula, fine sandpaper or mesh intended for floating fillings.
Useful advice! If previously the joint between the wall and the ceiling was plastered, before proceeding with the installation of ceiling moldings, the surface should be primed and wait until it dries.
Always mount you need to start at the corners. How to glue the plinth to the ceiling and cut the appropriate angles, previously discussed. All other elements are simply adjusted according to the desired size.

Flexible polyurethane moldings
Not so important, what glue to glue the ceiling moldings. Approach and "Moment", and liquid nails. The main thing is not to cause too much of its quantity to the protruding surplus not soiled exterior surface of the eaves, since due to rapid adhesion composition to remove it would be quite difficult, and the use of household chemicals in this case, unacceptable. Usually recommended to apply makeup dot, and only in the middle of the product, and the technological gap, which remains as a result, to close up, which will be using a special blend of sealant color.
Understood as gluing ceiling moldings in the corners, can only fill the space between them. To do this, use the same technology. All that is necessary - to measure the right size and trim elements, respectively. A small amount of glue applied to the middle of the underside of the surface, after which the item is applied to the wall and is held in this position for a few seconds.
Related article:
Skirting for suspended ceilings: the basic rules of selection and installation
Review and comparison of materials, what to pay attention to the recommendations of an independent installation, important points.
Understand how to glue the ceiling moldings, it is not difficult. just enough time to see the photo or video instructions, and read the available materials, which illustrate some of the subtleties of working with this material. The Internet presents a lot of different videos like glue ceiling moldings in the corner, as well as around the perimeter of the room.
That the first glue: wallpaper or ceiling moldings
Another often debated issue, which, despite its apparent simplicity, and has no clear answer - which should be pasted first wallpaper or still ceiling moldings. To understand yourself is which option more comfortable and correct, consider the arguments presented in favor of one or another method.

Mounting dimensions angular ceiling moldings
The main problem that arises when you first stuck ceiling moldings - fit the upper edge of the wallpaper evenly, so as not to leave a gap between them. But at the same time you will not be afraid to stain the wallpaper and plaster to produce in the joints and painting will be much easier.
If you kleite ceiling moldings on top of wall-paper, the first thing you need to give the glue to dry for wallpaper, and it takes at least a day. Then you need to stick wallpaper masking tape, and then observing very carefully, to glue and paint the ceiling moldings.
In fact, both of these options are acceptable, and everyone chooses the one that seems to him easier. So just appreciate that you have more than acceptable and can get to work.
Ceiling lights LED ribbon under the baseboard: photo and installation instructions
If you decide to arrange the room using a plinth with lighting, it is necessary to take into account some special features. For example, it is possible to give preference to an embodiment of the fillet, which is shaped like a metal profile. This will place not only inside LED Stripy, but any other light sources, such as neon tubes.

Mounting options LED backlight polyurethane skirting
At the same time, measuring out the amount of material needed, as well as making a purchase, it is necessary to consider not only the perimeter of the room, but also the fact that a certain percentage will go to waste in the process of cutting corners. Therefore, it is necessary to acquire a plinth with a small margin.
The main difference between the cornice with illumination from the usual - fixing is done not close to the joints of the ceiling and walls, but at some distance. Typically, the gap is up to 20 cm, and is selected depending on room height and the width of the used illumination element.
It is easy polyurethane ceiling cornices allows you to securely mount them to the wall only, leaving enough space for the installation of lighting and do not worry about the reliability of their fixation.
With regard to the installation of LED strip, then it should be placed in the space between the ceiling and skirting, using it to the wrong side of this, which is inherently tacky. All segments of the tape must be connected to the power supply using a special connector or regular spikes.

Scheme ceiling mounting LED-illumination
An important detail is also the fact that by the illumination necessary to bring the wiring. It is advisable to make, and the replacement of old switches with newer models that have at least three keys, and will allow you to independently control all light sources in the room.
Installation of ceiling moldings: prices for materials and professional installation
If, having familiarized with how to glue the skirting boards to the ceiling in the corners and along the perimeter of the room, you thought it was too complicated, or you just do not want to do repairs yourself, you can apply for services professional. Of course, in this case, you eliminate the risk of incorrect installation, the presence of the gaps at the joints, and other things, but the cost to be prepared that it will have to pay.
The average price for the installation of polyurethane plinth to ceiling varies from 150-450 rubles per meter. In addition, you can order further painting and fillets. The price of this - from 50 to 150 rubles.
Rates ceiling skirtings polyurethane presents very broad boundaries: Depending on the width elements, the complexity of the invoice, as well as the manufacturer, the cost can vary between 150-500 rubles.

The outer and inner corner decorated via plinth
As can be seen, although it is not the cheapest option of all possible, buy a ceiling polyurethane moldings can be at a reasonable price. As its operational life is incredibly long, and make installation of these elements is very simple, even if you do it with your hands. All that you need to understand - how to make the inner corner of ceiling moldings, or buy ready-made items. The rest of the fastening is straightforward.