Content
- Extras on the door and their varieties
- How to choose additional elements?
- The technology of installing extensions on the interior door
- Doors for the front door
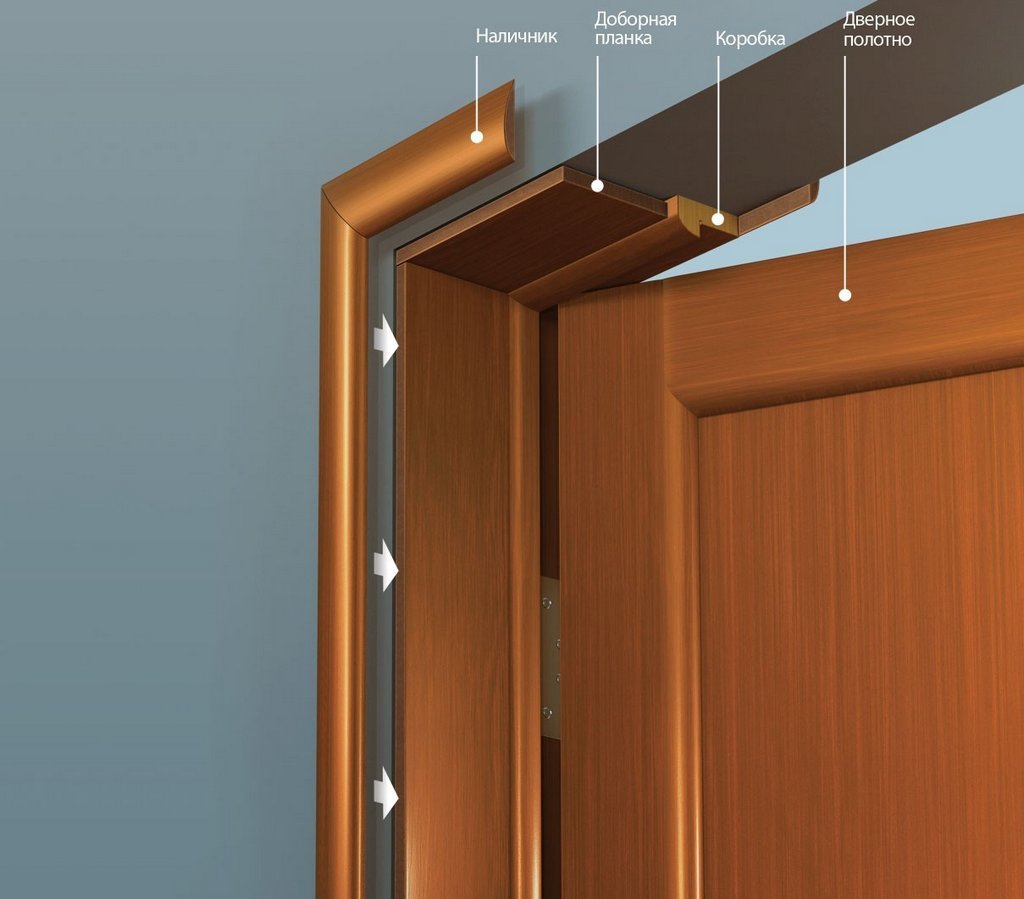
Very often, when replacing interior doors, a problem arises: the thickness of the wall in which the doorway is located is greater than the width of the door frame. The remaining open sections of the wall look unattractive and spoil the whole impression of the new door. To cope with this problem and give the doorway the necessary strength and a finished look will help door extensions.

Extras on the door and their varieties
An additional or additional board (plank) is a flat rectangular board. An array of wood and laminated or veneered MDF boards are most often used for its manufacture.

The variety of species this product does not differ. All additional elements can be divided into two groups:
- ordinary;
- telescopic.
Conventional additional strips look like an ordinary board, and differ from each other in the material from which they are made, in color and width. On the market are extras 100, 120, 150 and 200 mm wide.
Telescopic extensions by the principle of their installation are similar to lining. A strap of this kind is equipped with a groove on one side and a comb on the other. This allows you to clad doorways of any width. On sale you can find telescopic extensions 90, 120 and 150 mm wide.

It is also worth mentioning a decorative corner, combining the functions of an additional board and platband. Such a product is used only with a door frame of a special design. At its ends there are deep grooves, in which the platbands are mounted. It is convenient to use additional elements of this kind, when the width of the door frame is not enough quite a bit, up to 50 mm. For wider openings, they will not work.
How to choose additional elements?
Today, in almost all outlets offering interior doors, door extensions are also presented. Therefore, there should be no problems with the choice of color and texture of these components.
Choosing the size of additional planks, it is necessary to make simple calculations. To do this, you need to know the width of the wall (ShST) and the width of the door frame (ShK). Knowing these values, it is easy to calculate the width of the extension (ШД): ШД = ШСТ - ШК.

Attention! To obtain more accurate calculations, measure the width of the wall at several points, at least four. In the formula, you need to insert the measurement with the highest indicator.
Also, when choosing add-ons, you should pay attention to the design of the door frame. If it has a special groove for installing an additional board, then its thickness should correspond to the thickness of the groove.
The technology of installing extensions on the interior door
Installation of door extensions does not require any special skills, so this business can be handled with your own hands. Install additional boards after the box of the interior door is mounted in the opening and the mounting foam is completely dry. If there is a special groove in the box for the extension, it must be thoroughly cleaned. If it is not, it is necessary to clear the foam behind the box. The width of the resulting slit should be 1.5–2 cm, depth - 1-2 cm.
Further installation technology may have slight differences depending on the type of installation.
Installing custom extensions
The whole process of installing ordinary do-it-yourself planks with your own hands can be divided into several successive stages:
- Fitting the upper board. First, the bar is measured and cut in length. Next, the width is adjusted. To do this, you need to insert the board into the prepared groove with the working side out and mark the width of the wall at both ends. Connect the resulting points with a straight line and cut along it.
- Adjustment of lateral additional boards. It is carried out similarly.
- Assembly of add-ons. At this stage, it is necessary to adjust the lateral additional elements in length so that the upper bar lies on them exactly in a horizontal position.
- Mounting additional strips. In order to avoid the formation of cracks and gaps, it is necessary to wedge the additional board between the opening and the box. As wedges, you can use pieces of wood, cardboard folded in several layers or dried mounting foam. After examining the junction of the upper bar with the side, the space between the extensions and the opening is pointwise foamed. When the foam dries, it fills the remaining cavities.
- Installation of struts in an aperture between additional elements. This action will prevent their displacement during the drying process of the foam.
- Installation of platbands.

Installation of telescopic extensions
The installation process of telescopic elements as a whole repeats the installation steps of conventional extensions. The peculiarity of the installation of this type of extensions is that each subsequent row of slats is installed only when the previous one is securely fixed in the opening.
Tip: it is not recommended to first assemble a shield from several rows of telescopic additional boards and then completely assemble it in the opening. This can lead to deformation of the connection of the planks during the drying of the foam.
Thus, telescopic door extensions can be installed without any problems yourself.

Installation of add-on platbands
This kind of additional elements is installed easier than everyone else. Combined accessory platbands do not require capital fastening. The entire installation process consists in fitting them in length and installing them in a special groove on the door frame.
First, the upper additional platband is measured, cut and installed, then the side corners are mounted. Side elements should be cut only from below, since a recess is located in their upper part, which ensures a tight connection of the side parts with the top. For the installation of additional elements on the interior doors with their own hands, this kind of them fits simply perfectly.
Doors for the front door
Installing extras on the front door is not much different from installing these elements on interior doors. Their installation can also be done with your own hands without the help of professionals.

There are three ways to install additional elements on a metal door:
- underlay (an additional board is filled under a box);
- attached (the product is applied directly to the box);
- using the mounting beam.
For the front door, fittings made of MDF or natural treated wood are ideal. These materials are resistant to mechanical stress, high humidity and have sufficient heat and sound insulation.
The stages of installation of extensions on the front door can be identified as follows:
- Taking measurements from the wall to the box and from the top of the opening to the threshold.
- Preparation of strips in accordance with the obtained dimensions. In total, three details should turn out: two vertical and one horizontal.
- Mounting additional elements. In the case of a gap between the extensions and the wall, it must be filled with mounting foam, fixed and wait for complete drying. If there are no gaps and the fitting fits snugly against the wall, it can be attached with glue, galvanized nails or self-tapping screws. The heads of nails and self-tapping screws are masked with the help of special mastic or caps to match the additional fabric.
- Installation of platbands.
Installation of door extensions does not take much time. After completion of work, the doorway will acquire a beautiful and complete look.

EXPERT SITE
Tsugunov Anton Valerevich
Master Station Wagon
- Since 2003, I have been engaged in the repair and decoration of premises.
- Over 100 completed objects.
- I appreciate the quality, more than the quantity!
Personal page >>>
Friends!
I offer you the service "Friend Builder"
As this site develops, subscribers and visitors are turning to me more and more often asking for help with advice on various issues of repair and decoration.
Questions are sometimes asked very complex and interesting. You can’t write an article for each situation, so I decided to advise you individually.
Thanks to you, friends, a new direction of my favorite work has been born - share your experience and benefit everyone who is undergoing repairs!
Get a one-time consultation from me >>>
Order full apartment repair support >>>


