Content
- What are the advantages of niches from GCR?
- Drawing up a drawing
- Necessary materials
- Instruments
- How to make a niche out of drywall with your own hands: creating a frame
- Drywall Mount
- Preparation for finishing
Drywall is widely used in the repair and decoration of apartments. However, coatings made of it have one significant drawback: various hinged interior elements, such as shelves or cabinets, very poorly hold on their surface. Therefore, it is recommended to strengthen the frame in advance in the places of their fastening. But a niche in the wall made of drywall, which can be made with your own hands, can become a more original and aesthetically attractive solution.

What are the advantages of niches from GCR?
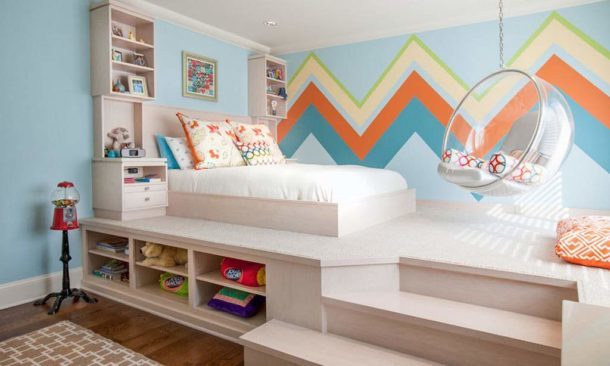
The recesses in the walls can perform both decorative and practical functions, so they are relevant for all rooms in the apartment. They are made in bedrooms, halls, hallways, kitchens, bathrooms and bathrooms. They allow you to:
- To save the free space of the room, "eaten" when leveling the walls with drywall.
- Divide the room into separate functional areas.
- Arrange convenient storage of books and small items on shelves placed inside a niche.
- Place appliances with a solid weight on the wall, such as a TV or audio system.
- Give the room a unique look.
Niches can be open or closed. In the latter case, they turn into original lockers. A good visual effect can be achieved if additional illumination is made in the recess with the help of spotlights or LED strip.

Drawing up a drawing
Each room is individual, so you will have to design a niche yourself, focusing on your own idea. You can get ideas here, and choosing a niche designed for TV will help this article.
Having decided on the purpose and type of niche, first of all make up its detailed drawing. It is needed to calculate the required amount of material.
The dimensions of the recess are calculated depending on its purpose: what is planned to be installed there, whether there will be backlighting, whether shelves are needed in a niche.
HELPFUL INFORMATION:How to stick tiles on drywall

Particular attention is required to install household appliances, such as a TV. In this case, it is necessary to provide for such moments:
- Niche shelf must have considerable strength to support the weight of the device. It should be further strengthened with horizontal jumpers. Some craftsmen advise making the shelves themselves not from drywall, but from plywood: it is more durable and can withstand a large load.
- The depth of the niche should be calculated taking into account the gap between the device and the rear wall. It is needed not only to place wires or other communications, but also to exclude drywall heating from a working device.
Tip. It is advisable that the outside of the installed equipment, such as a TV screen, be in the same plane with the border of the niche or be slightly pushed inward. So it is more difficult to accidentally hurt and knock over from a shelf.
- Top and sides also require clearances for a comfortable installation of the equipment and its maintenance.
In the drawing, all elements of the future frame are indicated. When placing profiles, the dimensions of drywall sheets are taken into account to reduce the amount of waste. All GKL elements should be joined on the profile, and joints are not recommended to be placed at the edges of the structure.

Necessary materials
Having made calculations according to the sketch, they purchase the necessary materials with a certain margin:
- Drywall. In most cases, a regular wall gypsum wall with a thickness of 12.5 mm is used, but you can take a thinner one, including an arched one. For rooms with high humidity, such as a bathroom, moisture-proof drywall is used.
- The frame is made of a guide (UD) and a rack (CD) profile.
- If the base wall is uneven, direct suspensions may be required.
- Damping tape providing sound insulation of the structure.
- Dowel-nails 6 × 60 mm for attaching the guides to the wall, floor and ceiling. With a large layer of plaster take longer hardware, for example 8 × 80 mm.
- Self-tapping screws for metal to fasten the frame elements together.
- Putty and primer for drywall, as well as a mesh-sickle - to prepare a niche for finishing after assembly.
HELPFUL INFORMATION:Laying tiles on a drywall in the bathroom

Instruments
The standard set required for the construction of drywall constructions:
- Scissors for cutting profile.
- A hammer drill equipped with a drill of the desired diameter.
- Screwdriver. It is recommended to purchase a special drywall mounting bit. It limits the screwing depth of the screws and prevents damage to the material.
- Marking and measuring tools: tape measure, pencil, square, level and plumb line.
- Spatula, brush and roller.
How to make a niche out of drywall with your own hands: creating a frame
Assembly instructions for the frame:
- The sketch drawing is transferred to the walls, floor and ceiling.
- The necessary pieces of the guide profile are cut off. Their back side is glued with a damper tape.
- The guides are mounted on the ceiling, wall and floor with dowels in increments of 30–40 cm.

- The racks of the rear plane are installed: sections of the profile are cut 1-2 cm less than the height of the room. They are inserted into the guides on the floor and ceiling, and then fixed with metal screws or notch. They can be additionally fixed with dowels to a flat wall. If the base surface is knobby, then direct suspensions are used.
When the niche has a curved configuration, you can use the flexible arched profile. Another option: cutouts in the form of a petal are made on the guide in the side walls, after which it will easily take the required shape. The desired bend is fixed using vertical jumpers.

- The necessary horizontal jumpers are made from the rack profile and fixed with self-tapping screws. The result is a flat frame of the back of a future niche.
- In the same way, the frame of the front part of the structure is going to be mirrored.
- Both designs are connected by horizontal jumpers. They are needed not only to create the contour of the recess or fastening the shelves, but also for rigidity. Jumpers are made of rack profile and fixed with screws.

Drywall Mount
Facing the GCR framework begins with the back wall of the niche, if necessary, because often its role is a flat base surface. First, the grooves are lined, and then drywall is mounted on the front plane. In this case, several points should be taken into account:
- If you plan to place sockets or spotlights in the niche, then the holes for them in the drywall are cut out in advance.
- Chamfers are made at an angle of 45 ° in all places where individual plasterboard fragments will dock.
- Sheathing elements forming right angles are installed so that the plane of one covers the end of the other.
- GKL fragments are mounted in increments of 20–25 cm. The fastener points on adjacent pieces are offset relative to each other.
HELPFUL INFORMATION:GKLV: decoding, technical characteristics, comparison of manufacturers and prices

- To bend drywall, for example for an arch-shaped niche, proceed as follows: the surface of the element is moistened with water and rolled with a needle roller. Another option: a series of parallel cuts are made on the fragment, forming the desired bend. The smaller the radius, the more often the incisions. Only a layer of cardboard on one side of the element should be cut.
Preparation for finishing
The assembled drywall construction is step by step prepared for finishing:
- All corners are additionally reinforced with special corners with perforation: this will protect them from damage during operation. A small layer of putty is applied to the corners, after which a corner is pressed into it. Excess mixture protrudes through the holes and is removed with a spatula.

- Seams are glued with a reinforcing mesh, and then sealed with putty. After it dries, it is grouted with fine sandpaper. Technology described here.
- The holes formed by the heads of self-tapping screws are sealed with putty, and then overwritten.
- The entire niche is primed twice. The application of the second layer occurs only after the complete drying of the first.
Before finishing with wallpaper or paint, the structure is putty, before laying tiles or decorative stone, this does not need to be done.

Adhering to simple rules and recommendations, creating a niche from drywall yourself will not be difficult even for a novice master. Ask questions about the installation process in the comments!

EXPERT SITE
Tsugunov Anton Valerevich
Master Station Wagon
- Since 2003, I have been engaged in the repair and decoration of premises.
- Over 100 completed objects.
- I appreciate the quality, more than the quantity!
Personal page >>>
Friends!
I offer you the service "Friend Builder"
As this site develops, subscribers and visitors are turning to me more and more often asking for help with advice on various issues of repair and decoration.
Questions are sometimes asked very complex and interesting. You can’t write an article for each situation, so I decided to advise you individually.
Thanks to you, friends, a new direction of my favorite work has been born - share your experience and benefit everyone who is undergoing repairs!
Get a one-time consultation from me >>>
Order full apartment repair support >>>