Content
- Wood or metal?
- Types of ceiling frame
- Necessary materials and tools
- Charting
- Preparatory work, transferring the circuit to the ceiling
- Frame mounting
- Drywall Mount
Drying the ceiling with plasterboard can pursue several purposes at once. This is the alignment of the surface, and the masking of various elements of communications, and the construction of complex multi-level structures. It is possible to place a heater, sound insulation, lighting elements in the space above the gypsum plasterboard. But in order to create a strong and durable construction, it is necessary to correctly make a frame for drywall on the ceiling.

Wood or metal?
There are several options for the execution of the battens for attaching GCR to the ceiling.
It can be made of wood or of a metal profile. The main advantages of a wooden frame are environmental friendliness, material availability and ease of assembly. But there are many disadvantages:
- As a rule, such a frame is used only with a flat base surface. Aligning with it the walls or ceiling is a torment.
- Before assembly, all structural elements must be thoroughly treated with an antiseptic solution. Otherwise, their long service life cannot be guaranteed.
- Wooden crates are not used in rooms where humidity exceeds 12%. At high rates, structural elements will swell and warp.
- During installation, it is required to leave gaps between the wall and the bars, compensating for the displacement of the geometry of the latter under the influence of temperature and moisture.
- A wooden frame is considered less durable than a metal profile structure.

The metal frame is devoid of these disadvantages. It is resistant to the effects of the external environment and microorganisms, durable and practical. With minimal construction skills and the necessary tools, it is easy to assemble it with your own hands. Mounting the frame from the profile will require careful calculation of the required material and various auxiliary elements: suspensions, crabs, connectors.

Types of ceiling frame
The crate is of two types:
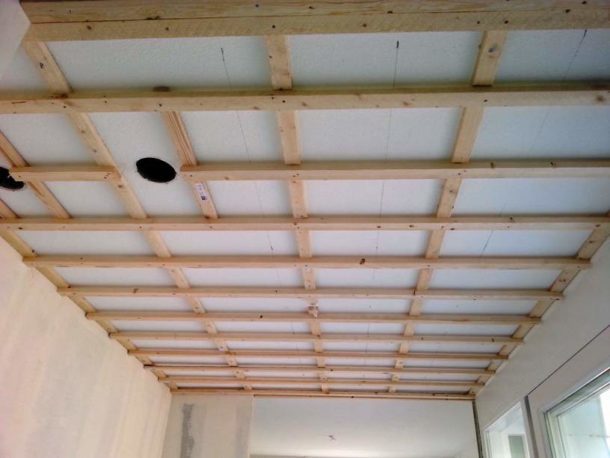
- Cellular, when the supporting profiles or bars create a kind of lattice (see next photo). As a rule, it is used in most cases of leveling the ceiling with drywall.
USEFUL INFORMATION:Niches from drywall with plasterboard: how to make a frame and install lighting

- Transverse. Profiles or rails are located in only one direction, and the gypsum wall board is attached to them across. This method is usually used by experienced craftsmen.

There are also single-level and multi-level designs. A ceiling of two or more tiers is quite complicated in the calculation and installation, but all the costs more than pay off the original appearance. To develop projects of such structures, it is better to resort to the help of a professional designer.

Necessary materials and tools
Since metal frames are most often used for leveling ceilings, we list all that is required for their installation.
From the tools you need to cook:
- Levels. Will fit and bubble, but better laser. Buying it specifically, if there are no plans to professionally engage in repair work, it makes no sense. It is better to borrow from friends or rent. The water level is easy to do with your own hands.
- Puncher for making holes in the wall under the dowels, on which profiles will be mounted.
- Drill and drill bits for metal.
- Screwdriver.
- Hammer, metal scissors and tape measure.
It is convenient to use profiles for connecting profiles cutter. It provides better fastening than small metal screws (they are also called “fleas”, “bugs” or “seeds”).
Of the materials required:
- Profiles - bearing and guiding. Fasteners: suspensions, crabs, metal screws, dowel-nails.
- Damper tape.

To determine the exact amount of material will help a correctly drawn frame diagram.
Charting
Depending on which type of frame is selected, the necessary measurements are carried out. Then, a diagram is drawn on a sheet of paper taking into account the features of the selected design.
For mesh frame:
- The length of each wall is measured. Each one, since often the opposite walls in the apartments do not match in size.
- The floor-to-ceiling distance is measured in the corners of the room and in its center.
- The thickness of the suspended structure is laid off from the lowest point of the ceiling. It depends on what will be placed in the space between the base surface and drywall. This can be insulation, sound insulation, lighting elements, wiring or other communications. The minimum distance between the ceiling and drywall is 50 mm.
USEFUL INFORMATION:Beautiful stretch ceilings for the hall (13 photos)

- The arrangement of bearing profiles and cross-sections is drawn. In this case, it is necessary to choose the optimal step so that the sheets are sure to dock on the profile. Usually the pitch is 60 cm.
- The result is a grid with cells of the same size. On it it is necessary to designate the mounting points of the suspensions with a step of 30-40 cm.
- It will be useful to apply to the circuit all communications and the location of the lamps.

For transverse frame:
- The height of the structure is chosen according to the same principle.
- The step of the bearing profiles is 0.5 meters.
- The locations of the suspensions are determined in the same way as for the honeycomb frame.

For multilevel constructions, a clear algorithm does not exist. The order of work depends on the number of levels, the location of the boxes and other features of the design ceiling. But the general principles for the placement of fasteners remain the same.
Preparatory work, transferring the circuit to the ceiling
Preliminary preparation consists in liquidation of an old covering. All elements are removed for which there are doubts about the fastening strength. Large cracks are sealed with cement and then putty.
At this stage, you also need to get rid of stains of fungus or mold, if any. It is better to treat the entire base surface of the ceiling with an antiseptic to prevent their occurrence in the future.
After preparing the base, you can proceed to the marking according to a pre-compiled scheme. It is convenient to carry out using a chopping cord or masking thread. The scheme drawn on paper is transferred to the walls and ceiling. Not only the position of the profiles, but also the mounting points of the suspensions is noted.

Frame mounting
Work order:
- In the guides, holes for the dowel-nails are drilled in advance with the intended step (sometimes they were made at the manufacturing stage by the manufacturer).
- A damper tape is glued to the side adjacent to the wall. It is needed so that sound vibrations are not transmitted from the wall to the frame.
- Guides are attached to the wall. The bottom edge of the profile should coincide with the line on the wall.
- Suspension is being installed. The step between them is 60 cm. If the frame is cellular type, they should fall between the jumpers.
- Support profiles must be trimmed by about a centimeter. This is necessary so that the structure does not deform with the possible expansion of the metal under the influence of temperature.
- Installation of the profile begins from the place of its interface with the guides. For fixing, metal screws are used.
- Aligning the leveling rails to the level, attach them to the suspensions. All profiles must be strictly in one plane.
- If the structure consists of cells, the cross members are attached. It is preferable to arrange them in a checkerboard pattern. The joints are strengthened by crabs.
USEFUL INFORMATION:GKL installation on the ceiling: technology, design, cost

Some experts recommend assembling multi-level ceilings, starting from the lower level: this way the design will be more durable and rigid. The necessary bending of the guides is achieved by notching them at certain intervals. The stronger the bend, the more often the incisions.
First, vertical racks of the required size are attached to the guides, and then the lower edges. All elements are interconnected with screws or with a notch.

Drywall Mount
Dry-cut pieces of drywall are mounted on the finished frame. The ceiling is a prominent place, so saving on the quality of the material is not worth it. It is better to choose the goods of a well-known manufacturer, for example, the Knauf company.
- GCR is fixed with self-tapping screws with a step of 10–20 cm, recessing the heads into the material by 1 mm.
- After this, the seams are processed: sealed with putty and reinforced with reinforcing tape. Joint processing technology described in detail here.
- The entire surface is primed and is ready for further finishing as it dries.
Any questions regarding the layout and installation of the frame, ask in the comments. An experienced master will answer them.

EXPERT SITE
Tsugunov Anton Valerevich
Master Station Wagon
- Since 2003, I have been engaged in the repair and decoration of premises.
- Over 100 completed objects.
- I appreciate the quality, more than the quantity!
Personal page >>>
Friends!
I offer you the service "Friend Builder"
As this site develops, subscribers and visitors are turning to me more and more often asking for help with advice on various issues of repair and decoration.
Questions are sometimes asked very complex and interesting. You can’t write an article for each situation, so I decided to advise you individually.
Thanks to you, friends, a new direction of my favorite work has been born - share your experience and benefit everyone who is undergoing repairs!
Get a one-time consultation from me >>>
Order full apartment repair support >>>


