How to make a dome house - step by step guide for the construction of 6 stages
Table of contents
-
1 Features of residential houses in the shape of a dome
- 1.1 How to construct the dome home
- 1.2 Varieties frame domes
-
2 Construction of the geodesic dome home
- 2.1 Step 1: preparation of tools and materials
- 2.2 Step 2: production of foundation
- 2.3 Step 3: Installation of foundation of the house
- 2.4 Step 4: assembling the supporting frame
- 2.5 Step 5: Sex arrangement
- 2.6 Step 6: the dome lining
- 3 conclusion

Despite the seemingly small size, the dome inside the house is very spacious.
You want to impress your guests or neighbors in the area unusual shape of a country house? I'll tell you in detail how to build a dome house with his own hands. For those who question the wisdom of such a decision, I will describe all the positive and negative sides domed buildings, and step by step instructions visually confirm my words.
Features of residential houses in the shape of a dome
Self-supporting construction of a spherical shape began to build in the last century, but in housing domed houses appeared relatively recently.
Among the private developers have a lot of supporters and opponents of this form of house. I did not bow down to the one or the other, but simply give the obvious facts:
Benefits:
- Low cost:
- For the construction of the dome of the building requires much less time and building materials than for the construction of a model of a wooden or brick home with the same area;
- Accordingly, in this case, the construction cost is reduced, and the speed increases.
- Low weight:
- A thin-walled spherical shell has a low specific weight, so you can use melkozaglublenny tape or pier foundation for the erection of such a building;
- For the same reason, these homes can even be built on unstable or heaving soils.
- Self-supporting:
- Spherical dome itself has good self-supporting capacity, so it does not require any support or supporting structures (columns, beams, girders and so on.) The elements for him;
- If necessary, you can always install the power components within the home, for example, to maintain the ceiling of the second floor, balcony or attic.
- The even distribution of loads:
- Arched ceiling under the influence of the vertical load is always in compression;
- The vector of the applied force is directed tangentially with respect to the hemisphere, which also has an ideal aerodynamic shape;
- The combination of these factors provides a high seismic resistance and ability to withstand significant snow and wind loads.

Heated minimal space and efficient distribution of hot air can save up to 30% of the fuel for heating houses the dome.
- Good energy efficiency:
- Heated volume dome Housing 30% less than the internal volume of the standard building with the same area on the floor;
- In the spherical house no cold corners and ceiling joints, which largely lead to heat losses;
- The arched shape of the dome in a more even and smooth distribution of the heat flow.
- Free planning:
- The hollow spherical shell allows you to perform the internal layout of the premises in the building at its discretion;
- If you are such a plan eventually get bored, you can always alter it without altering the building of the structure.
- Original design:
- Residential building hemispherical shape has an unusual appearance, so it will focus on the attention and visually stand out among the other buildings of the private sector.
- In order not to disgrace the neighbors, you need to properly consider the concept of outdoor design and architectural style.
Disadvantages:
- The spherical shape It may not be very convenient for the usual space planning, as well as for the arrangement of furniture, plumbing fixtures and appliances.
- The complex architecture. We round the house harder to make the porch, doors, windows, balconies and other architectural elements.

Inside the dome is loosely provided a full two-storey house for a big family.
How to construct the dome home
For individual building dome homes use several technologies:
- Monolithic concrete vault It produced in the form of a thin outer shell reinforced monolithic concrete:
- Steel rebars welded lightweight frame hemispherical shape;
- By itself, it has practically no stiffness so supported by temporary props;
- Inside and outside frame around the perimeter of installed sliding formwork, and concrete is poured inside it dissolved;
- As concrete pour cleaned some formwork section, and it moves up, whereupon it is poured into a new portion of the solution;
- When all the concrete fully hardens, formwork is removed, and remains sturdy reinforced shell in the form of a hemisphere.

For pouring the concrete formwork inflatable dome used as a large cylinder with compressed air.
- Dome of brick or stone you can build even without special equipment:
- The round foundation perimeter laid several rows of bricks;
- Laying first rows is vertically plumb;
- Starting with 10-15 series, each successive bit of bricks is laid obliquely toward the center of the circle;
- With each next laying more bends, and its radius gradually decreases;
- In order to maintain the back rows are substituted by temporary supports, and at the end in the middle put the capstone.

Masonry dome made of brick requires a lot of experience, so this method is not suitable for beginners.
- Dome vault of foam to do with their hands is even easier, because it is collected from the lungs of finished spherical segments:
- Polystyrene sections from the finished sets are installed on a circular foundation, and bonded to each other by a special glue;
- Outside on the surface of the foam is laid reinforcing mesh, a moisture-resistant layer is then applied on cement-based plasters;
- The lower part of the facing hemisphere obkladyvaetsya clinker brick or tile, and the top is mounted on a flexible roofing bituminous base (roofing material, shingles);
- Interior finishing and plastering reduced to dome staining with reinforcing mesh serpyanku.

Foam dome, surrounded by artificial stone looks quite solidly and stylishly.
- Frame dome house It is assembled from a plurality of small pieces of wood or timber boards:
- All preform for the carcass of the dome have the same cross section, but differ slightly in length;
- They are mounted on a circular base, and are connected with each other in a strictly defined sequence;
- Outside skeleton is sheathed waterproof plywood or oriented strand board (OSB) 10-15 mm;
- The lower part can be plastered or covered with facing bricks, and the top of the arch of the dome cover flexible roofing materials;
- The inside of the carcass cavity laid thermally insulating material, and then executed decoration sheets OSB board or other paneling interior materials.

Semicircular terrace around the dome home can significantly increase the usable area.
Varieties frame domes
Frame construction technology involves the construction of a dome house bearing skeleton of one of two types:
- Stratodezichesky dome the house has an arc supporting frame. According to the structure of the lattice frame, he recalls parallels and meridians of the northern hemisphere:
- Circumferentially disposed plurality of foundation meridional radius segments that converge at the top in the central part of the house;
- All vertical segments interconnected parallel horizontal webs, which are uniformly arranged with equal pitch from the base to the top of the dome.
Benefits:
- Such a construction assembly with plating resists well the vertical and horizontal loads;
- The rectangular shape of the lattice cells, it is convenient to incorporate the standard windows and doors;
Disadvantages:
- The bearing capacity stratodezicheskogo dome is retained only if the complete set of linked elements and the presence of the outer skin;
- If a portion of the outer skin and the carrier segments removed, a house may crumble;
- For this reason stratodezicheskaya technology is not suitable for the construction of houses of spherical irregularly shaped with large openings or cut off a flat facade.

Stratodezichesky frame consists of a plurality of curved segments, similar orange segments.
- geodesic dome characterized by a mesh structure supporting frame. At first glance it may seem chaotic lattice, but in fact it is strictly codified:
- All the constituent elements of the geodesic dome bound in separate bundles of 6 pieces;
- These are connected by means of metal connectors, and are arranged at an angle of 45 ° relative to each other;
- Each tuft forming spatial polyhedron, similar in shape to a segment of the right sector.
Benefits:
- Interconnected beams provide good bearing capacity even without an outer skin, and also in the case where the scope is not fully assembled;
- This property allows the use of a geodesic dome grating for construction of houses the most unusual shapes, such as open-air terraces, wide apertures or flat facades;
Disadvantages:
- a large number of connectors and more complex engineering calculations required for manufacturing;
- The triangular shape of the lattice cells is not always convenient for cutting materials, as well as for the installation of plastic windows and doors.

Frame geodesic dome consists of a plurality of individual straight edges connected to each other at a slight angle.
Construction of the geodesic dome home
Step 1: preparation of tools and materials
To build a dome house with his own hands, does not require lifting equipment or special equipment, except for the sawmill. For the rest, you can do the usual set of household tools:
Instruments:
| Illustration | list of tools |
 |
Carpentry tools:
|
 |
Hand tools:
|
|
Gardening Tools:
|
|
Power:
|


materials:
| Illustration | List of materials |
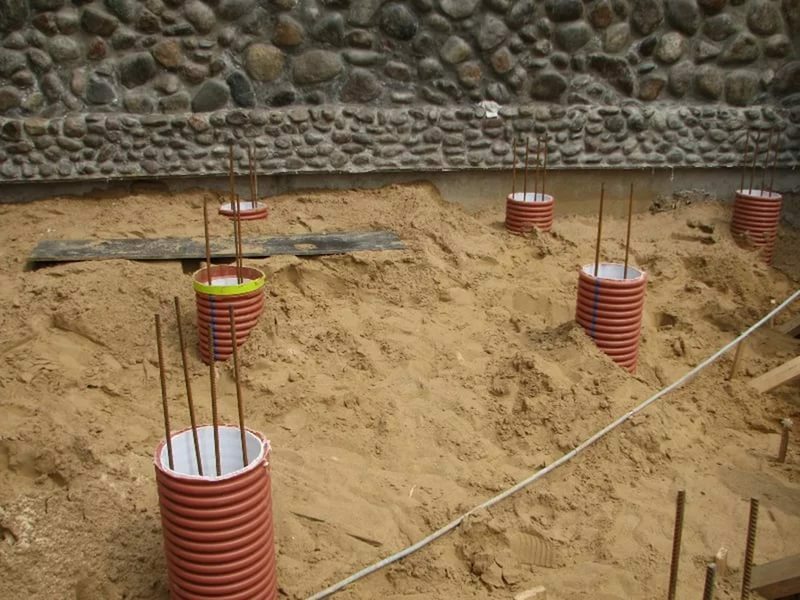 |
Materials for pier foundation:
Instead of plastic pipes can be used cardboard casings from large rolls or rolled into a 2-3 roofing material layer. |
|
Timber:
|
|
Thermal insulation and waterproofing:
|
|
fasteners:
Connectors can be welded to a thick-walled pipe of steel plates and 4-5 mm. It is convenient to use a jig made of plywood and wooden beams. |


Step 2: production of foundation
Building dome house with their hands always begins with the foundation. In this case it can be a tape or columnar. Last to make it easier and cheaper, so I will talk about the production of columnar foundation:
| Illustration | Description of work |
|
Marking territory:
|
|
Holes for pillars:
|
|
Pouring of the foundation:
At the time of the threads on the stud, it is desirable to protect the masking paper tape. |


To eventually under house grass did not germinate after mounting foundation, in place of soil excavated upper geotextile layer to be stacked, and the top fill layer of sand and gravel.
Step 3: Installation of foundation of the house
The construction of the dome house on the pier foundation can begin no earlier than 2-3 weeks after the pouring of concrete:
| Illustration | Description of work |
|
Scheme base:
So that moisture from the concrete does not penetrate into the wood, on the top of each column should be glued gaskets roofing. |
|
Stacking timber and radial lag:
|
|
Installation of vertical pillars:
|


Step 4: assembling the supporting frame
Carcass of a geodesic dome home, you can use a connector or connection beskonnektornoe faces:
- Compound with connectors designed for heavier loads, however, such a method would be more expensive;
- Beskonnektornoe connection easier and cheaper, but it can only be used for small-sized domes.
| Illustration | Description of work |
|
Lower section:
|
|
Installing the lower section:
|
|
Mounting frame:
|
|
Dome frame:
|


Step 5: Sex arrangement
Dome house on pier foundation turns slightly raised above ground level. To eliminate penetration of the cold bottom, in such houses do boarded flooring insulated with an inner tongue and groove decking planks:
| Illustration | Description of work |
|
Filing subfloor:
|
|
Laying insulation:
|
|
Installation of the finished floor:
|


Step 6: the dome lining
After mounting the frame to install windows and doors. Given the specific shape of the house, the window is better to order in a specialized workshop. The construction of outer and inner domes casing supporting frame:
| Illustration | Description of work |
|
Vapor barrier:
|
|
Kontrobreshetka:
|
|
Siding:
|
|
Exterior finish and waterproofing:
|
|
Warming and inner lining:
|


conclusion
According to the instructions described here you will be able to build a domed building on the site for 1-2 months. In this case, the materials required for 30-40% lower than for the construction of a classical building. I advise you also see the video in this article, and any questions you leave me in the comments.