Construction of saunas with their own hands - the main points, and step by step installation guide
Table of contents
-
1 Preparation for construction
- 1.1 The legal side of the issue
- 1.2 What bath building
- 1.3 What we build and where to save
-
2 How to build a sauna
- 2.1 laying the foundation
- 2.2 Construction of saunas
- 3 Output
I, like the majority of ordinary people have always believed that the construction of saunas available only to professionals. Now, however, gain experience, I'll tell you how to build a sauna, a turnkey basis with their hands, you need to do and what points need to pay attention.

Private steam room on the waterfront - a cherished dream of all lovers of baths.
Preparation for construction
From personal observation, I can say that the very construction of baths and saunas a lot of time does not take more questions must be solved at a stage of preparation, and a lot of questions: what to build, where to build, how to plan a room, how to choose the furnace, whether the contract is necessary to conclude the relevant authorities and so Further.
The legal side of the issue
First of all, remember: if it is your personal privatized land, no building permits separate saunas and baths do not need.
There is the Town Planning Code, which in article №51, which regulates the issuance of building permits, in paragraph №17 is written, All such facilities are ancillary outbuildings and a separate pre-registration is not need.

Town Planning Code of the Russian Federation as the main instrument in the field of construction law.
Therefore, if an official of any rank and any instance needs to issue some documents, and even more asking money for it, then it is either not familiar with the town planning code, or you're dealing with fraud.
But after you build a sauna, you still it is desirable to formally register, otherwise problems may occur at the conclusion of the sales agreement, donation and other legal matters.
What bath building
Here we choose from three options, Turkish bath, Russian bath and Finnish sauna.
- For Turkish baths need a lot of water in these buildings high humidity and relatively low temperature to 65 ° C, plus continuous revetment tiles or stone require major investment. And most importantly, our people are not accustomed to such baths, we need Steam;

Turkish hammam - a bath is good, but the lover of her pretty hard to build.
- For classical Russian baths need to build wooden house. Steam them, of course, there is, but the humidity is also quite high. Ovens in Russian baths are built of brick, and to put everything in working condition, you need at least 3 hours;

Classical Russian bath is not always possible to build.
- For Finnish sauna enough to have a heat-insulated room and the stove-heater of any design. Temperature and humidity you handle yourself, plus with a good oven to heat the steam room can be an hour. This fact explains the huge popularity of the baths.

Small Finnish sauna - this is the most suitable option for the amateur.
What we build and where to save
| illustrations | recommendations |
 |
wooden bath. Wooden bath can be built from logs or from the timber to build the carcass structure. The log is Round and Round:
|
 |
timber is glued and profiled:
|
 |
Frame bath appeared relatively recently and if the budget is limited, and want to quickly bath, it is ideal, in a nutshell it looks like this:
If the foundation is ready, then a couple of weeks you can completely build bath turnkey. |
 |
block structure. Here, choose between the bricks, cinder blocks, as well as gas and foam concrete. Construction bath with his hands in brick really only if you know how to lay bricks. Otherwise recruit human or discard this material; |
 |
cinder block putting lighter than brick, plus the price for it is quite acceptable, but the boxes get cold, it will necessarily have to warm; |
 |
Cellular concrete (Gas and foam concrete) is easiest to build. Large light units are placed on a special adhesive, which is applied in a thin layer, I did it the first time, but then the walls definitely need to be plastered. |
 |
Choosing a cheap roof. It is believed that the most economical and easiest option is slate, but it will have to be changed after a maximum of 15 years. I covered my bath standing seam roof. Painted galvanized worth not much more expensive than slate, and it starts a guarantee of 25 years. Instruction is available there, with a small roof for the bath you are exactly right, but will have somewhere to rent special pliers to crimp the seams. About roofing forget - this is a temporary option, he will stand for no more than 5-7 years. |
 |
What furnace set. Brick wood-burning oven deservedly considered the most reliable and durable, it's a classic. Small brick stove in the bath, of course, you can lay your hands. But the point is troublesome. Under a separate heater to pour foundations, purchasing two kinds corpulent baked bricks (red and chamotte) and special masonry mortars. Plus there is always the chance of error, and then the oven will have to shift. A good master of this work will take at least 20 thousand. rub. |
 |
Electric - withamy fast and almost a win-win:
The only negative is the big bills for light. |
 |
Metal wood ovens, in my opinion, the best option for the amateur:
|
How to build a sauna
Building their own hands saunas can be divided into 3 stages:
- Laying the foundation;
- The construction of the box (walls and roof);
- Interior decoration, where the most important thing is the arrangement of the steam room.
laying the foundation
| illustrations | recommendations |
 |
piles screws. The quickest and easiest option is to build a foundation by means of screw piles of metal:
|
 |
pier foundation. This foundation will cost much cheaper, bearing capacity it is about the same as that of the metal, but its arrangement you will spend at least a month:
|
 |
|
 |
asbestos cement pipe with an inside diameter of 150-200 mm can be used instead of "shuttering" of roofing material, but such columns will cost much more expensive. |
 |
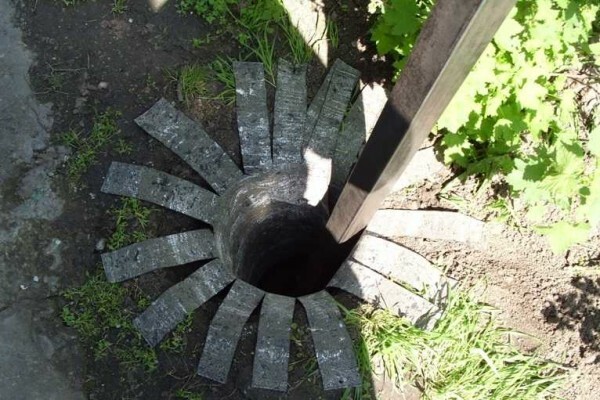
Band-pier foundation. This versatile design, it is able to withstand even the most heavy brick bath:
|
 |
Keep in mind that can not be linked back to back, they need to bend and lay, or over time may crack corners in the regeneration of the reinforcement cage in the corners of the foundation tape reinforcement bars. |
Construction of saunas
| illustrations | recommendations |
 |
Treatment of walls. Sauna room damp, so from whatever material it is not built, before finishing the walls, floor and ceiling must be covered with soil with an antiseptic function, preferably a couple of times. |
 |
floor arrangement. In the rest room floors can be made of any material, but washing and steam room floor is coated only with tiles, it is better to take the granite or ceramic tiles. Technology usual:
|
 |
installation of ventilation. In the farthest corner of the steam room, in a wall or ceiling mount forced ventilation. At the inlet pipe is placed a check valve. The influx is installed from the bottom, in the area of the door or doors are made with a gap at the bottom of the order of 30-50 mm. |
 |
Lathing on a wall. Before installing the battens on the walls lapped attached vapor barrier. Please note, the steam is always moving from indoors to outdoors. Lath do of wooden bars section 50x50 mm. The bars are mounted on a dowel "Quick installation". Cell sizes are selected by size of mineral wool slabs. |
 |
Lathing for ceiling. In the steam room ceiling must be no higher than 2.1 meters, so it is easier to warm up, so its level often have to be omitted. To do this, first at the ceiling mounted metal hangers, and already they are attached bars of crates. |
 |
electrical wiring. Wiring is installed either in the walls or under the crate. All cables must be heat-resistant and clad in plastic or corrugated metal hose. |
 |
Construction of the furnace space. The angle at which the planned installation of bath furnace obkladyvayut silicate blocks. Make sure that the adhesive is also heat-resistant. If you put a wood stove, and the furnace will be in the next room, the niche circuit also need to impose such blocks. |
 |
installation of insulation. The only mineral wool slab can be used as a heater for the steam. Plate should be 10-15 mm wider than the cell, then she would get tight, without gaps. Foam and its derivatives can only insulate the rest room, and washing in the steam room, this material is strictly contraindicated. The fact is that at temperatures above 70 ° C polystyrene begins to decompose. |
 |
Mounting foil. Above the insulation overlap is fastened by a stapler foil or paper foil. In this layer dual function: firstly it acts as a waterproofing and protection against moisture wool, and secondly reflects heat inside the steam room. All joints between the webs of foil glued foiled tape. |
 |
Crate under the bunk. From above through the foil to the basic crate galvanized screws fasten furring strips under the bunk. I used strips of 30x40 mm. |
 |
Door installation. Doors for steam rooms are sold together with the door frame and mounted in a doorway on the anchor bolts. Doors can be made of wood or tempered glass. The price of this item starts from 4000 rubles. |
 |
Finishing around the furnace. At least half a meter around the furnace walls are lined with refractory material. This may be a tile, natural stone or heat resistant man-made stone. Do not forget that the glue which will be stacked facing should also be heat resistant. |
 |
Facing steam clapboard. Molded board is mounted on the angle:
|
 |
choice of wood. Steam room decided to sheathe deciduous trees, usually basswood, aspen and alder. Solid wood, such as oak or walnut here is not suitable, since it will be very warm. Softwood sauna absolutely contraindicated, as they do not land, they still emit resin. As for the lining, it is necessary to buy only the premium (extra) or first grade (A). Molded is lower than the first grade with knots, and these swirls will crack and fall with temperature fluctuations. |
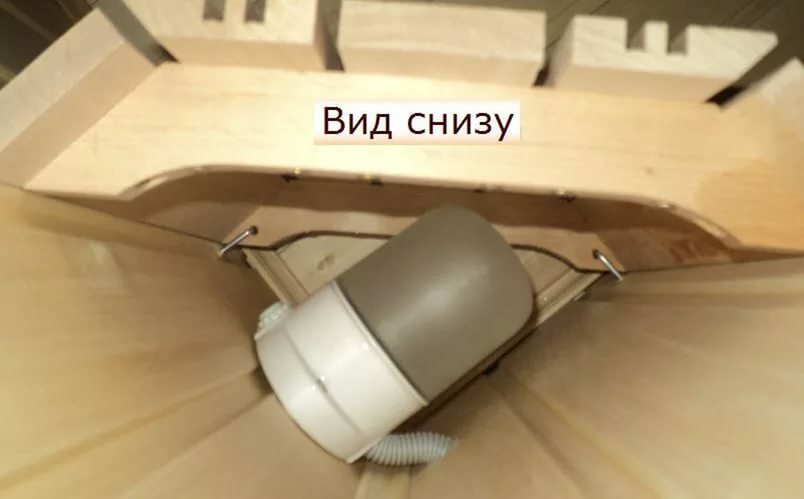 |
Luminaire. Fixtures for steam and hydro need to take termozaschischennye. Typically, the top they are covered with decorative wooden grids. |
 |
Putting shops. Bench or curtain in a small sauna is usually made bunk:
|
 |
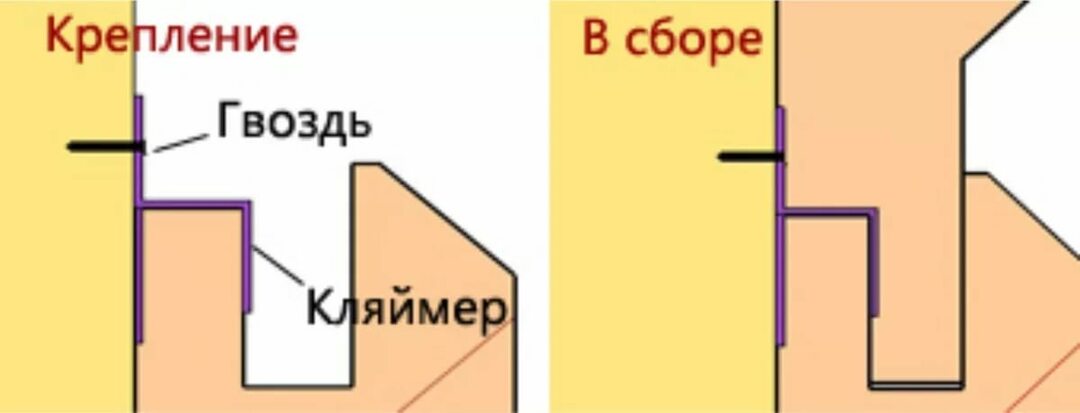
Fixing plinth. After the assembly and installation of benches, all the corners are covered with wooden baseboards. They need to be nailed studs, but in pre-studs biting cap. |
 |
put ladders. To wash floors was convenient, and you do not fall on a slippery tile on the floor are placed removable wooden ladders. As seen in the photos, the device is the simplest of traps, they can bring down their own hands or buy. |
 |
A few words about the stones. What got the stones on the stove can not put, it is dangerous, as they can "shoot". For these purposes, sell special minerals
The price of the stones starts at 80 rubles. per 1 kg. On the smallest stove in the average need about 10-15 kg. |
Output
As you can see, the construction of saunas with their own hands is a real challenge. The video in this article highlights the process shown in detail, if you have any questions, please write in the comment, I will try to help.

Wooden tub with bowl the required attributes of a good steam.