Repair of kitchen mixer: features single-lever ball, ceramic cartridge and designs with two taps
Table of contents
- 1 Preparing for repair
- 2 Repair of single-lever mixer ball
- 3 Repair of ceramic cartridge mixer
-
4 Repair mixer with two taps
- 4.1 The search for the cause
- 4.2 The sequence of work
- 5 Summing up
Repair of kitchen mixer - it is simple and the power of each. Doubt? Our school repairs will prove you otherwise.
 As practice shows, the vast majority of minor faults kitchen faucet easily removed by hand. In this case, you do not need any exotic instruments or expensive materials. To successfully repair enough of those that must exist in stock at any DIY.
In this article we will look at ways to repair the two types of structures:
- single lever;
- with two taps.
Preparing for repair
As with any repair, fix, we start with the preparation:
- Be sure to shut off the water, blocking the corresponding valves, which were installed on tap water from standpipes, while doing repairs in the bathroom. Drain the water from the tap.
- In order to collect the water, preparing a small container (preferably shallow and low flanges, so it will be more convenient substitute for dripping water).
- We find the statement that was included with the purchase.
When all of the above is ready, you can proceed directly to a repair.
Repair of single-lever mixer ball
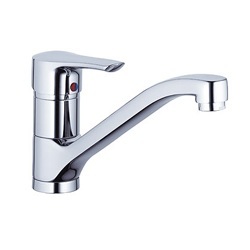
Single-lever mixer
Before proceeding to repair single-lever mixer ball, try to visually identify the cause of leakage. To do this, carefully inspect the crane.
The most common causes of leaks:
- mechanical damage to the body (as a result of the housing is formed crack or spall);
- wear of the inner lining.
In the first case (if a small crack) can try to eliminate damage to the sealant. But this measure is temporary and is only suitable for small damage. If it is cracked or chipped are of considerable size, the only way out is to be replaced.
If inspection of the surface of the body revealed no damage, but the crane still flows, it is likely that the case You have to deal with the replacement of the inner lining, which is worn out and has lost its elasticity over time.
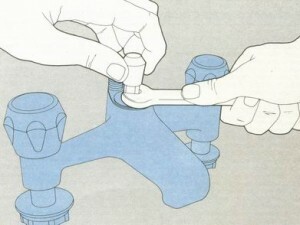
Replacement gasket requires complete disassembly. You can easily disassemble the valve by unscrewing the nut on his body. If the main body is covered with decorative cover (in some modern models of this housing serves an aesthetic function, concealing fasteners), slide the cover with little effort.
When access to the fasteners will be open, unscrew the nut and remove the structure.
Note! These guidelines are suitable for kitchen faucets, and some models faucets for bathrooms. More detailed instructions can be obtained by examining the documentation that comes.
Now, when the system is dismantled, note pad. Standard gasket for sealing compound is a rubber ring. Buy pads (different diameters, individually or in a set) can be almost any craft store.
The diameter of the gasket must be slightly larger than the diameter of the nest.
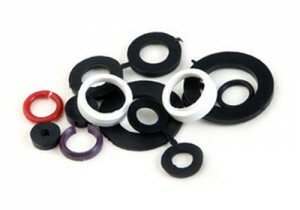
Sanitary pads. price - 20 rubles.
Take out the worn lining, in its place a new set of suitable size and design set in place, by securing nuts.
Note! Tightening the nuts after replacing gaskets, not overzealous - undue pressure on the gasket accelerates its deterioration at the waist compound.
If there was a leak in the mixer, built-in sink, which, in turn, is attached to the walls in the kitchen, here is somewhat more complicated repairs. The most common cause of leaks is a built-in ceramic cartridge wear.
Repair of ceramic cartridge mixer
The sequence of renovations:
-
With a sharp object (knife or screwdriver) poddevat link mechanism top cover. With a little effort the lid is removed, allowing access to the locking screw.
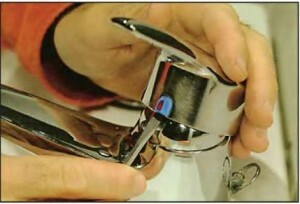
Removing the cover Lever
- Dismantling lever handle, unscrew the cap nut and decorative. After removing it, we have access to the root cause of the leak - ceramic (or brass) cartridge. Remove the cartridge.
- Matched install a new cartridge into the slot, ensuring that the holes and slots of the cartridge coincide with corresponding grooves in the housing.
-
After the cartridge is mounted, its anchoring tube nut, a decorative twirl nut and return the lever handle in place.

Cartridge
Repair mixer with two taps
If your kitchen has a mixer equipped with two cranes, eliminate leakage will not be difficult. As practice shows, these faucets are repaired easily lever.
The search for the cause
If failure is not associated with damage to the body, looking for the cause of a leak in the wear of the seal valve in the mixer. The easiest way to resolve this problem is tightening the nut until it stops.
Note! This method does not work if the oil seal is worn strongly enough. In this case, tightening the nut will not help, but also damage the threads with excessive force.
If the nut is screwed on tightly, and the leak eliminated, one way out - the replacement of worn-out the gland.
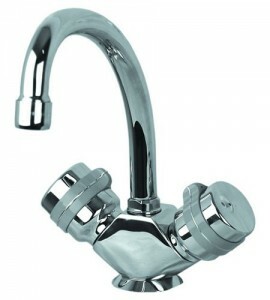
Kitchen mixer with two taps
The sequence of work
- Disassemble the union nut by unscrewing it using the appropriate tools.
- After dismantling the union nut pull out the hub gland. The resulting after removal of the sleeve seal gap laid. When laying need to very carefully and tightly wrap them stock. To do this, after each coil presses the seal as tight as possible.
- When winding the seal necessary to leave a gap large enough to hold the sleeve.
- After sealing wound, put the plug into place and fasten the coupling nut.
After the repair is made, connect the water. If we did everything correctly (in accordance with recommendations) and were sufficiently accurate, the water leakage through a worn oil seal must stop.
As you can see, repairing tap in the kitchen - it is the task of the shoulder is not even the most experienced master. With a minimum of tools, you can quickly eliminate the leakage, and possibly enough to avoid replacing expensive mixer.
Summing up
We hope our article has been helpful to you. In order to more accurately understand the technological and practical issues on our website provides detailed photo and video instruction, in which you will find useful information on the question.


