Textured plaster with your hands (30 photos) technology application from professionals
Table of contents
- 1 About the features of the material
-
2 The sequence of work
- 2.1 Preparing walls
- 2.2 Application textured plaster
- 3 Total
Often referred to as the usual decorative plaster texture, but this is not true. Performed textured plaster with your hands without mechanical action required her to provide relief additives: marble or granite chips.
About the features of the material
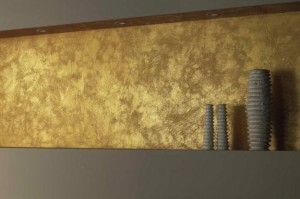
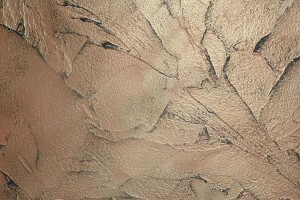
 Textured, it is also a structural plaster - and a viscous white heterogeneous composition, which comprises filling the granules of various fractions and binder. With the help of structural plaster with your hands, you can create a surface having a rough texture and varying degrees of granularity, raised the volume with a rich palette of colors, repeating texture of wood, stone, skin.
All that is limited to the result - your imagination, maybe you like the kind of wood, corroded bark beetle, it will require fine-grained material, which is called - "pitted" and embossed roller. Maybe you want to achieve the illusion of crumpled paper or snakeskin? An infinite number of options!
Applying stucco embossed roller (price - from 230 rubles).
For plaster walls outside the building is better to take cover, which consists of calibrated beads. For interior trim are more suitable for fine granules or unsorted mixed possessing factionalism.
To work with a coating having a large calibrated filler will need steel trowel / float, the thickness of the plaster layer must not exceed the dimensions of the granules.
If you prefer a material with a mixed filler, it can be applied and a roller and trowel. Permitted and spraying equipment, it all depends on the density of the mixture.
Fine-grained compositions - a liquid solution of lime-based, they are much easier to apply, you can do it by roller or a vacuum cleaner.
The sequence of work
Preparing walls
Works with decorative cover - one of the last stages of renovation or new construction. Before making a textured plaster, doors and windows should already be installed, all with floor and ceiling are finished, all the rooms free of dirt and dust.
After leveling the wall should be dry for 4 weeks, then, they must be covered with an acrylic primer.
Tip! If the base does not have sufficient density, it is necessary to treat the soil reinforcement. Walls in wet rooms it is recommended to impregnate antifungal compounds.
Primed shpaklyuyut wall, each of the layers of putty should be dry during the day. Further, it must be sanded with sandpaper slightly tapered.
First as a plaster angles, slopes and other places with mating components, in order to avoid cracking at all joints and interfaces use serpyanku.
Note! We do not recommend the use of finishing putty that hinder absorption, ie, materials based on gypsum plaster and oil-adhesive.
Before placing a textured plaster, it is strongly recommended to make a preliminary vykraski. This is necessary so that you can evaluate the texture of the finished lining and its color.
Application textured plaster
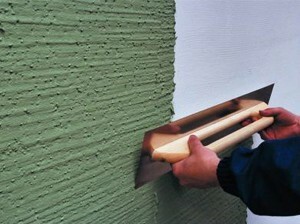
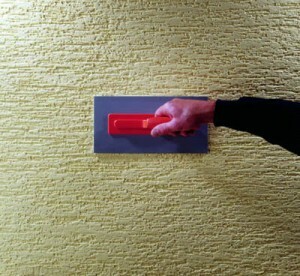
The photo application of structural plaster trowel
And now tell you about some of the methods of application of structural plaster.
To create decorated the walls, you will need the mixture itself, float or trowel, a tool similar to it, but on the other handle design - not in the form of "n" characters, but this: ¬.
Approximate textured plaster rate: 1-2 kg per square meter of surface. If the application process will require to make not one, but several layers, you will need more material. Therefore, think through just what you want to see your walls.
Instructions for tinting:
If you do not plan to leave the surface of applied plaster with his hands white, you will need to select the color for color chart provided by the manufacturer.
Please note that if you plan textured plaster walls with their hands in the kitchen or in the bathroom, where humidity increased, the dye should be selected moisture resistant and is not affected by household cleaners funds.
Mix the solution with the colorant in a proportion of 1:12 (form to the coating color and at the end of work).
Dial a small spatula and the mixture is uniformly distributed over the small portion of its Kelme. Next, putting the tool to the wall surface at an angle of 30 °, begin to apply to it a layer of 1-3 mm thickness.
Immediately with a large area is not necessary to work better to break the surface into small areas, about 1 m². Textured plaster - one of the most malleable and ductile kinds of plaster, it can take any form.
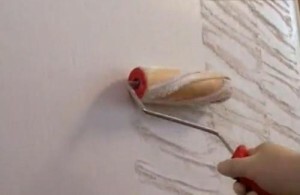
If you are not confident in their abilities, and can use ordinary masking nap roller. Repeat the same structure across all the walls is quite difficult without the skill and roll material roll can any of you.
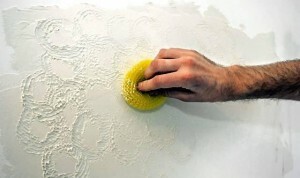
Application method textured plaster with sponge
Smooth movement, trying to keep to the same amplitude, roller spend the entire area of the treated surface area. Perform motion in one direction. Once finished plaster roll, walk on the wall a large spatula, a little smoothing is too sharp and protruding textural elements.
This method keeps the so-called pitted plaster - application of technology which, as can be seen, the most simple and easy to master it.
Instead of a roller, you can take any loofah or sponge, and the result is just as smooth with a trowel.
If you have patience and some artistic skills, you can use to create patterns embossed roller, brush, notched trowel or an ordinary.
Smears can be anything - wide, amplitude or, on the contrary, short and economical. It all depends on your imagination and think texture, which should be a result of the work.
Another fairly common technique that can create textured plaster - application technology called "scratch coat".
The coating is done in several stages. Before creating the next layer is necessary to the previous time to fully dry. Each layer is sprayed with a brush, a large brush or conventional broom. This makes it possible to create a fine-grained structure of the surface. The method is also very simple, but requires a little more time to exercise.
Plaster can dry from 6 hours to days, all depends on the flow plaster per 1 m2, the total layer thickness. At the final stage of the walls are painted, if you did not add the dye in the composition itself.
You can carefully paint the entire surface of the walls, and you can do something original and applied dye lightly with a sponge, brush or roller. Then smears should be done uneven. Here is unacceptable uniform staining.
Total
Thanks to the excellent technological properties of plaster your walls will be for many years protected from moisture, dirt, mold and fire. We hope that our material has been useful for you. We can only wish you good luck and offer to view the video in this article.