Plaster slopes: the necessary tools, preparatory work and design features plastic windows
Table of contents
- 1 Tool
-
2 The sequence of work
- 2.1 surface preparation
- 2.2 A few words about Malke
- 3 General guidelines on plaster
- 4 If you have plastic windows
- 5 Summing up
Of course, plaster slopes - work that requires skill and experience. And to undertake it better when you have learned the basics of simple plaster surfaces, walls and ceiling.
So, for those. who are not afraid of difficulties, our article - plaster slopes with their own hands.
Tool
 For any business needs a tool. Plaster slopes window is no exception. tool set will depend on what materials you use.
In any case, you will need:
- good level;
- aluminum rule;
- pencil;
- Malka;
- roulette;
- Spatula 5 cm;
- plywood or metal bevel;
- Master OK;
- tank solution;
- water container;
- hammer-kirochka.
Too long level will not work. He simply can not fit between the web and the sill. At the same time short run inconvenient. Select a middle ground, it will be the level of 1 meter. To support work in handy pistol and a knife with a sealant.
You may need and cylinder mounting foam, to "blow out" the gap between the window frame and the opening, in which it is installed.
If you use the prepared solution for cement-based plaster, you must get a float and trowel. If Rotband, large and small trowel, spatula and 45 cm and spongy float.
Overalls and work shoes should be comfortable and not interfere with the movement. Since the hands plasterer in direct contact with the solution, it is best to get a sealed nitrile gloves.
If you have seriously decided to learn such a thing as plaster technology slopes, take the time to Put together or independently of normal plaster boards goat. The work will go more fun, and safer it is. Plaster with a stepladder or a stool - a bad idea. This is very inconvenient, and about twice as long.
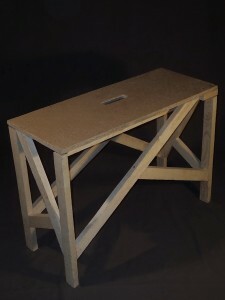
building goat
The sequence of work
surface preparation
Before plastering slopes of windows, it is necessary to hold a series of preparatory work.
Their quality will depend on further work as convenience and durability made finishes.
- The window sill is desirable to set up to start plastering. This will enable subsequently to seal the gap between it and the side slopes, as well as to enhance mounting strength.
Recommended securely protect it from mechanical damage and possible hit solution over paved with a dense layer of paper or after putting suitable for the size of the unnecessary pieces of drywall, if any remain after the finishing of plasterboard with their hands or ceilings walls.
- If the window opening has the remains of old plaster, paint or other contaminants should be removed. The solution should lie on a solid prepared by the plaster wall, and not on the dirt and dust.
- The window unit is also better to close the film. The unit production is possible to do film, sticking it to the window pieces of masking tape. It should also protect the handle, radiators and other hardware, paper wrapping them.
- Purification knife cut the excess foam.
- To improve adhesion (increasing curing the coating solution with a base) prime with primer surface, deep penetration. Its choice depends on the construction material from which the window opening.
- Then draw a vapor barrier. On the inner side walls of the foam need special seal or vapor barrier foil applied to it a layer of frost silicone sealant.
Tip! The sealant should be applied on a dry surface, the excess should be immediately removed.
Note! If you do not make a vapor barrier foam seal on the inside, with time may become wet from foam condensate and lose its thermal insulation properties, start sweating windows and slopes, pull out of the draft frames.
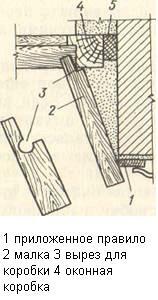
A few words about Malke
- Further, it should produce Malku. Malka - a template over which the plaster. If you look at the slopes, they are not just straight, and slightly expanded inward, forming the dawn of the window.
Usually it is made of a piece of plywood. It is a narrow fanerku a length slightly greater slope at 5-10 cm, a width of about 15 cm. One side has a cutout in the course of work is it will move along the slope. The second - on the set beacon.
With this device after removal Malka solution applied slope is straight. It is also necessary to make one more cut-through which will pass Window Hinges.
It is advisable to lightly remove the "facet" (round out a file) to plywood at work does not cleave.
Businesses use Malki metal of aluminum which is made to order. In principle, you can do without it, but there is no guarantee that the angle of the slope is the same everywhere.
General guidelines on plaster
The room temperature must not be lower than 5? C for mortar or + 10 ° C - for Rotband.
Do not try to cook once a large volume of the mixture. This applies particularly to plaster Rotband, which requires a fairly rapid technique works.
Before plaster slopes, necessary to make the calculation of the amount of solution. Its volume is determined based on the area of the slope and the thickness of the plaster layer of the future.
Plaster slopes carried out by the same rules as conventional plaster walls with corner windows only performed the dawn of Malki said.
This is done as follows:
- We determine the location of the slope angle.
- Expose him to the level of a rule and mark the position on the wall with a pencil.
- Malku tightly pressed to the window casement and slowly smoothed solution repose until until a smooth flat surface and the angle.
- Carefully remove the rule, gently moving it along the corner.
Plaster via bevel
Finishing is similar to plaster the walls with his own hands. Just before it is recommended to install at corners perfougol to protect the edge against mechanical damage.
If you have plastic windows
And now the recommendations how to plaster the slopes of plastic windows.
When the slope is already formed, but not yet dried solution must penetrate spatula groove between slope and the frame width of 3-5 mm and then fill it with silicone sealant. Cured silicone forms a protective lining.
The fact that the plastic windows (especially PVC profiles are not the best quality) under the action of sunlight greatly expanded. At the same time they can expand so that in place of the interface with the slope will crack. Silicone - a very elastic material, and will not allow it.
Summing up
We hope our article has been helpful to you. In order to more accurately understand the technological and practical issues on our website provides detailed photo and video instruction, in which you will find useful information on the question.