How to make plasterboard partitions (30 images): A Practical Guide
Table of contents
- 1 Types and examples of partitions
-
2 We start with the markup
- 2.1 Draw up a floor plan
- 2.2 Where to begin installation of partitions
- 2.3 Putting the base frame
- 2.4 Soundproofing, fastening sheets, sealing of joints
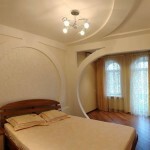
- 2.5 arched openings
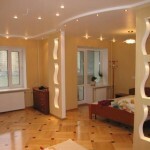
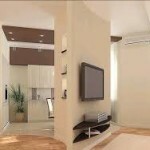
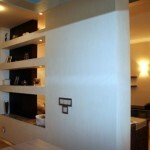
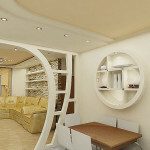
- 3 Photo Gallery
Plasterboard quite versatile material, and today we want to tell you how to make a partition of the drywall in a room on their own. We will not resort to the help of experts, and try to learn the tips and tricks you will find in this article.
After all, if you're a handyman, then you need to go through all the stages of building such structures as a partition in a room.

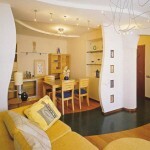
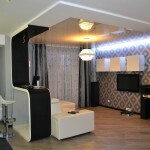
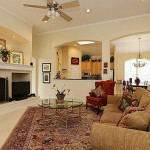
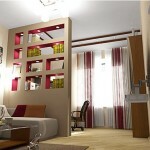
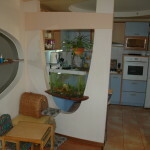
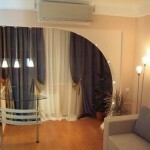
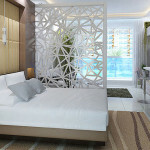
Decorative partitions, the subject of designer fantasies
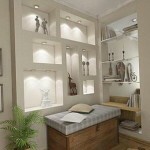
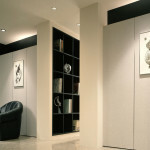
Types and examples of partitions
Due to the flexibility in the use of such material as drywall, we can create absolutely any geometric structure. As a rule, this design fits perfectly into the interior of the apartment, often due to the good idea of the designer.
Here are the basic construction of partitions that can be seen in our homes today.

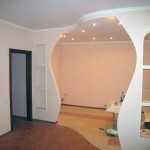
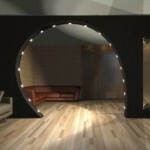
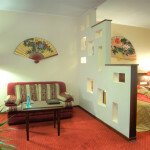
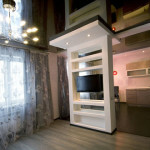
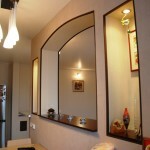
The design with an arch and windows
- The design with an arch - mostly in construction make arched doorway. Accordingly, in a doorway, or do not put all, or put in a decorative door, specially made for this opening. Perhaps the most popular design today.
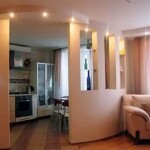
- Dividing wall with an angle - in this case the structure to be rotated, thereby forming a corner. As an example we can take a bath if you want to extend it, you disassemble the old concrete structure, and build a new one. When mounting a partition you will have angles of rotation in the kitchen or hallway.
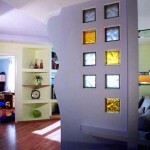
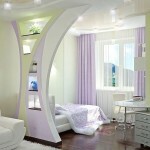
- The design of windows - this option is typically used designers, thereby making the interior of the special creative and sophistication. The office is also common to see this kind of technology, usually the window in such constructions provide greater flow of natural daylight.
You have to decide for yourself what kind of structure you want to build at home.
We start with the markup
Draw up a floor plan
The first step is to collect such a structure, we need to determine the markup, so we need to know exactly where it will be interior drywall. We should definitely extinct square the new building, which we want to get, because there need every square centimeter.
Gathering such a design once, you will already know how to make a partition of the drywall, and after can help their friends in such a complex case. But first, you better have a plan for future construction on paper.
You can use pre-existing otkserit floor plan, but you can draw his own. There is no fundamental difference, the main thing that you apply all of the dimensions on paper, and will visually know what in the future will have the dimensions of your new premises.
Where to begin installation of partitions
So you know exactly where to start the construction of such a structure, rather than marking time here are some recommendations before starting work.
- Make a plan for the future premises. This will greatly facilitate the installation. With all the dimensions on paper, you'll be sure to follow the drawing, and do not forget where it is.
- Decide on the location of the door opening, if it is. The door to the drywall should open freely. Consider the width of the door opening, maybe you'll have to put them in his furniture. If the opening is narrow some furniture in it just will not work.
- Soundproofing and heat insulation, important parameter of such a construction. Since we make a partition of the drywall, we need to know exactly whether we do or not soundproof. For example, if a decorative partition assembled with shelves and a variety of niches, the soundproofing is simply not needed. Well, if it's of interior structure, while on the contrary there needs soundproofing.
- Material - Calculate just how much material you will need to. Profile, drywall sheets, putty, is the basic materials you will need. Knowing the number, you will already know what the price or value of your partitions.
We proceed to the next stage now discuss in detail with the question of how to make plasterboard partitions and start assembling the frame.
Putting the base frame
Now that we are ready to get started, proceed to the most difficult stage, the process of mounting frame plasterboard partitions.

EXAMPLE finished carcass
First of all I would like to draw your attention to a profile for plasterboard partitions, which we will use in their work. So as usual partition structure includes a casing GCR with two sides, and the design will be a little different. Now it is very important to remember how to make a plasterboard wall with their hands, so that in the future you are focused in a situation without assistance.
So you will need a UD-profile 40 to 50, 40 to 75, 40 to 100, it all depends on the thickness of the planned construction. Typically, if you are planning a door in the wall, you should start with the profile of UD-40 to 75. This is just the size of the door frame.
Do not forget that you save every square meter of new space and the wider profile you choose, the less your new room. This must be taken into consideration.
Accordingly rack profile is necessary to take the size of CD-50 to 50, 50 to 75, 50 to 100 millimeters. It is this profile will make high-quality design partitions.
Initially, according to plan, we will make an internal partition may even be in the room, that's for you to decide.
Information!
Previously you need to know for any domestic purposes need this design.
From practical use depends on the material that will sheathe partition.
If it's just the division of the room, you can use an ordinary GKL.
If the construction of the future is expected to damp areas, such as the bathroom, you should use moisture-GCR.

The construction of interior walls sectional
Go ahead, and on the agenda we like to make a framework for plasterboard partitions, start to collect it.
The first thing to note, which will be the guide profile on the floor. To this end, according to your drawing set profile UDna place and fasten it with screw anchor to the floor. In this case, we do not forget about the doorway, if you have it planned. Then you can set the vertical supports of the guide profile, and also fasten them with dowels, but already on the wall.
Important!
This manual will greatly facilitate the installation of the frame, especially if you're building it for the first time.
Be sure to check the level of the building as you face the rack, or later all of your design can get littered.
And this can not be tolerated.
Then fasten the guide profile on the ceiling, then it seems to us question how to make a partition with plasterboard should arise. Ceiling profile must be reduced in a straight line with two wall rails. You can check the accuracy of the mounting using a conventional a nylon thread, attaching it at the corners and pulling. If your design is uneven, the thread will inform you about it.
When the guide frame perimeter may be ready to begin the installation rack profiles. Profile in this case is inserted at an angle of ninety degrees, i.e., so that the sides of the structure were from two sides. Thus, we get the plane, which in the future will tighten the screws when installing the GCR.
Rack profile should stand at a distance of 60 centimeters from each other. The distance is measured from the corner and to the rack profile center. It is possible to reduce the distance and set the profile to a distance of forty centimeters from each other, thereby ensuring the rigidity of our design.
Rack is attached to the guide frame of the press washer or a bedbug. Be sure to add the horizontal bridges, the height of the sheet, and in the center. At this stage, we can already say with certainty that you are almost at the end of the path, and know how to make a partition in a room plasterboard.
Soundproofing, fastening sheets, sealing of joints
Now the finished frame can be mounted drywall sheets. Here, too, there is a certain order to be observed.
First we fasten sheets with one side of the finished frame. We start on the angle from which you started to install rack profile. The edges must go to exactly the profile of the center.
If you notice that the sheet runs, it means that your measurements make a mistake. Correct it can just sufficient length to trim the sheet at the desired distance, and the following sheets should converge.
If you are interested in for the first time the question of how to make partition walls of plasterboard with their hands, these small nuances you need to consider first. Otherwise, you can skip the profile, and you do not what will tighten the screw, which is extremely undesirable.

Apparatus mineral wool soundproofing
After the one hand we have installed all the GC sheets, you can proceed to the insulation. To this end, better use of mineral wool. It not only absorbs the noise, but also non-flammable. Using mineral wool, we thereby increase the fire resistance of plasterboard partitions, absolutely in all areas.
But if we do not need insulation, you can immediately proceed with the installation of the FCL on the second side of our walls. Here the principle of operation is the same as the first side.
Well, that's when our frame is closed with sheets of drywall, you can proceed to sealing joints with putty. To do this, we take pre-cooked spatula serpyanku and diluted filler.
Joint compound is recommended to use putty "Fugenfyuller», KNAUF firm. In conjunction with the reinforcing tape serpyanku, this blend perfectly holds the joints and does not crack. The photo shows how to do it right.

Close up joints sheets of drywall
arched openings
Now that you know how to make a partition of the drywall, you can talk about how to make a half-circle of the profile and raise the arch, or poluarku. It all depends on your interior and fantasy.
Initially arch is a half circle, a diameter of the circle depends on the opening, wherein the installation is planned arch. But we need exactly one half of this diameter. To be precise, we calculate the radius of the proposed arch and causes marking.
After the marking is done you need a pair of scissors to trim the profile, so that we can bend it gently. Fasten it to the frame and set the ribs. Then on this foundation fasten GCR, pre-cutting and fitting pieces to size.
We hope that with our advice you are now, and you can tell yourself, how to make plaster walls, your friends, or boast in male company.
But to consolidate your knowledge, you can see the video, which tells about the simple installation, small partitions.
Photo Gallery