Precise ceiling marking - the key to successful installation of the frame for drywall Many people prefer to make the leveling of the ceiling with gypsum board, because it is quite easy to install such a structure. In order to properly assemble the plasterboard ceiling, you need to fix the crate. The frame for a false ceiling can be made from a metal profile or wooden bars. Before you start, you need to choose the optimal design dimensions and make a preliminary layout.
-
- Framework for the gypsum board ceiling: features and dimensions
- Ceiling for the gypsum board frame: step by step instruction
- Metal frame under the suspended ceiling
- Metal frame for the gypsum board ceiling:
- We install a ceiling made of plasterboard on a wooden frame
- Installation of a gypsum board ceiling( video)
Frame for a gypsum board profile: FeaturesAnd dimensions
Before you install a stretch gypsum plasterboard ceiling on a metal or wooden frame, you need to make a drawing. When you make it, you must take into account the configuration and size of the room.
The basis for the frame will be the UD profile. He will encircle the room around the perimeter. It is recommended that it is 5 centimeters from the base ceiling. Otherwise, the structure may become deformed.
 As a rule, before installing the gypsum plasterboard ceiling on the metal frame, make an exact drawing
. Also, when making the drawing, take into account the following dimensions:
- The CD profile must be placed parallel to the room. The distance between adjacent profiles should be at least 60 centimeters.
- If you are building a multi-level ceiling, the optimal distance between the suspensions is 40 centimeters.
- Mount the gypsum board to the profile in 25-27 centimeters increments.
Ceiling for a gypsum board frame: Step-by-step instruction
Layout is one of the most important steps, because it will depend on it to successfully assemble the profile and the structure as a whole. The markings should be applied to the ceiling after you have removed all defects and ground the surface.
In order to make the markup you will definitely need a laser level. This device will allow you to accurately mark up. Also for marking you will need a tape measure, a steel profile, a marker and a building level.
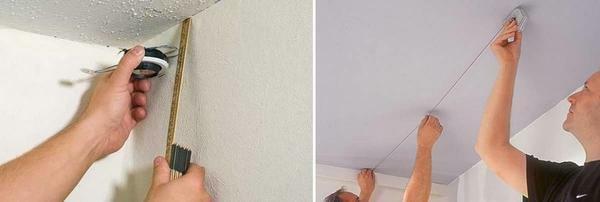 Before making the ceiling markings, all its irregularities and defects must be removed.
The ceiling must be applied:
- Distance between the hanging plane and the base plate. If you want to lay a layer of insulation, then the optimal distance is 40-60 centimeters. Also take into account the dimensions of the lighting fixtures.
- The size of the crate. The dimensions of the cell will be determined by the size of the sheet and the weight of the lighting fixtures.
- Placing the supporting structure. This size should be applied if you plan to install a multi-level ceiling. When choosing the optimum size, note that the wall should not be subjected to too high loads. If the walls in your room are made of concrete, then there are no restrictions.
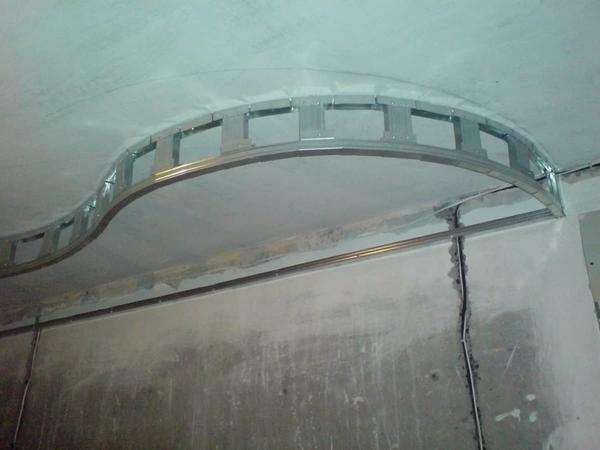
Metal frame under tension ceiling
The metal frame is made of several types of profiles. Every detail has its own purpose. In addition to the profiles, the frame consists of special fasteners. This can be a crab connector, a quick-suspension or a U-shaped bracket.
If it becomes necessary to strengthen the design, then it is rational to use the CW rack profile. It is installed in steps of 380-410 millimeters. Remember that it needs to be fixed in such a way that on both sides it was possible to attach sheets of plasterboard.
 When choosing a metal frame under a suspended ceiling, it is worthwhile to think in advance of the height of the planned construction
Also for the manufacture of metal frame is applied:
- Guide UD profile. This part is installed along the entire perimeter of the room. The width of this profile is 25 millimeters, and the length is 3000 millimeters. For finishing the ceiling, it is recommended to use parts made of thick steel.
- Carrier CD profile. These profiles are installed in the final formation of the crate. On the CD-profile, sheets of plasterboard are attached. The width of this product varies from 25 to 60 millimeters, and the length is from 3000 to 4000 millimeters.
- Arched profile. This profile has the same function as the carrier profile. However, this part has many incisions, which makes it easy to bend.
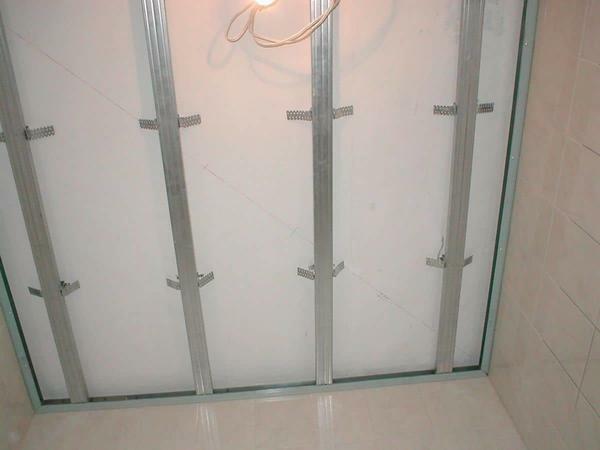
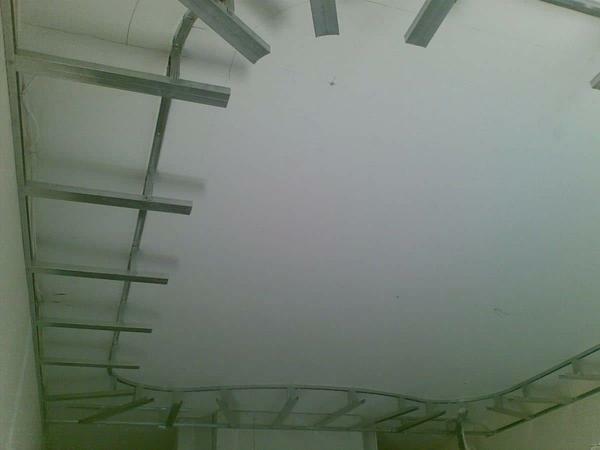
Metal frame for gypsum board ceiling: mounting diagram
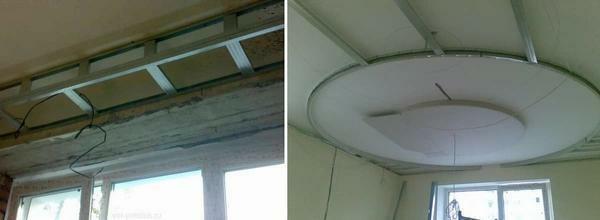
After you have marked the ceiling, you can start assembling the crate. For the construction of the frame you will need anchor fasteners or straight suspensions. If desired, you can use a crab-type fastener or clamps. To tightly fix the profiles on the carcass, you need to use drilling and piercing screws.
Before starting the installation, you need to determine the lowest angle in the room. After this, it is necessary to retreat from the distance necessary to hide communications and wiring under a suspended ceiling. At the resulting point, you need to set the laser level.
 The main stages of installing a ceiling from gypsum board - marking the ceiling and mounting the frame
Scheme of mounting the metal frame:
- Make a few holes in the ceiling. The distance between the holes is 40 centimeters.
- Insert the dowels and screws into the holes.
- Attach the guide rail to the wall. Repeat this procedure until you have installed the parts around the perimeter of the room.
- Attach direct suspensions to the ceiling.
- Pull several lines between the longitudinal guides. They will help you easier to navigate and make more accurate installation.
- Attach the load profiles to the direct brackets. It should be done very carefully, because the strength of the bearing structure will depend on this stage.
- Install the crossmembers. Secure them together with the help of "crabs".
- Sew the structure with plasterboard sheets.
We install a ceiling from gypsum board on a wooden frame
Wooden lathing is advisable to apply for finishing a private house. This framework is somewhat easier to install. However, remember that a tree can deform under the influence of moisture. Remember that the moisture content of the material should not be more than 13%.
For the production of wooden laths, use softwood bars. Such material is inexpensive and durable. Before installing the crate, do not forget to treat the wood with an antiseptic compound. This will protect the material from the effects of mold and fungus.
 As a rule, the installation of a ceiling made of gypsum board on a wooden frame is done in private houses
The wooden crate is installed in the following order:
- Mark the ceiling and walls. To do this, use the padded cord and the laser level.
- In the marked places, make holes with a depth of 3-4 centimeters. Remember that the diameter of the hole should not be more than 0.7 centimeters.
- Fix the rods in the suspensions.
- Fix the rods in the holes and hammer them with dowels. Do not forget that you need to glue the sealing strip on the back of the hangers.
- Fasten the brackets to the hangers.
- Pull the line to the same level as the attachment line.
- Align and lock the bars. For fixing use self-tapping screws.
Installation of plasterboard ceiling( video)
Install the frame under the gypsum plasterboard ceiling is not difficult. The main thing is to correctly mark the base surface and choose suitable materials for the crate. If you want to make a multi-level ceiling from gypsum board, then it is advisable to use a metal crate. Remember that for installation of multi-level structures it is necessary to use only those profiles that are made of thick steel. If you want to install a single-level ceiling and save money, use wooden bars for making the crate.