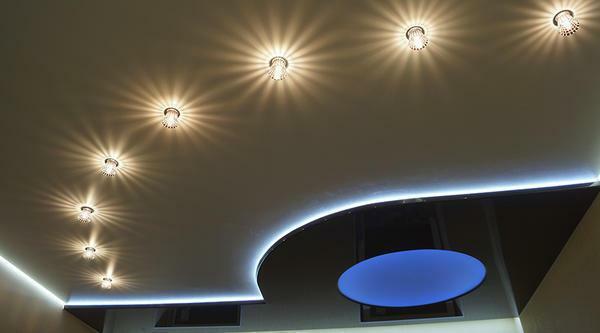
 The popularity of Armstrong's suspended ceiling is due to the ease and speed of mounting The Armstrong ceiling has become very popular due to its simplicity of installation and practicality. In addition, such constructions look very attractive. Mounting the ceiling Armstrong can by its own hands any novice. Due to the fact that the system of this design is very strong, such ceilings are durable. It is also easy to dismantle such a structure.
-
- Armstrong ceiling support technology
- How to install the Armstrong ceiling
- Step-by-step installation of the Armstrong ceiling
- How to assemble the Armstrong ceiling with your own hands
- What is the ceiling estimate for the Armstrong ceiling
- Dismantling the ceiling Armstrong: Step-by-step instruction
- Installation instructions for the Armstrong false ceiling( video)
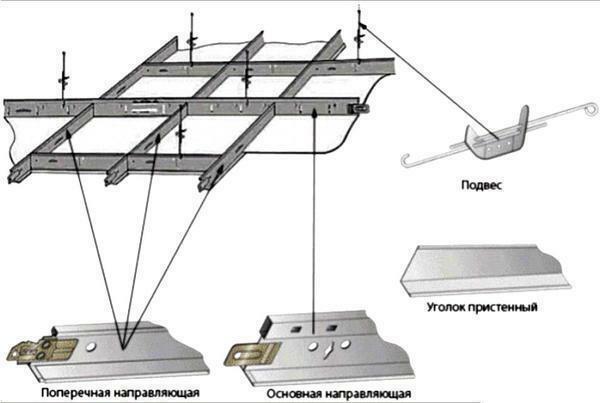
Armstrong ceiling support technology
Installation of load-bearing rails for ceilings of this type is the most difficult technical task. It must be done strictly according to the instructions, otherwise you will not be able to correctly install the entire structure.
Choose rails no longer than 3.5 meters. If you plan to install a structure in a large room, you can easily connect the rails with each other. To do this, use the special locks that come with these details.
During the installation of load-bearing racks on the ceiling, you need to install hangers. They will allow you to tightly fix the slats on the surface. The optimal distance between the suspensions is 1.5 meters.
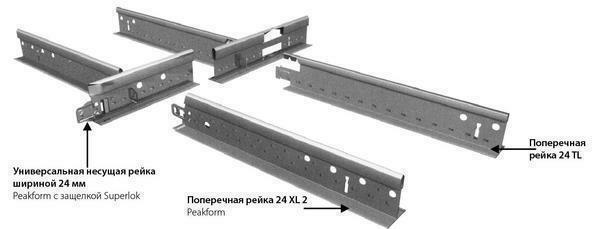 Suspended ceiling profiles are equipped with special fasteners that allow the assembly to be carried out as soon as possible
The suspension consists of 3 parts:
- Thrust with eyelet. This part must be attached to the ceiling with an anchor. If you do not have one, use the self-tapping screw. Tie rods with hook.
- . It needs to be attached directly to the carrier rail.
- Spring suspension. This item is needed for suspension length adjustment.
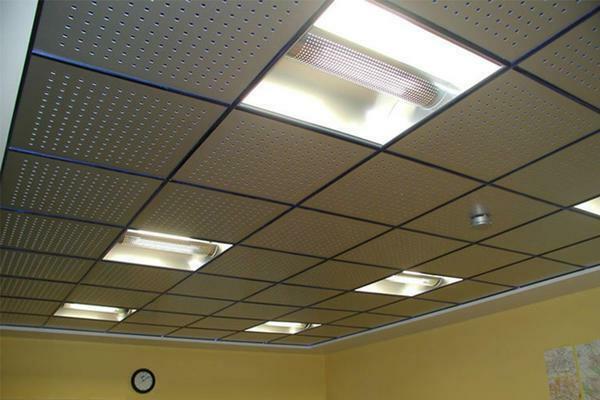
How to install the Armstrong ceiling
Armstrong ceiling installation begins with the selection of suitable materials and markings. When choosing plates, rely on individual preferences and interior design. You can purchase plates of different colors and textures.
If you want to paint the panels after installing the ceiling, do not use harsh chemicals. Experts recommend to stop their choice on acrylic paints. If you do not have the opportunity to purchase them, use a water-based paint.
 Ceiling marking for fixing the basic profile
Ceiling marking scheme:
- First you need to mark out the false ceiling rails. This will allow you to better assemble the structure. If you do not mark out the horizontal, you can mount the node incorrectly.
- In all corners of the room, place incisions. In order for the measurements to be as accurate as possible, use the laser level.
- Then measure the distance between the notches and the floor.
- Connect the dots together with a tracer.
After marking out, lay all necessary communications that will pass directly under the ceiling.
Step-by-step installation of the Armstrong ceiling
After marking and laying the communications, you can proceed with installation. Before you begin to collect the construction, prepare all necessary equipment and materials.
Remember that the room temperature should not exceed 30 degrees. Otherwise, the fasteners may become deformed. In addition, in the room where the assembly is carried out, the humidity should be no more than 65%.
 Suspended ceiling device layout Armstrong
Armstrong ceiling installation instructions:
- First, you need to attach an L-shaped profile to the surface. Profiles of this type can be adjusted to the required size with a hacksaw for metal.
- Then attach the T-shaped profiles.
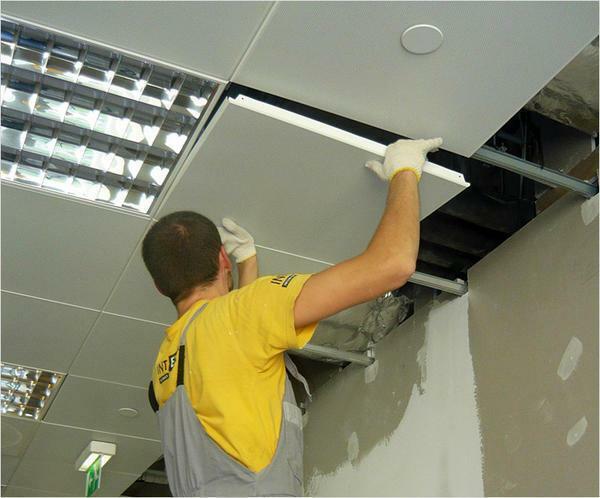
- Obtain the resulting frame with cassettes.
- Then install the lights on the ceiling.
How to assemble the Armstrong ceiling with your own hands
Stacking plates on a frame is a simple process that even a beginner can handle. Before making this operation, make sure of the strength of the frame. If you notice any defect, reassemble the frame.
Algorithm for laying ceilings Armstrong:
- Raise the contents of the cells.
- Enter it into the interstitial space.
- Carefully place the tile in the cell.
- In the end, you need to install a blind plate.
 Completes the installation of a false ceiling by laying blind plates in metal frame cells
If you have installed a tile in a curved way, do not push it from above. So you can damage the canvas. Curved tiles can be aligned by pressing them from below.
What is the estimate for the installation of the Armstrong ceiling
The estimate for installation is the amount of money that you will need to spend to purchase all the necessary materials for the installation of the system. To make accurate calculations, it is best to use special calculators on the manufacturers' websites.
When calculating the estimate, consider the cost of lighting equipment. Typically, for 10 m2 of ceiling you need to install 2 LED or fluorescent light bulbs. Undoubtedly, this formula is inaccurate and can vary.
When calculating the estimate, it is necessary to take into account:
- Room size. If the length of the room is more than 3.7 meters, then you will need to purchase specialized locks. Although, in some cases they are included.
- When calculating the required number of dowels and screws, consider the number of hangers.
- If there are projections in the room, be sure to take into account their dimensions when calculating the perimeter of the room.
Removing the ceiling Armstrong: Step-by-step instruction
Before dismantling the construction, stock up on the necessary tools. You will need a spatula, a hacksaw, pliers, nippers and wrenches. In addition, stock up with a screwdriver.
 A set of necessary tools will allow you to dismantle the suspended ceiling yourself
Before starting the dismantling, you need to remove the lighting fixtures from the tiles. To begin dismantling it is necessary with removal of decorative elements of the fixture. Do not forget to disconnect the wires first.
Dismantling is carried out in this order:
- First, you should gently bend the profile on which the last panel is fastened.
- If you used staples, remove them using a screwdriver.
- Remove the first panel. Do it carefully, because you can easily damage the profile.
- Remove the bracket and remove the second panel. Repeat this procedure until all plates are removed.
- Remove the frame from the hangers.
- Disassemble the suspension and angular profile.
Installation instructions for the Armstrong false ceiling( video)
It is not difficult to install the Armstrong type ceiling. Begin the assembly of the structure from the marking and communication in the ceiling area. After that, you need to calculate the cost of installing ceilings. And only after this begins assembling the frame and laying the panels. During work, make sure that the cloths lie flat. The construction is dismantled by bending the profiles and dismantling the tiles.