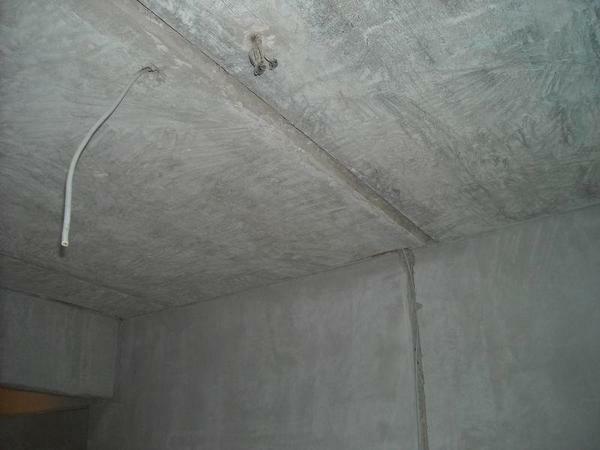
 Repair of the ceiling must begin with a study of its surface: the state of the base layer, the presence of cracks and roughness How to start repairing the ceiling?Of course, with the analysis of the surface - in what form the base ceiling, whether it should be leveled, etc. And the initial view can be different - from almost ideal, to requiring alignment. For example, in many, a new building requires embedding of rusts, furrows of docking concrete panels.
-
- Repair ceiling in the room: cleaning
- If the ceiling has old paint or tile
- If the ceiling is glued tiles polystyrene
- Proper ceiling repair: a primer and putty
- sequence ceiling painting
- Repair of the ceiling in the house with your own hands: adobe ceiling
- Finishing in the repair of the ceiling
And only then you can choose the future design, materials, etc. If you are afraid at this stage to make mistakes, invite specialists at least for diagnosis. They will tell you where to start and what needs to be corrected, and you will not worry about the further course of events.
Interior ceiling repair: cleaning
First, the ceiling must be prepared for repair. What this means is that you must clean it of the old finish. You can bring the ceiling in order and most. If the ceiling has been whitewashed, painted, plastered or wallpapered, it will not be difficult to get rid of this coating.
For this you need:
- Take the paint roller and the bar, moisten the roller with warm water and squeeze out a little;
- Then, roll a part of the ceiling, beginning with a slight pressure on the roller, ending with stronger clamps to the ceiling;
- As soon as you see that the roller has become dry again, dipping it again in water - and again you need to do the same;
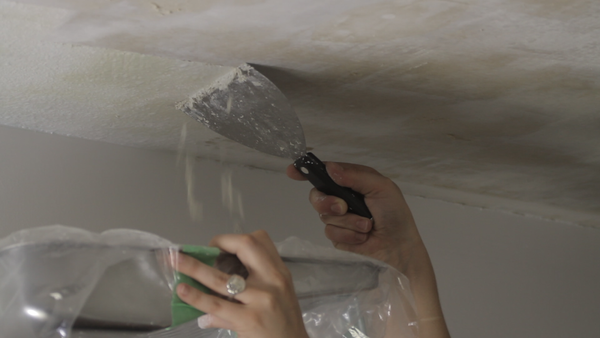
- After a couple of square meters of ceiling well to wet, take a tool such as a spatula, and clean whitewash, plaster or wallpaper to putty or concrete base.
 First of all, before the repair is carried out preparatory work: cleaning of the ceiling of the old paint layer
Next you need to do a test - to check the strength of the layer of putty. If it keeps well, do not remove it. If in doubt, remove this filler and apply a new one. A doubt will arise if the putty begins to crumble or flake off.
If there is an old paint or tile on the ceiling
Often the ceiling was painted with a simple oil paint or a water-based paint. Removing the paint is not so simple. The following methods are commonly used: chemical and mechanical.
Mechanically remove the paint either with sandpaper or with a spatula. But this is far from a new technology, the process is dusty and long. There are options and simpler - this is a special wash, you can buy it in the building materials store. When you impregnate the paint with a wash, you will have to wait 12 hours, the paint will soften and easily separate from the surface.
Remove latex paint from the ceiling( video)
If the ceiling tile is glued polystyrene
- Rid ceiling from such skin can be the same spatula with a sharp blade;
- After that, a part of the glue may remain on the ceiling, but it must be removed, otherwise the subsequent repair will not be possible.
These simple tips are just the beginning of the process, called the integrated ceiling repair. Do not ignore the stage of leveling the ceiling and removing the old finish, they directly affect what the strength and reliability of the new ceiling will be.
Proper ceiling repair: primer and putty
Without these steps, it is almost impossible to repair the ceiling. An exception is the erection of suspended structures that "allow" not to mess with alignment.
If you proceed step by step, the next step is priming:
- First you check the seams and joints on the ceiling, each seam and joint must be filled with plaster or plaster mortar, which is very firmly held there.
- Apply a primer to the surface, of course - deep penetration, this will improve the adhesion with subsequent finishing.
- Primer is applied with a brush or roller.
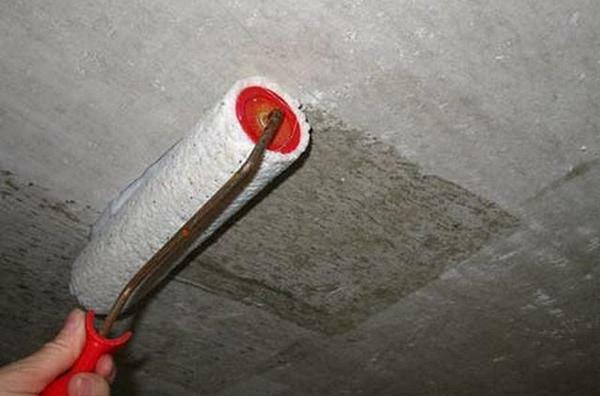 A primer layer of deep penetration is applied to the work surface to ensure better adhesion between the concrete ceiling and the subsequent coating
The following work can only be transferred when the current stage is completely completed. That is, when the primer has dried. Then you either shpatlyuete, or plaster the surface. Each master has his own arguments in favor of this or that method.
For example, plaster reduces the centimeter by three height of the room, and by weight it is not lightweight.
As for the putty, it gives a large shrinkage, which requires, respectively, the application of several layers. Stucco work is easier, and the time for this alignment process will be less.
Both the process of the wall plastering, and the process of the plaster ceiling are very similar. The only difficulty is that the plastering of the ceiling is physically heavier, since the surface is not vertical.
Sequence of ceiling painting
If the floor today, consider, do not paint, then the ceiling can still be transformed with paint. Many people mistakenly believe that this is not a European-style repair( although there is no such official term), but simply a cheap finish. At the root of the wrong opinion, today you can paint the ceiling very beautifully.
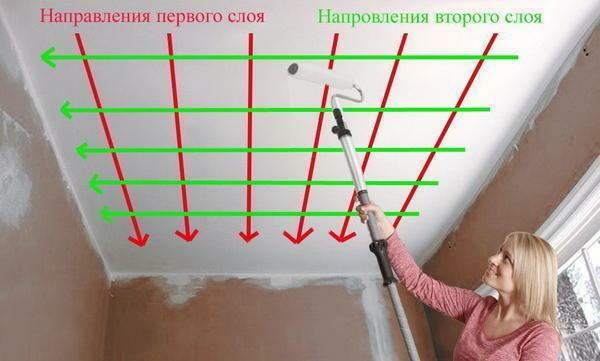 Painting of the ceiling coating starts from the room window, moving deep into the living room.
Painting is very simple:
- Dye the coloring composition to the optimum density( usually using water-based paints or oil);
- As a tool, you need a roller on a long bar and a brush;
- Begin painting from the edges, they just need, according to the rules, to paint with a brush;
- Cover the central area with a roller.
It happens that a painted ceiling needs partial repair. In places where the paint is swollen or exfoliated, you need to clean it with a spatula. Then this place can be painted over again. True, such methods are imperfect, with a partial repair of the ceiling still does not last long, you will have to remove the old finish and paint the ceiling on a new one.
Repair of the ceiling in the house with your own hands: adobe ceiling
Repair of the adobe ceiling is in some way overhaul. Today, such houses are practically not built, but nevertheless. It is assumed that once the house is made of Saman, then the ceiling in it is the same. Plaster of adobe and its composition depends on what components are used - sand, clay, organic fillers.
If a large percentage of the clay component, then take a fine-grained clay, which is easy to mix.
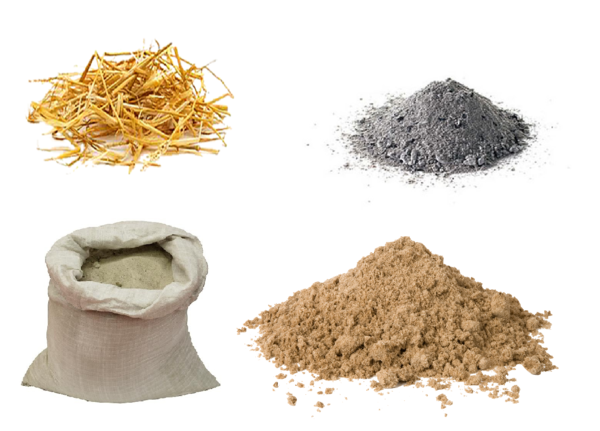 For the preparation of adobe plaster you need the following materials: water, sand, clay, earth and straw
For plaster you need to prepare such a solution: lime, clay and organic additives( proportions - 1 to 1 to 0.5).
Finishing in the repair of the ceiling
When the task is to "repair the ceiling from scratch", the work should be a long one. But what if the construction or basic repairs have already been completed, and now we just need ideas for finishing the finish.
A gypsum board, for example, can be painted. And not only the white color is in your arsenal. To help you come modern types of decoration, which can be estimated using the photo gallery.
For example, today the unity of the color of the ceiling and the floor is very popular. Both the floor and the walls are decorated with turquoise paint - most elements in this interior should be light. And a little bit, a little dark color is used. Turquoise, in this case, oddly enough, will not suppress. And soft soft colors of furniture and textiles will come to the forefront, and turquoise will perfectly cover the room.
Do not be afraid and liquid wallpaper for finishing the ceiling, with something made by yourself. Use paper, sawdust, mix the colors yourself to get the right color. Fashionable interior is always a little original interior, representing your tastes, your preferences and your aesthetic ideal.
Proper ceiling painting( video)
Apartment ceiling repair can be the simplest - removing old coatings and, for example, painting. And it can include alignment, which takes a lot of time. Choose high-quality materials, follow the instructions and do not be afraid of bold decisions.
Good luck in repair!