Sewage in a private home: how to make an efficient waste management system in 6 steps
Table of contents
- 1 sewerage scheme
- 2 Materials for the establishment of an autonomous sewer
-
3 exterior work
- 3.1 Step 1. The principle of operation and the calculation of the volume of the septic tank
- 3.2 Step 2. Installation and equipment septic tank
- 3.3 Step 3. Laying of pipes from the tank to the house
-
4 How to make a sewer layout
- 4.1 Step 4. Basic elements of internal network
- 4.2 Step 5. pipe connection
- 4.3 Step 6. Connection to plumbing fixtures
- 5 conclusion

Sewage system Private house includes interior and exterior storage device and sewage treatment
Sewage in a private house in definitely need if you live there permanently, and is highly desirable, if you bring there only during the summer months. I will help you understand the basic diagram of a device of sewer systems, and together we analyze the algorithm implementation of key milestones.
sewerage scheme
Sewerage system for private homes - an essential condition for a comfortable stay. Use the outside toilet and a cesspool can only temporarily. Sooner or later it refers to the establishment of an integrated system.
Before you make a sewer in a private home, you need to decide on its configuration. The easiest way to do it consistently:

In the presence of the sewer easy to connect to it
- Analysis of the available communications. If the village has a centralized sewerage system, the operation is simplified considerably. We can simply reach the collector trubyi connect to it.
To connect to a common manifold you need permission from the local administration, and the work itself is best left to professionals. But in any case it will be much cheaper, than to do the sewage tank.
- Determination of the tank type. Here we have only two options: a septic tank or cesspool. Septic tank to do more complicated and expensive, but it rarely needs to be evacuated, a cesspool - on the contrary. The optimum choice - septic, combined with a biological treatment station, but the high cost acts as a limiting factor.

Septic tank with biological treatment station - it's expensive, but effective!
- Selecting a location for the tank. In this issue should be guided by the existing standards, which define the minimum distance from the pits or septic tanks to different objects. It is desirable to find a point at the bottom of the relief (less dig) at a distance of at least 10 m from the house and a minimum of 15 m from the well / borehole.
- Isolation rooms.Sewer private home must bind together all the water drain point. It should bring them as close as possible to each other, because we determine where the bathroom is located. It is advisable to place it near the outer wall, on the side of the house where the tank will be - so we spend less effort and money for laying pipes.

The room under the bathroom need to allocate and prepare in advance
- Pre-planning. Based on this information we construct the entire system plan and pre-count, how many and what materials we need. According to calculations of the budget plan (once lay in it exceeded 30%) and evaluate whether the project will "lift".
If the preliminary stage was completed successfully, you can proceed to the procurement and execution of preliminary work.
Materials for the establishment of an autonomous sewer
Separate sewer chastnomdomovladenii device - it is a resource-intensive project. What is the minimum of materials required for its implementation?
Main article raskhodovotrazheny in the table below:
| Illustration | member |
 |
Ready septic tank. The optimum solution for autonomous sewer - installation of a septic tank industrial production (Tank, Triton and analogues). These products are equipped with multi-chamber reservoir of sufficient volume and all the necessary appliances for primary sewage treatment, so we will just install them. The main disadvantage - high price. |
 |
Plastic container for a septic tank. The tank can be used as a plastic (polyethylene, polypropylene) tank for storing waste. You can also buy a so-called "evrokuby". A plus - complete tightness. Minus - fairly high cost and the need for additional treatment devices. |
 |
Concrete ring. If you create a sewer sistemyprioritetom will be savings, the accumulation tanks and wastewater treatment can be made of standard concrete rings. shortcoming - the need for additional sealing capacity and complexity of installation. Without the involvement of a crane, probably not enough. |
 |
Pipes for outdoor sewerage. For compounds cesspool or septic tank used to house a special outer tube (orange color). They temperature changes well tolerated and does not deform even under significant pressure when laying on depth. |
 |
Pipes and fittings for domestic sewage. Domestic sewage wiring is formed of polypropylene (gray) in diameters from 110 to 40 mm. Together with the pipes is desirable to get the desired number of fittings for registration of turns, bends, revisions etc. D. |
 |
Pipe insulation. When laying the outer part of the network as well as communications during assembly in unheated rooms (plinth, basement), there is a risk of freezing tubes. To avoid this, it is desirable to insulate the sewage system using casings made of mineral wool, polyethylene foam, polyurethane foam, and so on. D. |
In addition to the basic materials that are used directly to create a system will be needed, and additional:
- gravel and sand for the excavation and laying of the drainage layer;
- grout;
- sealant based on water-resistant silicone;
- inspection chambers - if you want to lay a long or convoluted tubing.

Device inspection chambers for a private sewer
exterior work
Step 1. The principle of operation and the calculation of the volume of the septic tank
Installation of sewage in a private house includes two kinds of work:
- external - lie in the reservoir device (cesspool or septic tank) and the laying pipe to the house;
- internal - suggests installation of pipework in the house and connect to points of water consumption.

Cesspool easier to do it yourself, but it requires frequent pumping
If there is a possibility that these works are carried out in parallel, if not, you should start it with the outside of the device.
The most efficient design for autonomous sewer private house is considered to be septic. In contrast to the sump, it does not accumulate waste water, and ensures their processing. The output is a relatively clean water that is filtered into the ground, contaminating organic matter at a minimal level.

A diagram illustrating the principle of action of a septic tank
It works septic simply:
- settling. First, sewage flows into the first vessel - the sump. It is carried out the separation of sewage into fractions: solids precipitate (yl), light organics floats on the surface and in the middle portion of the clarified collected liquid. It also occurs bacterial decomposition of waste with isolation of gaseous reaction products and residues mineralization.

Overflow pipes that move clarified effluent
- overflow. In the first vessel wall is an overflow hole that is located at the level required. Through an overflow pipe clarified water flows from the sump into the second chamber, and the solid residues are retained.
- Filtration. In the second chamber (filtration or drain well) pass through clarified effluent drainage layer at the bottom. Drainage delays still part of pollution because the soil is almost pure water is supplied.
That is the way the factory septic tank
According to this principle works almost all the septic tanks - both homemade and factory. The difference lies in the construction of reservoirs, as well as their amounts. Sometimes a septic not two, but three chambers - then between the sump and the filter capacitance added another reservoir for a more effective purification.
Before you arrange a septic tank, it is necessary to calculate the optimal amount.
Calculation of the volume of the septic tank is performed by the formula:
V = n * Q * 3/1000where
- V - the required amount of septic tanks in cubic meters;
- n - persons residing in the home;
- Q - water consumption rate per person liters per day;
- 3 - the average duration of cleaning drains days.

For large families may need to design with significant volume, sometimes - with additional cameras
Assuming a rate of flow approved in SNIP 200 liters, then, for example, for a 4-person capacity will be as follows:
V = 4 * 200 * 3/1000 = 2.4 m3.
Step 2. Installation and equipment septic tank
Now we look at how to properly do the sewers in a private home. The algorithm works on installation of a septic tank in the table below:
| Illustration | milestone |
 |
Excavation. In the selected spot portion put on the layout, then digging a pit for the installation of the tanks. The dimensions of the pit select from the reserve - so that the bottom could put a layer of bedding and waterproofing / drainage, and on the sides to make a clay castle. Septic tanks for a small amount of a pit dug by hand, for large-scale construction is better to use the services of an excavator. |
 |
Preparation of the base. The bottom of the pit aligned and then laid sand podsypku thickness up to 20 cm. Podsypku ramming. Under the installation location of the settler (first container) may be beforehand laid a waterproof pillow of clay or concrete disk whose diameter corresponds to the diameter of the well. |
 |
Installation containers. At the bottom of the pit omit concrete rings, which form the two wells. The joints between the sealing rings to prevent ingress of untreated effluent into the ground. |
 |
Apparatus bottom tanks. The lower part of the settler do sealed by pouring concrete layer thickness up to 10 cm. Additionally, you can handle the base mastic asphalt and lay waterproofing roll material. At the bottom of the filtration wells fall asleep drainage: pebbles, gravel, broken bricks, ceramic, etc. It is also possible to make holes in the lower ring of the tank or to use a special perforated preform of reinforced concrete. |
 |
Making overflow. Both reservoir connect overflow pipe, which is inserted into the hole at a distance of about 1.5 m from the bottom. To the settler from the filtration capacity did not fall organic waste, set on a pipe T-fitting. Due to the lower pipe fitting allows a selection of the clarified liquid under the surface of the organic film. the installation location of the overflow pipe carefully sealed. |
 |
Overlapping and neck. On wells installed slabs with openings for the hatches. If septic located deep, there may be additionally used neck - narrower ring providing access for cleaning, inspection and repair. |
 |
And ventilation hatches. The overlap embed the vent pipe. It is desirable to make higher - so unpleasant odor will quickly evaporate. Wells or separately derived neck cover with hatches suitable diameter, fixing them with a cement slurry. |
If the septic tank is located below the groundwater level, then it is desirable to seal the outside using roofing felt or bituminous mastic. Also from seepage of moisture in the chamber will blow dense layer clay perimeter tanks - the so-called lock clay.

For exterior waterproofing can use bitumen-based compositions
Step 3. Laying of pipes from the tank to the house
The next element outdoor sewerage - pipe connecting the reservoir to the house. According to her clearing / Cumulative construction will come wastewater.
pipe laying technology:
| Illustration | The operation to perform |
 |
Digging trenches and preparing. Between home septic tank and dig a trench depth from 50 cm to 1.5 m (the deeper ground freezes in the winter - the need to dig more). To maximize the drain bias toward forming septic about 2 cm to 1 m. At the bottom sand laid podsypku thickness up to 15 cm. Podsypku moisturizes and ramming. |
 |
Laying tube. The trench laying pipe for draining waste. The optimum diameter of the outer part trubydlya sewer - 110 or 160 mm. |
 |
Thermal insulation pipe. If the septic tank is relatively shallow, and the tube is obtained zaglubit not more than 1 m, the circuit requires additional insulation. For this wrap his web material based on glass or mineral fibers, or using cylindrical housings suitable diameter. |
 |
Entering into the septic tank. One end of the pipe in the septic tank Zawidow through a hole in the concrete wall of the pit. As with the installation of overflow hole carefully sealing. |
 |
Entering into the house. Place entrance to the house can be decorated in different ways, but most of the tube is put through the hole in the base or foundation. The hole is desirable to insert a metal sleeve, which protects against damage sewage accompanying shifting and loss. Also, input unit should insulate. |
After completing these works fall asleep all trenches and trenches completely, and then laid on top of the filling of fertile soil or turf layer.
It is also desirable to make a mark on the wall at the entry site. These markers will be needed when we look for, where it is laid drainage pipes.
How to make a sewer layout
Step 4. Basic elements of internal network
The next stage - equipping domestic sewage. Its configuration depends on where are the sources of waste, because here I will give a description of its basic elements:

Diagram showing the basic elements of the internal sewer system
- Riser - the central vertical pipe, large diameter (at least 110 mm), which combines all the circuits together. As a rule, in a private house make one riser, but in large buildings there may be several. The lower part is connected through the knee to outputting the sewer pipe.
- sewage pipes - is mounted in the upper part of the riser serves to exhaust gases accumulating in the pipes of the system to the external environment. Displayed in a separate vent shaft or is connected to a vent pipe, located above the roof level.

Conclusion sewer pipe
Without sewer pipe pressure in the system will increase, which may lead to incorrect operation of valves. Moreover, accumulating gases become a cause of unpleasant odors.
- main branches - pipes of a diameter of about 50 mm (2 inches). Used to connect the plumbing fixtures and other sources flow to the riser. Since the septic tank is usually done by gravity (i.e., operating without additional head), the pipes laid with a slope towards the drain. For a two-inch pipes optimum slope is about 3 cm to 1 m.
- Supply pipes - used to connect the issues of plumbing fixtures with highways. The diameter of such a tube can not be greater than the diameter of the pipe.

Connection assembly to a toilet bowl with taps and audit
- audit - special fittings, which are tee with a single tap, fitted with closing hatch. Revision is placed at the base of the riser, cornering, ramifications and highways ends. It provides access to the interior of the pipeline for removal of blockages or maintenance.
Step 5. pipe connection

The circuit connection of pipes
All tubes are interconnected by means of fittings that allow to draw twists, bends, branching, etc. When installing the system it is desirable to avoid sharp turns at right angles and forming a smooth arc - so we reduce the risk of blockages in the place of the speed reduction flow.
Typical modern pipe, equipped with sockets and elastic cuffs are easy to install their own hands:
| Illustration | assembly operation |
 |
Pruning pipe. Using a hacksaw with a fine tooth comb, cut the smooth end of the pipe to the desired size. |
 |
Chamfering. Place trim clean by removing burrs from the outside of the inside - they may cause clogging. |
 |
Preparation of the socket. The socket insert rubber sealing ring. Flatten seal, putting it in the slot and watching the lack of folds and creases. |
 |
Compound pipes. Insert pipe spigot and is pushed until it stops. If necessary cranking pipe so that removal or inspection aperture in the right position. |
After assembly of all the pipes are installed on the supporting surface. Instruction allows both hidden (in Stroebe or skin), as well as the open seal. In the latter case used for fastening plastic pipes clamps with snap or screw connection.

Hidden laying sewerage in Stroebe

Photos open installation of the riser using a clamp
Step 6. Connection to plumbing fixtures
In the last phase, the connection of sanitary equipment:

Connect the toilet via the corrugations
- Toilet bowl - it is usually installed in the immediate vicinity of the riser. Release of the toilet is connected flexi hose or pipe segment or a tap riser or backbone with short diameter of at least 110 mm.

Flat siphon under the bath, the pipe diameter is not less than 50 mm.
- Bath or shower cubicle - are connected to the sewer by means of compact siphon, which are placed under the drain plug. The optimum diameter of the draft tube is at least 50 mm.
Some models are showers and toilets require vertical supply sewage - it must be considered in advance when designing the system.

Shell connection with a siphon and flexi hose
- Sinks in the kitchen and in the bathroom - built into the system using the siphon with water seal. Siphon generally has the shape of the flask and placed under a sink and a sewage output it connects the flexible corrugated pipe.
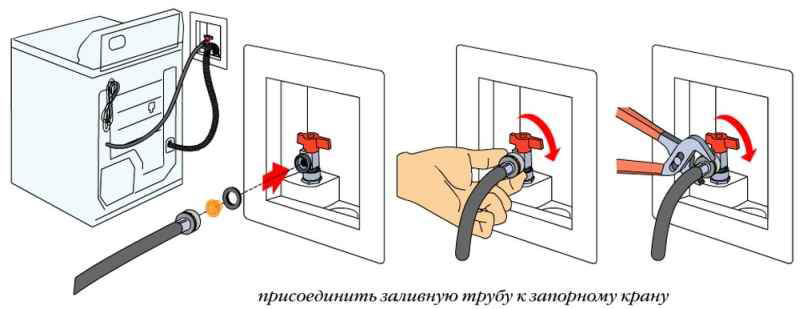
- Washing machines and dishwashers - also mounted using flexible corrugated hose. To connect such devices must be installed separate outlet sewer pipe socket equipped with a rubber lip seal.

The node connecting the washing machine
conclusion
sewerage system installation technology includes a number of nuances that directly affect the final result. Now you know them. Familiar with the intricacies of topics can be clearly in the video in this article. Answers to any questions you can get in the comments on this item.