Suspended ceiling: assemble themselves two popular varieties
Table of contents
- 1 Types of ceiling structures
-
2 Type 1. Armstrong ceilings
- 2.1 Design
- 2.2 What you need for installation
- 2.3 slab ceiling mount technology
-
3 Type 2. Ceiling rack type
- 3.1 Design
- 3.2 Materials and tools
- 3.3 The algorithm works on installation of the rack system
- 4 conclusion

Assemble the hinged construction under the ceiling - is complicated, but it really
Questions about how to make a false ceiling with his hands, invariably become leaders in popularity on construction sites and forums. However, a complete and reasoned response is quite difficult, so below I have tried to organize their experience in the installation of such structures. The instructions will be useful for both novice and (in any case, I hope!) Experienced craftsmen.
Types of ceiling structures
In general, the false ceiling - is any structure that is installed on the ceiling and the capital ceiling paneling, plates or strips, forming a single plane. In this case, sometimes these structures are divided into several groups:

The modular design of hinged assembled from separate elements on a common frame
- Actually suspended ceilings - construction of the individual elements, fixed on the basis of the carrier. Ceiling formed of plates, panels or strips, which are placed on or snapped on the guide suspended from the ceiling tire.
- Dropped ceilings - the design of the ceiling fixed on the frame and a solid skin (usually drywall). If the previous species originally different attractive appearance, the suspended structures is necessary either to paint or decorate decorative plaster, or hang wallpaper.

The most popular material for the cladding suspended structures - plasterboard
- suspended ceiling - a kind of suspension. The main difference lies in the arrangement of bearing elements: they have boarded species or mounted directly on the ceiling, or in general are part of it (beams). For the binder used drywall, wood panels, decking and so on. D.

An example of the binder boards on the beams of the attic ceiling
This classification is arbitrary in many respects. Strict separation of styles are not, so before purchasing or installing be sure to ask what kind of structure we have in mind.
If we talk specifically about false ceiling, they are represented by several species. Compare they can be on the table:
| Illustration | Kind of false ceiling |
 |
Armstrong. The modular design which consists of a suspension system on which stacked plate fixed size. The most popular type of ceiling systems for office buildings, since they can be mounted on virtually any distance from the ceiling. |
 |
Grilyato. Structurally, the system is similar to Armstrong, but not plates are used as a filling, and the lattice modules. Each module is assembled from strips of two types, which are connected crosswise. The result is a grating ceiling covering, through which can be seen overlap and communication. |
 |
Rack ceiling. Unlike previous versions, rack ceiling design is more rigid. The plane formed strips of plastic or aluminum, which are latched on fixed on the ceiling or suspended from the ceiling thorough tire. |
All of these kinds of hinged construction distinguishes the ability to install their own hands. The technology differs depending on the type of ceiling, because below I cite two main algorithms - for "Armstrong" and rack ceiling.

Suspended ceiling with his hands are mounted on two different algorithms - one for the modular, the second - for rack systems
Type 1. Armstrong ceilings
Design
Ceiling type Armstrong - it is one of the most popular solutions for offices, commercial premises, public buildings, etc... This - a modular design that can be installed in virtually any room:

Ceiling construction with main dimensions
- Suspension system It is mounted on a ceiling. For frame fixing meet rod hangers. suspension can be up to 1.5 meters or more, which allows to lower the ceiling level to the desired height.
- frame consists of two parts. Wall mounted starter P or L-shaped profile which provides a link suspension system with load-bearing structures. The plane formed by the supporting profiles, the edges of which are inserted into the starting profile and girders are suspended from the ceiling.
Scheme of the main components of the ceiling Armstrong
- filling. The stacked plate frame size 60x60 or 60x120 cm. The panels, which are along the walls, often have to cut across the width.
- Fixtures for "Armstrong" flows almost always produced with the same size as a separate module. With this lamp can be mounted on the plate at almost any point of the ceiling.

Lamps made in a standard size of plate that allows you to set them almost everywhere
What you need for installation
The set of parts for ceiling mounting "Armstrong":
| Illustration | ceiling component |
Suspensions Ceiling:
| |
 |
Frame system:
|
 |
plates:
|
 |
Lamps "Armstrong":
|
 |
wiring components:
|

We have to work at a height, so it will be useful, and the level of the console, and a stepladder
Set of tools and accessories:
- Stepladder for work at height.
- Laser level.
- water level.
- Roulette.
- Puncher.
- Screwdriver.

Screwdriver - a versatile tool fitter
- Shears for metal (cutting profile).
- Peel (for fitting boards).
- Hand tools (hammer, pliers, knife, and so on. D.).
slab ceiling mount technology
Installation of suspended ceilings type "Armstrong" should be carried out according to a specific algorithm. The sequence of actions represented in the table:
| Illustration | sequence deysviya |
 |
Determination of the ceiling. Using the laser level, we determine the height to which we shall omit the ceiling slab. On all the walls need to make a mark, to which we will focus during installation. |
 |
Trimming profiles. Starting undercut profile on metal scissors in accordance with the length of each wall. Similarly we proceed with the carrier and intermediate profiles, measuring out their ceiling layout. |
 |
Installation starting profile. With the help of anchors with plastic sleeve mounted on the wall starting profile. It must be fixed horizontally, so carefully monitor the level of his position. |
 |
Installation of hangers. At a distance of no more than 45 cm from the wall and then in increments of up to 120 cm fasten hangers. For fixing using anchors that are hammered into the pre-drilled holes. The optimum diameter dowels - 8 mm penetration - 45 mm. After mounting carry out a preliminary adjustment of the length of suspensions, pushing their rods to the desired length. |
 |
Fastening longitudinal carrier profiles. Fasten to the suspension bearing profiles, which are along the premises. Focusing on the water level, adjust the length of suspensions, leveling the next frame. |
 |
Fastening transverse support section. Stykuya transverse to the longitudinal carrier profiles by inserting tabs into technological holes. |
 |
Installation intermediate profiles. If the suspensions are arranged with 120 cm steps and slabs 60x60 cm are used for forming the ceiling, then add to the bearing intermediate profiles. They connect with the already established framework with regular fixtures. |
 |
Laying and connection of wiring and lighting. We carry out electrical work:
|
 |
Laying entire plate. Plates "Armstrong" 60x60 and 60x120 cm laid in the frame of the cell. As a rule, it is possible without effort: the panel is pivoted at an angle, refineries bearing elements and put on top, a little pressing to secure the. |
 |
Trim parts. Along the edges is usually no room for placing the whole plate. Therefore, the panel has to crop either a knife or a saw for plastics. |
 |
Styling parts on the edges. The cut parts should be laid in a reduced around the edges of the cell, completely blocking the ceiling. |

As a result of the work we should get something like on the picture
The algorithm false ceiling mounting can be used when "Grilyato". They differ only in the final stages instead of solid boards in the frame lay lattice modules. They may be ready-made and the teams of the perforated panels.

Driving ceiling "Grilyato": pay attention to the lattice structure
Type 2. Ceiling rack type
Design
Suspended ceiling rack type is different in design from "Armstrong":

Basic elements of the ceiling systems and their placement scheme
- Suspension system quite similar - to set the false ceiling can be used as a rod hangers and brackets plate. The first length, at least stable in the second times stiffer and stronger.
- frame - the main "trick" rack ceiling. It contains the non-standard profiles and rails (crossarms, stringer) on the underside of which the latch lugs are located.

Racks and inserting on the bus: shows a snap lock principle
- Ceiling modules. Suspended ceilings themselves are formed from elements of two types - rods and inserts. They latched onto the projections of support rails, and their edges are inserted into the profile on the perimeter of the room. For the manufacture of strips used, or plastic (less) or aluminum with anticorrosive coating (often).

On the ceiling of the closed type seen alternating strips and inserts
gated ceilings include both types of elements - and the rack-and-paste. Open design without rails mounted - so the ceiling is a more "air", but worse masks overlap and communication.

Example of an open ceiling with rails under the tree
Undoubted negative of such systems - the high price (at least 800-1000 rubles per square). You can save, setting a ceiling on its own.
Materials and tools
To assemble the rack ceiling will need:
| Illustration | member |
 |
Suspensions Ceiling:
|
 |
guide rails. |
 |
Reiki and paste. |
 |
Recessed. |
A set of tools to install the rack structure will be similar to the one used during installation "Armstrong". The only thing you should pay attention, because this is the presence of high-quality metal saw for cutting aluminum slats.
The algorithm works on installation of the rack system
Installation instructions rack ceiling:
| Illustration | Sequencing |
 |
Marks on the walls. Laser level repel the line that will be assigned to the ceiling. Apply on line layout for the installation of wall profiles. |
 |
Trimming profile. Scissors cut the metal trim profile, adjusting it to the size of the room. Tires made of sufficiently thick galvanized steel, easier to cut grinder. |
 |
Installation of wall profile. Within the walls of marking drill holes with a spacing of about 50 cm. The optimum hole diameter - 6 mm depth - 40-45 mm. The holes are hammering the plastic anchors. Install the trim profile, fixing it with screws with a broad hat. |
 |
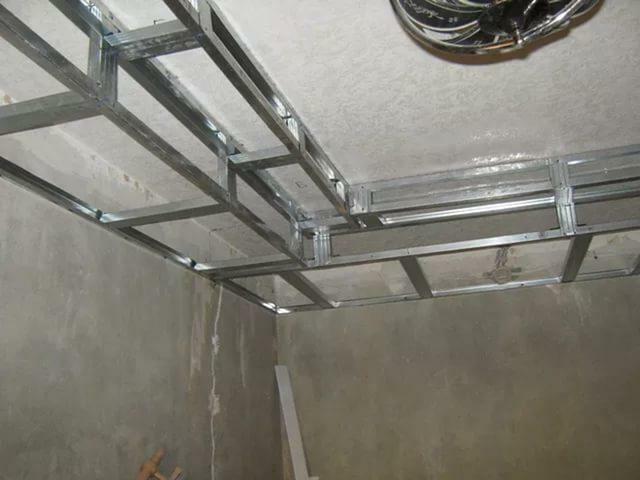
Mounting support rails. The ceiling set support rails, fixing them, or on the suspension or on the ceiling. Optimal tire mounting step - 80-100 cm. The edges of the tire plant in the starting line trim profile. In some cases, it is necessary to trim and bend the part details. |
 |
Installing the rails. Cut a rack size set on the carrier frame. For this purpose, the edge rails starter plant in profile, and the tabs on the underside of the pawl on the tire mounts. |
 |
Prepare holes for recessed luminaires. Using a drill with a crown, cut out holes for recessed luminaires. In the absence of crown aluminum can be cut with a knife by gently tilting the cut portion inwardly ceiling. |
 |
Installing racks with openings for light. Mount rails with installed lamps in front of wire rings, engagement from the distribution panel or box. The opening lead wires, which by means of terminal blocks connect the recessed lights. |
 |
Longitudinal cutting of the last rail. The last rail is often necessary to adjust the width. For precise cutting edge of the easiest way to make cuts with a pitch of about 10 cm, and then gently remove excess with scissors fragments. |
 |
Mounting inserts. Finally we close the gaps between the slats intercalary profiles. Insert just snapped and aligned on width. |

Photos of the finished rack ceiling
Plus the resulting structure would be a good air tightness and water resistance. In addition, it looks correctly assembled rack ceiling very carefully!
conclusion
Suspended ceiling - or modular rack - quite feasible to mount their own. When installing, use the recommendations in the text and in video in this article. All the questions you can ask in the comments to the material: either I, or my colleagues are sure to help you understand the intricacies and nuances.