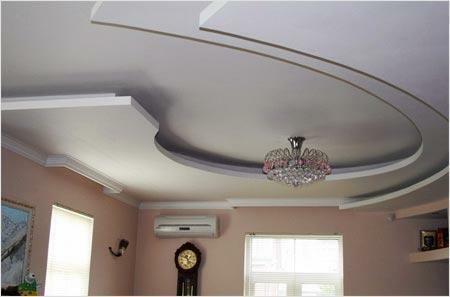
 Suspended ceiling from plasterboard looks original and at the same time is less expensive to install than the tension ceiling What to do more profitable - suspended ceiling or tension?The question often depends on the price and how you decided to repair the ceiling, by masters or with your own hands. In financial terms, it will be more profitable to have a drywall construction, which you can do yourself.
-
- suspended ceiling of plasterboard with their hands: Tools
- calculation profile for the ceiling structure plasterboard
- Plasterboard and mount ceiling
- suspended ceiling of plasterboard with their hands: the design scheme
- mounting frame suspendedplasterboard ceilings
- sheathing frame plasterboard
- How to make a false ceiling of plasterboard with their hands( video)
suspended ceilingfor plasterboard with their hands:
instruments Preparatory work for those who have decided to put together their own ceiling, is primarily in the preparation of instruments.
So, you will need:
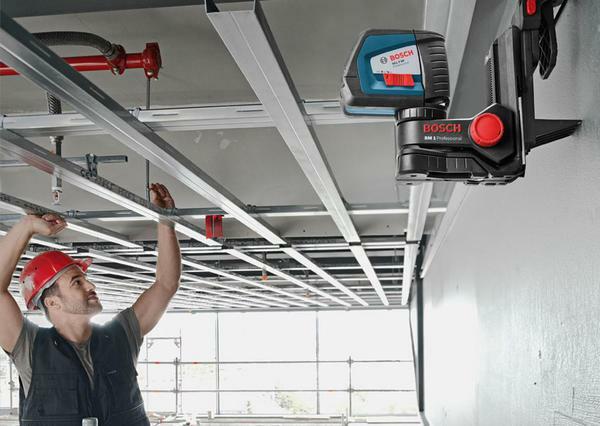
- Water or laser level for marking;
- Two-meter level to determine the flatness of sheet mounting;
- Rotary hammer to drill holes for dowels;
- Screwdriver;
- Drill;
- Roulette five-meter;
- Monter knife;
- Bulgarian or hand hacksaw;
- Special metal shears;
- Pencil for marking.
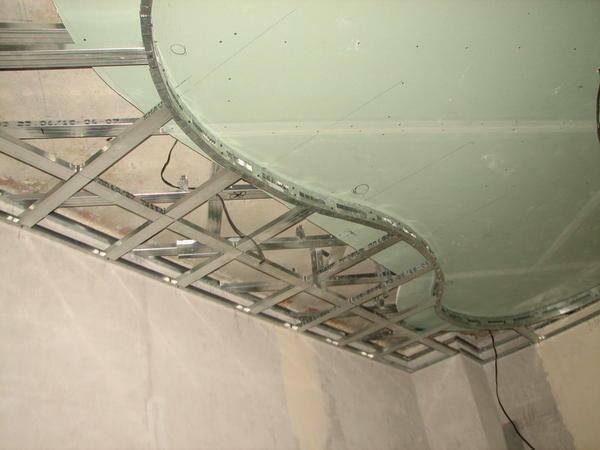 Before installing ceiling drywall, metal profile is required to attach to the ceiling
detection technology is the basis of the frame assembly. For this you use a metal profile.
Profile calculation for
gypsum board structureProfile can be of two types: guiding and ceiling. The guide is fixed along the perimeter of the whole area, and the ceiling is called otherwise C-shaped. It is very important that you purchase both profiles from the same manufacturer.
How to calculate the number of profiles by yourself:
- The guide profile is calculated along the perimeter of the room. If the total area of your room, for example, 20 squares, and walls of 5 and 4 m, respectively, you need 7 pieces of profile. Since the length of the profile is 3 m. One profile will be spare.
- In this case, you can take a four-meter profile in the number of five pieces.
- Counting is simple - the length of the perimeter is divided by the length of the profile.
 calculation is made proportionally to the number of the profile to the complexity and the ceiling area
If you're doing a complex multi-level ceiling, these figures add length design.
Calculation of the ceiling profile is as follows: the width of the plaster board is 1250 mm, the fixing step is 600 mm, take the four-meter profile, divide the five-meter wall by 600 mm( 60 cm), get the answer - 8 ceiling profiles.
Drywall and ceiling mount
Drywall can be of three types: ordinary, fireproof and moisture resistant. In a normal room you do not need a drywall with special characteristics. Another question is if you are making ceilings in the bathroom - there is a moisture resistant material.
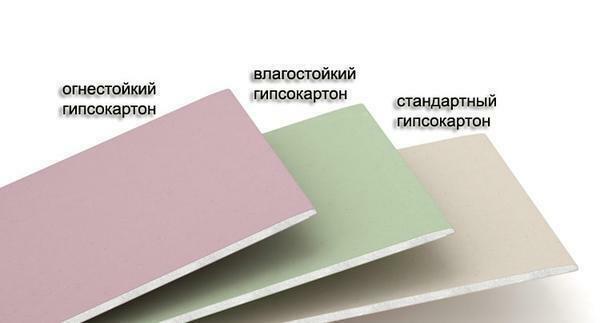 Depending on where in the room to be installed suspended ceiling, drywall selected: moisture-proof, ordinary or refractory
To take drywall ceiling structure with a sheet thickness of not more than 10 mm thickness. Otherwise, the weight of the structure will increase, and the installation will become more complicated.
Calculation of plasterboard
How to calculate the number of plasterboard:
- Divide the ceiling area in the area of one plate;
- For example - the area of one plate is 3 square meters( rounded), the area of the room is 18 m, divide by 3, you will get 6 sheets.
It is recommended to always take sheets with a small margin.
For attachment, you will need a direct suspension in the amount of 50-60 for an average room of 20 squares. For a complex design with a greater thickness of the sheet and hangers will need more. The amount of fastening is calculated independently, taking into account that the fastening step is 60-70 cm.
 For calculating the number of sheets of drywall it is necessary to divide the area of the ceiling into the area of one sheet of drywall
To join the profile, a bundle of screws is needed, and for fixing gypsum boardsSlabs to the profile you need 25mm self-tapping screws.
Suspended ceiling from gypsum cardboard by one's own hands: design diagram
Why do we need a circuit and so or is it even needed?A detailed drawing of the plasterboard ceiling is rarely created, if you are doing to someone, and you need to coordinate the details with the customer, the scheme will be required.
In his apartment, he usually manages a sketch.
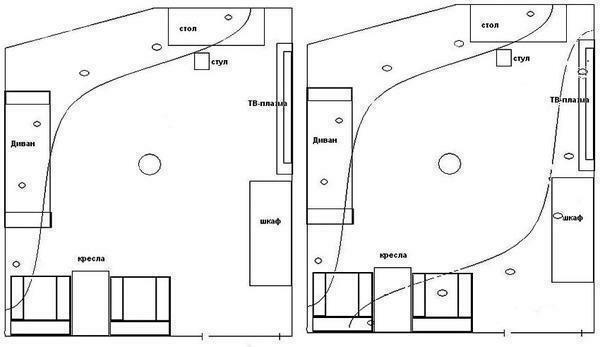 The sketch of a suspended ceiling from gypsum board is primarily necessary for the accurate calculation of material consumption
For this you need a detailed diagram:
- Accurate calculation of material consumption - actual in large rooms with multi-level ceilings;
- Coordination of anchorage points with a communication plan - for concealed wiring;
- Creating a large plan of a room with built-in furniture - if you order furniture together with installation work.
But even if you have a detailed scheme, drywall and profiles are bought with a margin. And the stock should be at least 10%, since it is impossible to insure against expenses for cutting.
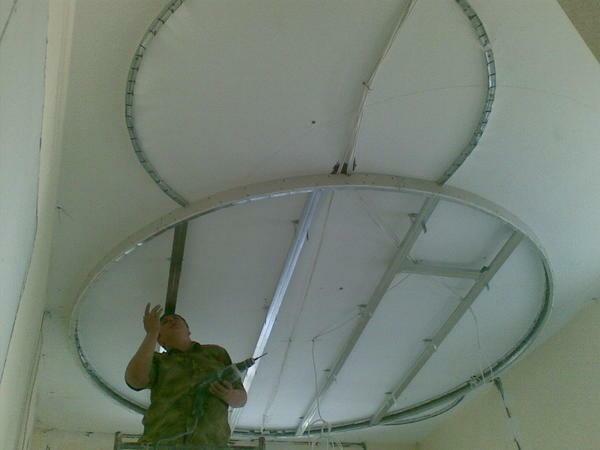
Assembling the frame of suspended ceilings from gypsum board
The installation of the frame is perhaps the most important stage.
Skeleton installation plan:
- Use the water level to make the markup;
- Drill holes for dowels with a perforator;
- Guide the profile to the wall in 35 cm steps, the distance in the corners is 10 cm;
- Use a tape measure to make marks on the wall, step - 60 cm, mark the locations of the PP;
- Mount the suspension to the ceiling, step - 70 cm;
- After installing the hangers, fix the ceiling profile directly;
- If you need to dock, do so - in the places of the profile connection, install two additional. Suspension to the ceiling and the suspension themselves twist them together;
- Screwdriver or drill connect the joints of two profiles, ceiling and guide, and suspension with a C-shaped profile;
- With a two-meter level, keep an eye on the leveling of the profile, there should be no sagging and deflections.
When all the metal elements of the frame are connected, check the level of the surface of the profile with a level, the deviations will have to be corrected.
 Install the frame to the ceiling for gypsum board carefully, as it will guarantee the reliability of the
After the frame is ready, conduct the wiring to the fixture locations. Heat insulation cotton wool is laid as desired.
Gypsum board plastering
The next stage is the planking of the frame with gypsum boards. In fact, nothing complicated at this stage and no. The sheet is raised to the profile and fixed with screws. An interval of approximately 100 mm between the fasteners is optimal.
"Zashivka" goes around the perimeter and center. Screws need to be dug in the sheet somewhere 1 mm. The sheets have rounded ends, so that there are no cracks in the joints at the joints. When docking whole sheets or pieces, with a knife, make a small groove on the edges in places where it does not exist.
Where the fixtures are installed, you cut the holes with a knife.
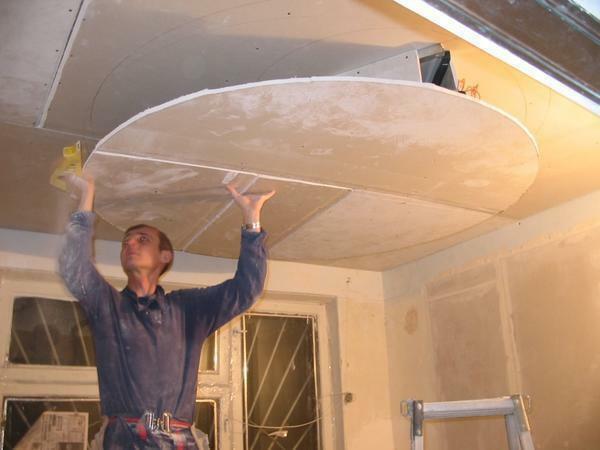 Drywall is fixed to the ceiling after installation of the metal profile
After all the plasterboard sheets are fitted one to one, the joints are cut, all the holes are cut, and the surface can be puttyped. To do this, you need a suitable mesh and gypsum plaster. Putty begins with joints. Let the surface dry, sand the surface smoothly and you can start any finish.
How to make a false ceiling from gypsum cardboard with your own hands( video)
So it looks like a step-by-step instruction on designing false ceilings with your own hands. Well, high-quality video and photo materials help to understand the essence of the process and avoid typical mistakes.
Good repair!


