Contents
- 1 One-level suspended ceiling with your own hands
- 2 How to make a suspended ceiling from gypsum board yourself?
- 3 Materials and tools for installing a suspended ceiling from gypsum plasterboard
- 4 An example of installing a single-level false ceiling with your own hands.
- 5 We fix the sheets of gypsum cardboard to the skeleton of the ceiling independently
- 6 Video how to do the installation of the false ceiling yourself
- 6.1 A simple way of self-mounting the sheet to the ceiling without the help of
 You really wanted to make a suspended ceiling from gypsum board yourself? This is quite easy for people who are familiar with this matter. People who do repairs do it quickly and on the machine. If you are new to such matters and you wanted to make the installation of suspended ceilings from gypsum board yourself, this work will not be easy. But our site - repairing an apartment with your own hands will help you to learn this from the photo and video instructions. If that is not clear, then ask in the comments, we will definitely answer.
One-level suspended ceiling with their own hands
Ceilings from plasterboard have a number of irrefutable achievements. It hides all the shortcomings of your ceiling( cracks, unevenness, etc.) Under such a ceiling it is very convenient to hide the wires. And also, the most important advantage is a flat surface.
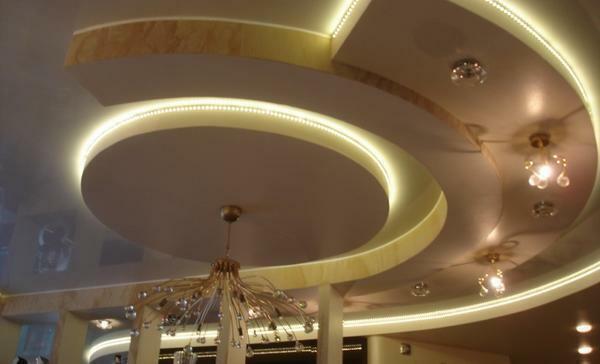
Ceilings from plasterboard are very diverse and numerous in terms of design. You can make such a ceiling from the GKL, for every taste. In the choice and imagination there is no limit, they have a different color range, there are single-level, multi-level. Ceilings made of plasterboard allow you to improve the lighting in your house, apartment and give it a unique and elegant. On suspended ceilings it is very convenient to place the light as you wish. There is an opportunity to conduct a soundproofing of the ceiling, which would save yourself from unnecessary noise.
Such a ceiling will fit any room, so to speak "universal".You can make such a ceiling even in the bathroom, you first need to treat the sheets with a special compound that repels water. Now let's look at how the ceiling is made of plasterboard with our own hands. For this, a photo-instruction is presented below, we tried to make it as clear and simple as possible. You will have a video for assembling and installing the ceiling yourself.
How to make a false ceiling from gypsum board yourself?
- Initial( perimetrial starting profile)
- Basic( supporting frame profile)
- Longitudinal profile( for stiffness and reliability)
There are only two technologies for wall mounting with sheets. This is a technology called Knauf and Giprok. You can see them and evaluate them yourself. Experienced masters prefer Giprok technology, since our suspension and profile, so to speak the basis of which the entire load-bearing structure of the suspended ceiling consists and which are attached later, drywall sheets are done not by European standards, as in other things. .. OneIn short, to make a good and high-quality suspended ceilings, you need to include wit.
The construction of your ceiling from GKL, first of all, should be strong. And all the other parts( mounts, hangers) should be very well fixed to the base itself at such a distance that would not let the drywall sheets sag. Because it is sagging that leads to the appearance of cracks between the joints of the sheets and the appearance of the hillocks. Under the fastening of drywall you need to select quality and technological materials.
Materials and tools for installation of suspended ceiling from gypsum board
 First of all, these are special suspensions( photo on the left), which must be fixed to the base. What would they firmly and securely attached, use the so-called dowel - nails( photo from the left) or metal anchors - wedges. More preferable is the dowel - a nail. To the suspensions with the help of the so-called "toddlers", shown in the figure below under the number 1,( screws with a metal burr, they are better "included" in the profile) a profile of 70 mm width is attached. Then go themselves sheets of plasterboard with a width of 12.5 mm, they are screwed with the screws indicated in the photo on the right under the number 2.
  In length, measure each piece yourself, depending on the size of the ceiling. You also need a laser level. And do not forget about roulette, pencil, puncher and screwdriver, you can not do without it. In the video lesson, everything is clearly shown. Calculate the right number of sheets and profiles, accessories, our free online calculator will help.
An example of installing a single-level false ceiling with your own hands.
To begin with, you need to chart a line for the original profile, to do this, use the laser or water level to help. The distance from the ceiling should be 10 - 20 cm. Do so that it would be possible to hide electrical wiring, communications, etc. Put the level on the elevation. Mark the line on the wall with a pencil. Then attach the guides along the perimeter of the room along this horizontal line by dowels in increments of 350-500 mm.from each other.
 The next stage will be the marking of the ceiling for the main bearing rails. To begin with, you need to draw parallel lines greater than 1250 mm, this is where half the sheet of drywall. The sheets of plasterboard will be fastened with a small gap between them, and when we putty, what could be filled with gypsum mixture to seal the seams between the sheets. The main profiles will run along the edges of the sheet and in the middle, please note. And on these lines we will fix the hangers on the metal anchors - wedges or dowels of 400 mm size.
Now you can take the profile guides and insert them into the starting frame, which we fixed around the perimeter of the walls of the room. The only thing you should not do is insert them in the back of the wall, you need to leave a small gap, so that there is no deformation of the ceiling from various unforeseen circumstances, like temperature expansions. Therefore, insert the guides into our hangers. Guides are attached to the suspension brackets by metal screws, 2 on each side of the profile. For horizontality, always check with a long level or with a laser.

 Further installation of a ceiling from gypsum cardboard with own hands, assumes a marking and an insert of longitudinal profiles( a photo from the right).It is recommended to look at the specification for transverse installation of sheets of gypsum board guides about 600 mm, and for longitudinal - 400 mm. You can choose a design option for yourself and watch the video. Here we will consider the transverse fastening. You can easily cut the longitudinal profiles from the scissor guides on the metal to the desired length. Then insert the longitudinal profiles between the guides also in steps of about 500mm. They should be located so that they do not fall on the ends of the fastening of the guide profiles with suspensions.


Longitudinal profiles are attached to the guides, using special crabs, the photo above. To make the structure more durable, use a different structure for fixing the longitudinal profiles. Two sections are attached to the supporting profile and a longitudinal one is inserted in them. It is this method that very well strengthens the structure. To fix the longitudinal profile it is possible with the help of hangers, approximately in the middle of each.
It is possible to use pieces of the same profile for rigid fixing of the profile to the ceiling, but it must first be cut at the edges and bent by the letter D. For convenience, first measure the distance from the ceiling to the bottom edge of the profile, this will be the cut point and leave about 3 centimeters for fasteningdowel to the ceiling. Please note that it is necessary to fasten the dowel closer to the edge of the profile bend in order to prevent sagging under the weight of drywall sheets. With this method, you can make your own hangers of any length and the ceiling can be raised or lowered to the desired distance. Important tips how to prevent typical errors while working, be sure to look at the secrets of working with the profile.
We fasten drywall sheets to the skeleton of the ceiling
 That's the main frame for the GKL ceiling. Now you need to cover it with sheets of plasterboard. Before this, treat each sheet from the ceiling side with a special primer, this will improve the waterproofing, after fixing, treat and on the back side. Step back from the wall a few millimeters, that would drywall drywall. Attach the sheets across the longitudinal profiles. First sheet attach from the wall, and the next one is starting with the first longitudinal profile. Distance( between the wall and the longitudinal profile), seal half the sheet. So we pass the whole ceiling. Fasten the sheets of gypsum cardboard to all the profiles laid with metal screws in steps of about 15-20 cm.
The self-tapping screws do not need to be strongly heated, they should be almost flush, but not sticking out above the plane of the plasterboard. This will help you with a screwdriver with a stiffener, set it so as to achieve the operation of the limiter on the easy deepening of the screw. Make a gap between the sheets in 2 - 3mm, to further seal the seams with a gypsum mixture.
That's all. It remains only to cover the joints that formed between the sheets. It is necessary to fill the ceiling completely, first pass it with a primer, with putty, it may be necessary to twist the protruding screws. To seal joints well, use a special mixture or gypsum mixture. It is superimposed with a sticky reinforcing mesh, made of fiberglass. And level with a spatula, so she does not stick out. When everything is dry, remove all patched areas with fine sand from the stains. In the same way, the gaps that are formed between the wall and the sheets of gypsum board are also processed. The ceiling completely shpakkuetsya gypsum mixture, as in the photo below, try to do it without a divorce, if you do the painting, if the wallpaper, then this may not be visible.
 So the false ceiling made of plasterboard is made, made by own hands. Then you can do anything with it. Glue wallpaper, paint and so on. If you did everything correctly, then the ceiling will last you a very long time. The ceilings are also multi-leveled about this written here. Now read the video installation instructions to consolidate knowledge before practice.